Understanding Coupons
Overview
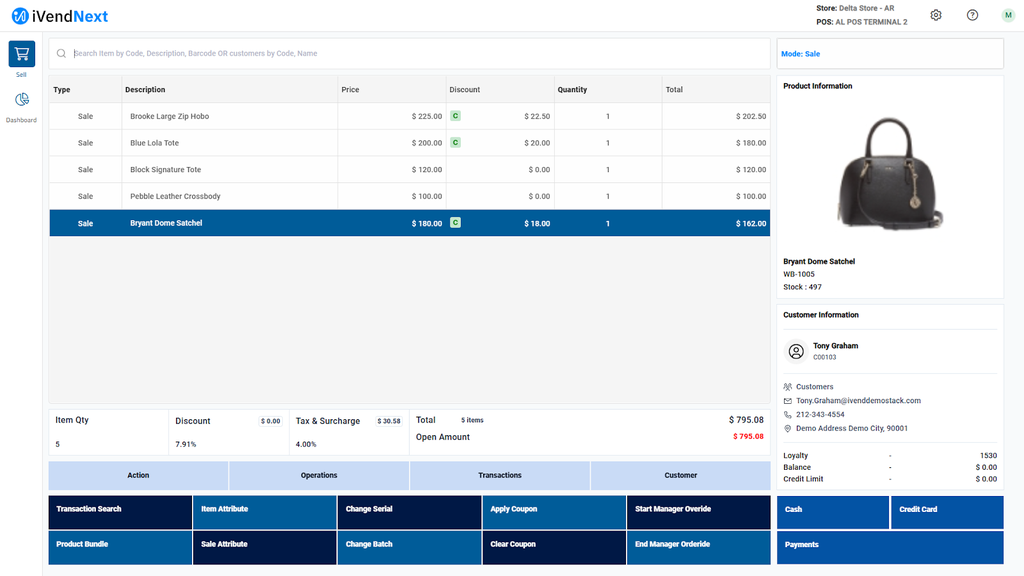
Coupons are codes that apply discounts during checkout, either online or at the point of sale. Every coupon follows specific rules—such as how long it’s valid, how often it can be used, and what kind of discount it provides. When a customer enters a valid code, the application checks and validates these rules and then applies the discount automatically.
Steps to Create a Coupon in iVendNext
The steps to create a Coupon in iVendNext are summarized below:
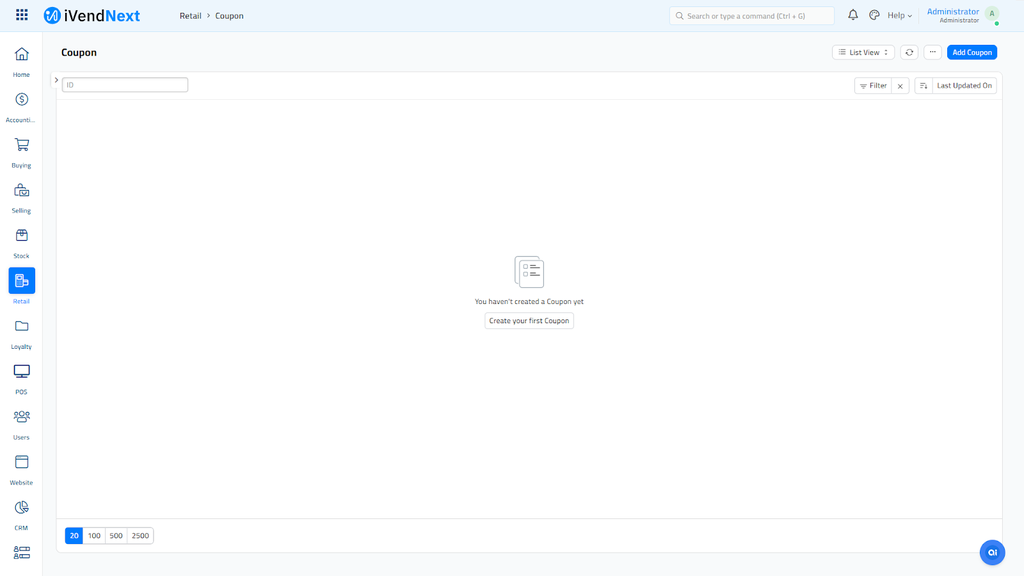
Step 1: Access the Coupon Screen
Log in to iVendNext. Navigate to Home> Retail. Then click on the Coupons shortcut. This will take you to the Coupon screen.
Tip: To locate coupon-related records in iVendNext, start by navigating to the Home screen. In the Awesome Bar at the top-right corner, you can type "Coupon List" "New Coupon" or "Coupon Report" — even a few characters will trigger smart search results.
Step 2: Launch the Coupon Creation Screen
On the Coupon screen, first-time users will see a Create Your First Coupon button, while returning users will see an Add Coupon button. Click the Create your first Coupon Or Add Coupon button to reach the Coupon Creation screen. The Coupon Creation Screen is split into the following sub sections:
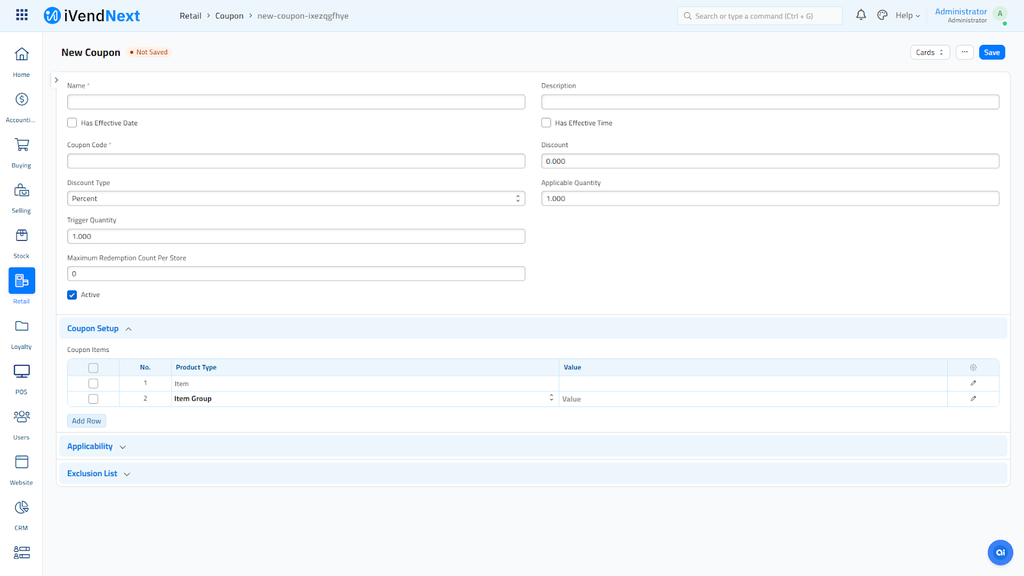
The Details Section
This section allows you to set key coupon attributes: Name, Description, Coupon Code etc.
The Coupon Setup Section
This section allows you to define which products the coupon applies to. You select a Product Type (for example, an item, or an item group) and specify its Value. Multiple entries can be added to cover different products.
The Applicability Section
This section controls where and to whom the coupon can be applied. You define Source Type (such as customer group or store) and then select a Source. Additionally, you can restrict coupon availability to certain days or times. For each entry, you select the Day, mark it as Enabled, and define the Start Time and End Time during which the coupon remains valid.
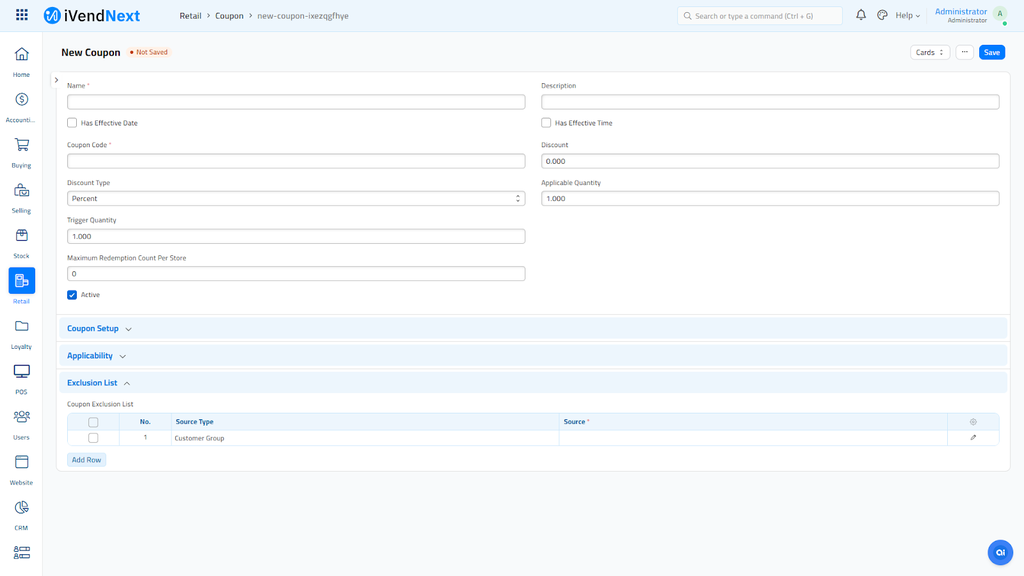
The Exclusion List Section
This section allows you to define where the coupon should not apply. Similar to applicability, you select a Source Type and then choose a specific Source to exclude.
Step 3: Configure the Details Section
Configure the Details Section by filling in the required information including the mandatory fields. All the mandatory fields are marked with red asterisks.

The various fields are explained below:
Name
Use this field to specify a name for the coupon. The name must be unique and can comprise up to 20 alphanumeric characters. This field is mandatory.
Description
Use this field to specify a description for the coupon. The description can comprise up to 50 alphanumeric characters. This field is mandatory.
Has Effective Date
Use this checkbox to restrict the coupon to a specific start and end date. If not selected, the coupon remains valid without a date range. This field is optional.
Has Effective Time
Use this checkbox to restrict the coupon to specific hours in a day. If not selected, the coupon remains valid throughout the day. This field is optional.
Coupon Code
Use this field to enter the code that customers must provide to redeem the coupon. The code can be entered manually or scanned. This field is mandatory.
Discount
Use this field to define the discount value for the coupon. This field is mandatory.
Discount Type
Use this field to specify how the discount will apply. Options include percentage or fixed amount. This field is mandatory.
Applicable Quantity
Use this field to define the maximum number of items to which the coupon can be applied in a single transaction. This field is optional.
Trigger Quantity
Use this field to define the minimum number of items required in the transaction for the coupon to apply. This field is optional.
Maximum Redemption Count Per Store
Use this field to define the maximum number of times the coupon can be redeemed in each store. This field is optional.
Active
Use this checkbox to activate or deactivate the coupon. If not selected, the coupon will not be available for use. This field is mandatory.
Step 4: Configure the Coupon Setup Section
Configure the Coupon Setup Section by filling in the required information.
This section allows you to define which products the coupon applies to. You select a Product Type (for example, an item, or an item group) and specify its Value. Multiple entries can be added to cover different products.The various fields are explained below:
No
Displays the line number of the entry. This field is system generated.
Product Type
Use this field to specify the level at which the coupon applies, such as item, product group, or category. This field is mandatory.
Value
Use this field to specify the product, group, or category selected based on the chosen Product Type. This field is mandatory.
Step 5: Configure the Applicability Section
Configure the Coupon Applicability Section by filling in the required information.
This section controls where and to whom the coupon can be applied. You define Source Type (such as customer group or store) and then select a Source. The various fields are explained below:
No
Displays the line number of the entry. This field is system generated.
Source Type
Use this field to specify where the coupon will be valid, such as store, customer, or customer group. This field is mandatory.
Source
Use this field to select the specific store, customer, or customer group defined in the Source Type. This field is mandatory.
Step 6: Restrict coupon availability to certain days or times
Additionally, you can restrict coupon availability to certain days or times. For each entry, you select the Day, mark it as Enabled, and define the Start Time and End Time during which the coupon remains valid. The various fields are explained below:
No
Displays the line number of the duration entry. This field is system generated.
Day
Use this field to specify the day of the week the coupon is valid. This field is mandatory.
Enabled
Use this checkbox to activate or deactivate the coupon for the selected day. This field is mandatory.
Start Time
Use this field to specify the start time from when the coupon becomes valid on the selected day. This field is optional.
End Time
Use this field to specify the end time until when the coupon remains valid on the selected day. This field is optional.
Step 7: Exclusion List Section
Configure the Exclusion List Section by filling in the required information.
This section allows you to define where the coupon should not apply. Similar to applicability, you select a Source Type and then choose a specific Source to exclude.
No
Displays the line number of the entry. This field is system generated.
Source Type
Use this field to specify what to exclude from coupon applicability, such as store, customer, or customer group. This field is mandatory.
Source
Use this field to select the specific store, customer, or customer group to exclude. This field is mandatory.
Step 8: Save the Changes
Click the save button to save the settings. This will activate the coupon based on the rules defined.
Example Coupon Setup
Scenario:
Let us consider the below scenario:
There are 2 Stores - The Alpha Store and The Delta Store
Offer 10% off on all Shirts every day from 09:00 hrs to 21:00 hrs, excluding the Delta store.
Details Section:
Name: Festival Coupon
Description: 10% off on Women Bags
Has Effective Date: Yes (Start: 2025-10-01, End: 2025-10-15)
Has Effective Time: Yes
Coupon Code: FEST25
Discount: 10
Discount Type: Percentage
Applicable Quantity: 5
Trigger Quantity: 2
Maximum Redemption Count Per Store: 100
Active: Yes
Coupon Setup Section:
Product Type: Category
Value: Women Bags
Applicability Section:
Source Type: Store
Source: Alpha Store
Duration: Everyday
Enabled: Yes
Start Time: 09:00
End Time: 21:00
Exclusion List Section:
Source Type: Store
Source: Delta Store
Result:
The coupon is valid everyday between 9:00 AM – 9:00 PM, applies to Bags, has quantity limits, and excludes the Delta store.