A User's Guide to Retail Module - Advanced
This guide is designed to help users learn the daily processes around selling using the iVendNext POS.
1. Quick Sale
Performing a Quick Sale involves a few key steps. Here's a simplified guide to help you get started:
Add Item(s)
Click the Quick Cash button to complete the transaction
Click the New Transaction button to return to the Transaction Screen
Important Points to Consider
By Default a Walk In Customer, also known as the Cash Customer, is pre selected.
To record the sale against a customer, you must add that customer to the sale.
Perform an item search using the item by code, description, or barcode.
You can edit the Item Quantity and the Item Price from the Item Edit screen. (Optional)
You can offer discount and levy surcharges. (Optional)
The entire payment is made in cash when you select the Quick Cash button.
2. Normal Sale
Performing a Sale involves a few key steps. Here's a simplified guide to help you get started:
Add Items
Specify the Quantity To Sell (Optional)
Change Unit of Measure (Optional)
Select the Customer (Optional)
Apply Discount (Optional)
Levy Surcharge (Optional)
Click the Checkout Button
Select your desired mode of payment on the Payment Screen
Specify the Amount To Pay
Save to conclude the sale
Print the Transaction Receipt (Optional)
Click the New Transaction button to return to the Transaction Screen
Important Points to Consider
By Default a Walk In Customer, also known as the Cash Customer, is pre selected.
To record the sale against a customer, you must add that customer to the sale.
Perform an item search using the item by code, description, or barcode.
You can edit the Item Quantity and the Item Price from the Item Edit screen. (Optional)
You can offer discount and levy surcharges. (Optional)
The entire payment is made in cash when you select the Quick Cash button.
3. Sale Using Multiple Payment Modes (Cash, Credit Card)
Performing a Sale using multiple payment methods (Cash, Credit Card) involves a few key steps. Here's a simplified guide to help you get started:
Add Item(s)
Specify the Quantity To Sell (Optional)
Select a Customer (Optional)
Click the Checkout Button
Choose Cash as the mode of payment
Specify the amount (partial) to be paid in cash

Choose Credit Card as the payment method
Specify the amount (remaining) to be paid via Credit Card
Enter the last 4 digits of the Credit Card Number
Input the Expiry Date on the card

Click the Save button to conclude the sale
Print the Transaction Receipt (Optional)
Click the New Transaction button to return to the Transaction Screen
Important Points to Consider
By Default a Walk In Customer, also known as the Cash Customer, is pre selected.
To record the sale against a customer, you must add that customer to the sale.
Perform an item search using the item by code, description, or barcode.
You can edit the Item Quantity and the Item Price from the Item Edit screen. (Optional)
You can offer discount and levy surcharges. (Optional)
The entire payment is made in cash when you select the Quick Cash button.
When a sale is made using multiple payment modes, the total payable amount is split across the selected payment methods.
4. Sell a Gift Card
Performing a Gift Card Sale in iVendNext involves a few key steps. Here's a simplified guide to help you get started:
Select the Customer
Click the Transaction button
Click the Gift Card button
Select the Gift Card you want to sell
Specify the Gift Card Serial Number

Click the Quick Cash button to complete the transaction
Click the New Transaction button to return to the Transaction Screen
Important Points to Consider
By Default a Walk In Customer, also known as the Cash Customer, is pre selected.
To record the sale against a customer, you must add that customer to the sale.
Perform an item search using the item by code, description, or barcode.
You can edit the Item Quantity and the Item Price from the Item Edit screen. (Optional)
Gift Cards in iVendNext can either be System Defined or User Defined and can be used as a Payment Type in sale and refund transactions.
The entire payment is made in cash when you select the Quick Cash button.
5. Redeem a Gift Card
Redeeming a Gift Card Sale in iVendNext involves a few key steps. Here's a simplified guide to help you get started:
Add Item(s)
Select the Gift Card Customer
Click the Gift Card button on the Transaction Screen
Specify the Gift Card Serial Number
Enter the Amount to Pay
Specify the amount (remaining) to be paid using the desired mode of payment
Click the Save button to conclude the transaction
Important Points to Consider
By Default a Walk In Customer, also known as the Cash Customer, is pre selected.
To record the sale against a customer, you must add that customer to the sale.
Perform an item search using the item by code, description, or barcode.
You can edit the Item Quantity and the Item Price from the Item Edit screen. (Optional)
Gift Cards in iVendNext can either be System Defined or User Defined and can be used as a Payment Type in sale and refund transactions.
You can pay the entire transaction amount using the Gift Card if you have sufficient balance in your Gift Card. However, if the Total Transaction amount exceeds the Gift Card Balance, you can pay the remaining amount using your desired mode of payment.
The entire payment is made in cash when you select the Quick Cash button.
6. Recharge a Gift Card
Recharging a Gift Card in iVendNext involves a few key steps. Here's a simplified guide to help you get started:
Click the Transaction button to get into the Transaction Mode
Click the Gift Card Recharge button to reach the Gift Card Sold List View screen
Select the Gift Card to recharge and click OK
Click the Item Edit button to launch the Item Edit screen
Click on the Change Price button and specify the recharge amount
Click the Quick Cash button to complete the transaction
Important Points to Consider
By Default a Walk In Customer, also known as the Cash Customer, is pre selected.
To record the sale against a customer, you must add that customer to the sale.
Perform an item search using the item by code, description, or barcode.
You can edit the Item Quantity and the Item Price from the Item Edit screen. (Optional)
You can pay the entire transaction amount using the Gift Card if you have sufficient balance in your Gift Card. However, if the Total Transaction amount exceeds the Gift Card Balance, you can pay the remaining amount using your desired mode of payment.
Gift Cards in iVendNext can either be System Defined or User Defined and can be used as a Payment Type in sale and refund transactions.
You can identify the Gift Card from the Serial Number or the Item Code.
The entire payment is made in cash when you select the Quick Cash button.
7. Gift Card Balance Check
Checking a Gift Card Balance in iVendNext involves a few key steps. Here's a simplified guide to help you get started:
Click the Transaction button to get into the Transaction Mode
Click on the Gift Card Recharge button
Select the desired Gift card on the Gift Card Sold List View screen
Important Points to Consider
The Gift Card Search screen will display the Gift Card Serial Number, Gift Item Code, and the Gift Card Balance.
You can identify the Gift Card from the Serial Number or the Item Code.
Gift Cards in iVendNext can either be System Defined or User Defined and can be used as a Payment Type in sale and refund transactions.
The entire payment is made in cash when you select the Quick Cash button.
8. Gift Card Cash Back (Only the current balance)
Issuing Gift Card Cash Back in iVendNext involves a few key steps. Here's a simplified guide to help you get started:
Click the Transaction button to get into the Transaction Mode.
Click on the Gift Card Recharge button to reach the Gift Card Sold List View screen
Select the Gift Card that you intend to redeem for cashback and click OK
Click the Quick Cash button to complete the transaction.
Important Points to Consider
The entire payment is made in cash when you select the Quick Cash button.
The cashback amount will be a negative value.
9. Sale with Multiple Tender (Cash, Gift Card, Credit Card)
Performing a Sale in iVendNext using multiple payment methods (Cash, Gift Card, Credit Card) involves a few key steps. Here's a simplified guide to help you get started:
Add Item(s)
Select a Customer.
Choose Cash as the Payment Method
Specify the amount (partial) to be paid in cash
Choose Credit Card as the payment method
Specify the amount (partial) to be paid via Credit Card
Enter the last 4 digits of the Credit Card Number
Input the Expiry Date on the card
Choose Gift Card as the Payment Method
Specify the amount (remaining) to be paid using the Gift Card balance
Specify the Gift Card Serial Number
Click the Save button to conclude the transaction
Print the Transaction Receipt (Optional)
Click the New Transaction button to return to the Transaction Screen
Important Points to Consider
By Default a Walk In Customer, also known as the Cash Customer, is pre selected.
To record the sale against a customer, you must add that customer to the sale.
Perform an item search using the item by code, description, or barcode.
You can edit the Item Quantity and the Item Price from the Item Edit screen. (Optional)
You can offer discount and levy surcharges. (Optional)
The entire payment is made in cash when you select the Quick Cash button.
When a sale is made using multiple payment modes, the total payable amount is split across the selected payment methods.
10. Sale using On Account Payment
Performing a Sale using On Account Payment in iVendNext involves a few key steps. Here's a simplified guide to help you get started:
Add Item(s)
Select a Customer with a credit limit
Checkout to proceed to the Payment Screen
Select the On Account as the Payment Mode
Specify the amount you want to pay using the "On Account" payment option
Click the Save button to complete the transaction
Important Points to Consider
By Default a Walk In Customer is pre selected also referred to as a Cash Customer. To record the sale you've made against a customer's name, you must add that customer to the sale.
You can pay the entire transaction amount using the On Account payment type if you have sufficient Credit Limit Balance. However, if the Total Transaction Amount exceeds the Credit Limit Balance, you can pay the remaining amount using a different mode of payment.
11. Take AR Payment (Sale Payment)
Processing Advance Payments for Customers in iVendNext involves a few key steps. Here's a simplified guide to help you get started:
Select the Customer with a credit limit
Click the Customer Operation button
Click the Advance Payment button to reach the "Take AR Payment/Advance Payment" screen
Select the desired AR Payment/Advance Payment transaction
Specify the "AR Payment/Advance Payment" amount in the "Pay Amount" box

Click the OK button to return to the Transaction Screen
Click the Checkout Button
Select Credit Card as the mode of payment
Specify the amount (partial) to be paid via Credit Card
Enter the last 4 digits of the Credit Card Number
Input the Expiry Date on the card

Select Cash as the mode of payment
Specify the amount (partial) to be paid in cash

Click the Save button to conclude the transaction
Important Points to Consider
AR Payment is not allowed for Cash customer (Walk In customer)
The "Take AR Payment/Advance Payment" screen displays the Transaction Number, Transaction Date, the AR Total amount and the AR Balance amount. The Balance Total field displays the Total AR Payment.
You can choose to make a Full payment or a Partial payment.
12. Sale with Sale Surcharge (Transaction Level Surcharge)
Performing a Sale with Surcharge in iVendNext involves a few key steps. Here's a simplified guide to help you get started:
Add Item(s)
Select a Customer
Click the "Add Sales Surcharge" button to levy a Surcharge at the Transaction Level
Specify the Surcharge details on the "Enter Surcharge Details" screen

Click on the Update Surcharge button
Checkout to proceed to the Payment Screen.
Choose your preferred payment method and conclude the sale
Important Points to Consider
By Default a Walk In Customer is pre selected also referred to as a Cash Customer. To record the sale you've made against a customer's name, you must add that customer to the sale.
13. Sale with Item Surcharge (Line Level Surcharge)
Performing a Sale with Item Surcharge in iVendNext involves a few key steps. Here's a simplified guide to help you get started:
Add Item(s)
Select a Customer
Select the Item you want to levy a Surcharge on
Click the "Add Item Surcharge" button to levy a Surcharge at the Line Level
Specify the Surcharge details on the "Enter Surcharge Details" screen

Click on the Update Surcharge button
Checkout to proceed to the Payment Screen
Choose your preferred payment method and conclude the sale
Important Points to Consider
By Default a Walk In Customer is pre selected also referred to as a Cash Customer. To record the sale you've made against a customer's name, you must add that customer to the sale.
14. Sale with Item Discount (Line Level Discount)
Performing a Sale with Item Discount in iVendNext involves a few key steps. Here's a simplified guide to help you get started:
Add Item(s)
Select a Customer
Click the Customer Operation button
Select the Line Item you want to sell at a discount
Click the "Line Discount" button to offer a Discount at the Line Level
Specify the Line Discount in amount or percent and click the Enter button to return to the Transaction screen

Checkout to proceed to the Payment Screen
Choose your preferred payment method and conclude the sale
Important Points to Consider
By Default a Walk In Customer is pre selected also referred to as a Cash Customer. To record the sale you've made against a customer's name, you must add that customer to the sale.
15. Sale with Sale Discount (Transaction Level Discount)
Performing a Sale with Sale Discount in iVendNext involves a few key steps. Here's a simplified guide to help you get started:
Add Item(s)
Select a Customer
Click the Customer Operation button
Click the "Sale Discount" button to offer a Discount at the Transaction Level
Specify the Sale Discount in amount or percent and click the Enter button to return to the Transaction screen

Checkout to proceed to the Payment Screen
Choose your preferred payment method and conclude the sale
Important Points to Consider
By Default a Walk In Customer is pre selected also referred to as a Cash Customer. To record the sale you've made against a customer's name, you must add that customer to the sale.
16. Item Edit Activity - Change Quantity
Add Item(s)
Select a Customer
Select the Line Item you want to edit
Click the "Item Edit" button to open the "Item Edit Screen”
Click the "Change Quantity" button to change the Quantity
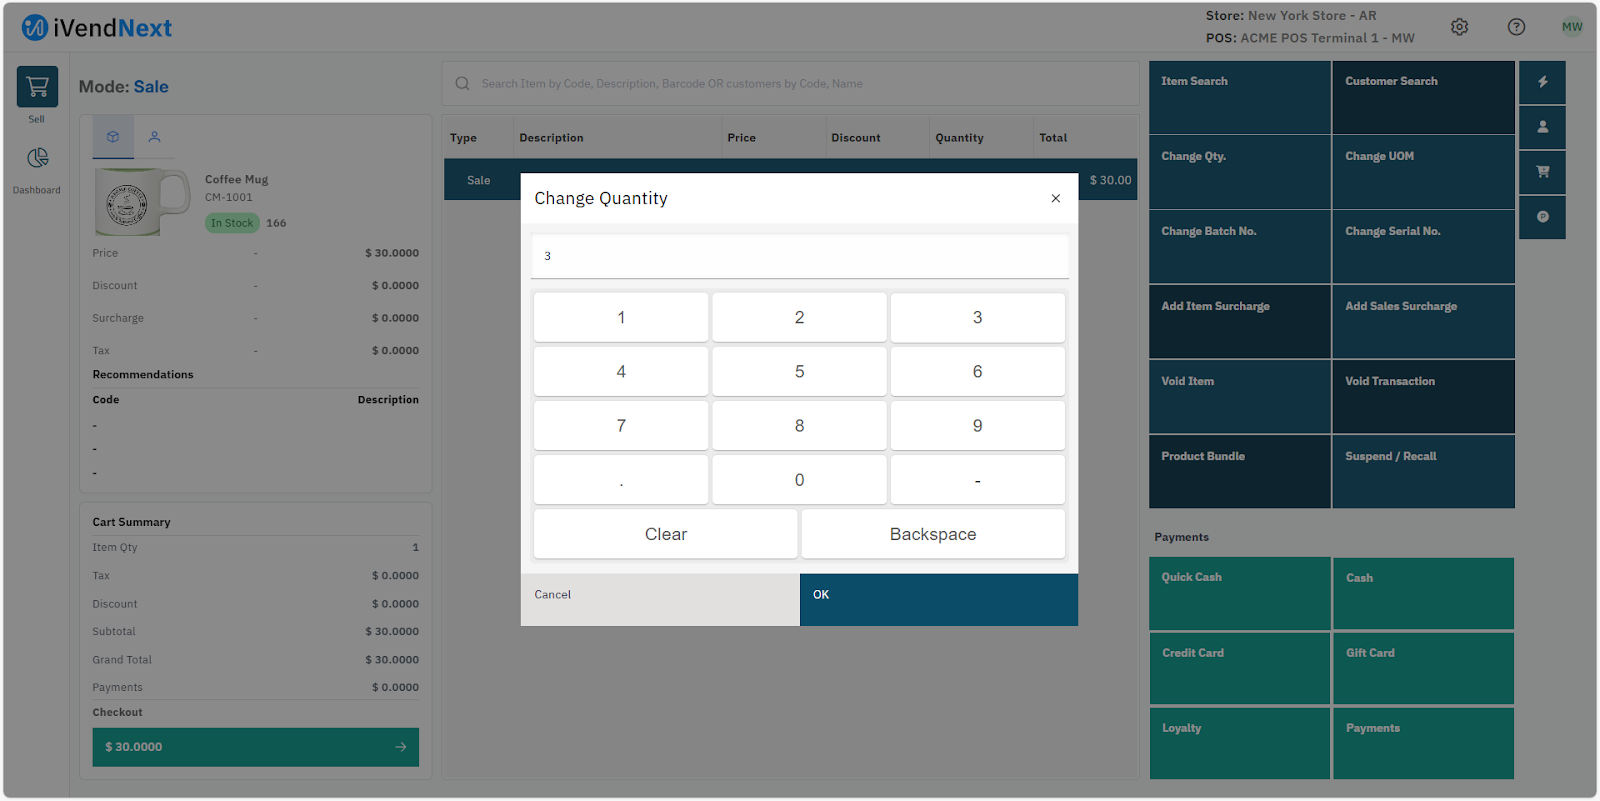
Click the Enter button on the "Item Edit Screen” to return to the Transaction Screen
Checkout to proceed to the Payment Screen
Choose your preferred payment method and conclude the sale
Important Points to Consider
By Default a Walk In Customer is pre selected also referred to as a Cash Customer. To record the sale you've made against a customer's name, you must add that customer to the sale.
17. Item Edit Activity - Change Price
Add Item(s)
Select a Customer
Select the Line Item you want to edit
Click the "Item Edit" button to open the "Item Edit Screen”
Click the "Change Price" button to change the Price

Click the Enter button on the "Item Edit Screen” to return to the Transaction Screen
Checkout to proceed to the Payment Screen
Choose your preferred payment method and conclude the sale
Important Points to Consider
By Default a Walk In Customer is pre selected also referred to as a Cash Customer. To record the sale you've made against a customer's name, you must add that customer to the sale.
18. Sale Return
Enter the Transaction Mode
Click the Transaction Search button to reach the Transaction Search Screen
Select the desired transaction and click Show Details

Select the item(s) that you want to refund on the Transaction Details screen
Click the Sale Return button

Checkout to proceed to the Payment Screen
Choose your preferred payment method and conclude the sale

Important Points to Consider
The Quantity, Discount, and the Amount Total, will be a negative value.
You can do a Full Return or a Partial Return.
You cannot return an Item if it is marked as Non-Returnable Item.
19. Item Return (No Bill / Receipt)
Add item(s) to be returned
Click the Transaction button to get into the Transaction Mode
Click the Item Return button
Checkout to proceed to the Payment Screen
Choose your preferred payment method and conclude the sale
Important Points to Consider
The Quantity, Discount, and the Amount Total, will be a negative value.
20. Cash In
Click the Transaction button to get into the Transaction Mode
Click the Cash In button
Specify the Cash In Amount
Specify the Cash In reason in the Comments field

Click the Submit button
Important Points to Consider
By Default a Walk In Customer is pre selected also referred to as a Cash Customer. To record the sale you've made against a customer's name, you must add that customer to the sale.
21. Cash Out
Click the Transaction button to get into the Transaction Mode
Click the Cash Out button
Specify the Cash Out Amount
Specify the Cash Out reason in the Comments field

Click the Submit button
Important Points to Consider
By Default a Walk In Customer is pre selected also referred to as a Cash Customer. To record the sale you've made against a customer's name, you must add that customer to the sale.
22. Expense Posting
Click the Transaction button to get into the Transaction Mode
Click the Add Expenses button
Specify the Expense Amount
Select the Expense Type from the drop down field
Specify the Expense reason in the Comments field

Click the Submit button.
Important Points to Consider
By Default a Walk In Customer is pre selected also referred to as a Cash Customer. To record the sale you've made against a customer's name, you must add that customer to the sale.
23. Void - Item
Add Item(s)
Select a Customer
Select the item(s) that you want to Void
Click the Void Item button
Click Yes on the Confirmation screen to Void the item

Important Points to Consider
By Default a Walk In Customer is pre selected also referred to as a Cash Customer. To record the sale you've made against a customer's name, you must add that customer to the sale.
A Void Item is removed from the Sale Items.
24. Void - Transaction
Add Item(s)
Select a Customer
Click the Void Transaction button
Click Yes on the Confirmation screen to Void the transaction

Important Points to Consider
By Default a Walk In Customer is pre selected also referred to as a Cash Customer. To record the sale you've made against a customer's name, you must add that customer to the sale.
A Void Transaction cannot be recalled
25. Suspend
Add Item(s)
Select a Customer
Click the Suspend / Recall button
Click Yes on the Confirmation screen to Suspend the transaction

Important Points to Consider
By Default a Walk In Customer is pre selected also referred to as a Cash Customer. To record the sale you've made against a customer's name, you must add that customer to the sale
A Suspend Transaction can be recalled
26. Recall
Click the Suspend / Recall button on the Transaction Screen
Select the Suspended transaction
Click the Recall button

Add / Remove Item(s), if required
Click the Quick Cash button to complete the transaction
Important Points to Consider
The entire payment is made in cash when you select the Quick Cash button
27. Fulfillment - Delivery
Performing Fulfillment (Delivery) in iVendNext involves a few key steps. Here's a simplified guide to help you get started:
Add Item(s)
Select a Customer
Click the Transaction button to get into the Transaction Mode
Click the Sales Fulfillment button to reach the Fulfillment Item List screen

Select the items you want to link to the Fulfillment Plan
Click the Select Delivery Plan button. This will open theDelivery Popup Screen

Choose Delivery Plan: Delivery Type Fulfillment Plan
Specify the Delivery Date
Add the Delivery Address
Click the Submit button
Then click the OK button on the Fulfillment Items Screen
Click the Quick Cash button to complete the transaction
Return to the Transaction Screen and click on the Transaction Search button
Perform a transaction search to select the desired transaction
Click the Delivery button
Click the Quick Cash button to conclude the sale
Important Points to Consider
By Default a Walk In Customer is pre selected also referred to as a Cash Customer. To record the sale you've made against a customer's name, you must add that customer to the sale.
You must record the Fulfillment sale against a customer's name. Fulfillment Plans can only be attached to the sale transactions of Registered Customers and not Walk In Customers.
Perform an item search using the item by code, description, or barcode. You can edit the Item Quantity and the Item Price from the Item Edit screen. You can offer discount and levy surcharges (Optional).
The entire payment is made in cash when you select the Quick Cash button.
28. Fulfillment - Pickup
Performing Fulfillment (Pickup) in iVendNext involves a few key steps. Here's a simplified guide to help you get started:
Add Item(s)
Select a Customer
Click the Transaction button to get into the Transaction Mode
Click the Sales Fulfillment button to reach the Fulfillment Item List screen

Select the items you want to link to the Fulfillment Plan
Click the Select Pickup Plan button. This will open the Pickup Popup Screen

Choose Fulfillment Plan: Sales Type Fulfillment Plan
Specify the Delivery Date
Click the Submit button
Then click the OK button on the Fulfillment Items Screen
Click the Quick Cash button to conclude the transaction
Return to the Transaction Screen and click on the Transaction Search button
Perform a transaction search to select the desired transaction and click OK
Click the Delivery button on the Transaction Detail screen
Click the Quick Cash button to complete the order
Important Points to Consider
By Default a Walk In Customer is pre selected also referred to as a Cash Customer. To record the sale you've made against a customer's name, you must add that customer to the sale.
You must record the Fulfillment sale against a customer's name. Fulfillment Plans can only be attached to the sale transactions of Registered Customers and not Walk In Customers.
Perform an item search using the item by code, description, or barcode. You can edit the Item Quantity and the Item Price from the Item Edit screen. You can offer discount and levy surcharges (Optional).
The entire payment is made in cash when you select the Quick Cash button.
29. Sale - Variant Items
Performing a Sale of Variant Items in iVendNext involves a few key steps. Here's a simplified guide to help you get started:
Add Variant Item(s)
Select its Variant
Select a Customer
Click the Quick Cash button to complete the transaction
Click Yes on the Transaction Completion Confirmation Screen to complete the transaction
Important Points to Consider
By Default a Walk In Customer is pre selected also referred to as a Cash Customer. To record the sale you've made against a customer's name, you must add that customer to the sale.
Perform an item search using the item by code, description, or barcode. You can edit the Item Quantity and the Item Price from the Item Edit screen. You can offer discount and levy surcharges (Optional).
The entire payment is made in cash when you select the Quick Cash button.
30. Sale - Serial Items
Performing a Sale of Serial Items in iVendNext involves a few key steps. Here's a simplified guide to help you get started:
Add a Serial Item
Select the Serial Number from the list displayed

Select a Customer
Click the Quick Cash button to complete the transaction
Click Yes on the Transaction Completion Confirmation Screen to complete the transaction
Important Points to Consider
By Default a Walk In Customer is pre selected also referred to as a Cash Customer. To record the sale you've made against a customer's name, you must add that customer to the sale.
Perform an item search using the item by code, description, or barcode. You can edit the Item Quantity and the Item Price from the Item Edit screen. You can offer discount and levy surcharges (Optional).
The entire payment is made in cash when you select the Quick Cash button.
31. Sale - Batch Items
Performing a Sale of Batch Items in iVendNext involves a few key steps. Here's a simplified guide to help you get started:
Add a Batch Item
Select the Batch Number from the list displayed

Select a Customer
Click the Quick Cash button to complete the transaction
Click the Save button to complete the transaction
Important Points to Consider
By Default a Walk In Customer is pre selected also referred to as a Cash Customer. To record the sale you've made against a customer's name, you must add that customer to the sale.
Perform an item search using the item by code, description, or barcode. You can edit the Item Quantity and the Item Price from the Item Edit screen. You can offer discount and levy surcharges (Optional).
The entire payment is made in cash when you select the Quick Cash button.
Glossary of Terms
Before proceeding with the implementation, it is important to familiarize ourselves with the relevant terminology and fundamental concepts associated with iVendNext.
POS Profile
A POS profile is a template that is attached to the Store and determines the behavior of the POS terminal to which it is attached to. A POS Profile references the following settings:
Interface profile - the look and layout of the POS
Payment Methods - the different payment methods that can be used at the POS
Print settings - format of the printouts that are taken at the POS: transaction receipt, gift card receipt, X Tape and Z Tape report, etc.
Price list and other accounting information
Customer Display
Path: Home > Retail > Settings > POS Profile |
POS Terminal
A POS terminal is the physical POS terminal on which the POS software is installed. A POS Terminal has the reference of the hardware id of the physical terminal. In addition to this, the POS terminal also has the reference of the hardware id of payment devices that are connected to this physical terminal.
Path: Home > Retail > Settings > POS Terminal |
POS Shift Profile
A POS Shift Profile is also a template that is attached to a User. It determines a few settings like: Float Amount, whether tender counting is mandatory or not at shift closure, whether or not any variance is allowed in counting and if yes, whether the variance will be a percentage or an absolute amount, etc.
Path: Home > Retail > Settings > POS Shift Profile |
User
As the name specifies, users are people who use the application based on their roles and permissions. This is also the place where you specify whether the user is a cashier or not. If a user is categorized as a Cashier, you get to specify the Stores he has access to and his POS Shift Profile.
Path: Home > Users > User |
Item Tax Template
There are jurisdictions where more than one tax is applied to the product being sold. Item Tax Template lists the taxes that are to be applied to Items. The template also lets you specify whether the second tax should be applied On Net Total, On Previous Row Amount or On Previous Row Total.
Path: Home > Accounting > Tax Masters > Item Tax Template |
Operation Panel Buttons on POS screen
iVendNext POS consists of an Operations Panel Button Group. This group consists of the following button controls:
Action Operation Button
Customer Operation Button
Transaction Operation Button
Product Operation Button
These Operations Panel Buttons are interactive elements that enable users to perform various tasks directly from the POS interface. These buttons are a part of a customizable grid on the POS screen and can be configured to execute specific operations.

Action Operation Button: Configured Functions
Action Operation Button is a part of the Operations Panel Button Group. By clicking on this button you can perform the following functions:
Item Search
Item Edit
Change Batch Number
Add Item Surcharge
Void Item
Product Bundle
Customer Search
Change UOM
Change Serial Number
Add Sales Surcharge
Void Transaction
Suspend / Recall
Customer Operation Button: Configured Functions
Customer Operation Button is a part of the Operations Panel Button Group. By clicking on this button you can choose to perform the following functions:
Transaction Search
Customer Edit
Advance Payment
Line Discount
Apply Coupon
Start Manager Override
New Customer
Customer View
Change Price
Sales Discount
Clear Coupon
End Manager Override
Transaction Operation Button: Configured Functions
Transaction Operation Button is a part of the Operations Panel Button Group. By clicking on this button you can choose to perform the following functions:
Sales
Sales Fulfillment
Gift Card
Gift Card REcharge
Cash In
X-Tape
Item Return
Add Expenses
Gift Card Serial Number
Gift Card Cashback
Cash Out
Close POS
Product Operation Button: Configured Functions
Product Operation Button is a part of the Operations Panel Button Group. By clicking on this button you can group identical items. The following Item Groups come preconfigured based on the Demo Data.
Apparel
Shoes
Health and Hygiene
Bathroom Fixtures
Luggage and Bags
Home Audio and Theater
Electronics
Sports and Outdoor
Bedding and Furniture
Books
Fashion Accessories
Tools and Home Improve