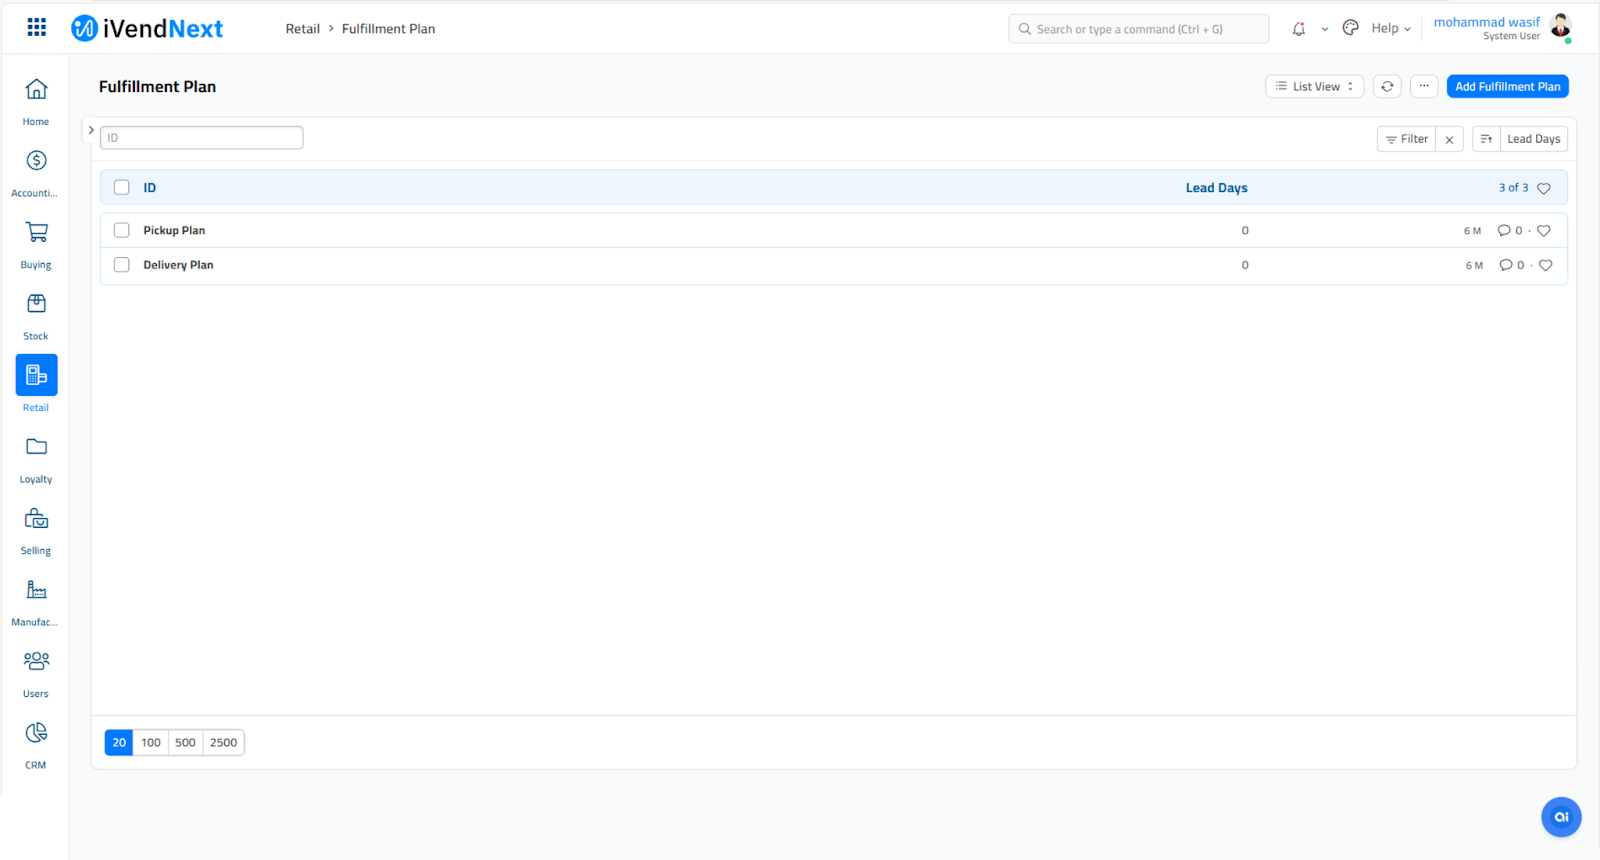
Fulfillment Plan
Fulfillment plans are attached to sale, special order and layaway transactions at POS. Fulfillment plans are created (and attached to sales / sales orders / layaways) in cases when the delivery of the items is to be done later OR the delivery attracts some additional surcharges OR the retailer wants to reserve the stock before the items are delivered. Fulfillment plans are also created when the retailer has to facilitate home delivery and store pickups. Fulfillment Plans can only be attached to the sale transactions of Registered Customers and not Walk In Customers. If a "Cash" customer wants to place a special order, a customer master record would have to be created in order to complete the transaction.
1. What is a Fulfillment Plan?
A Fulfillment Plan in iVendNext is a record that is created with pre-defined Delivery Mode, Lead Days and Fulfillment Charges if any. So when an order is placed clicking on the Fulfillment button takes you to the Fulfillment Transaction List screen where you can select either a Delivery Plan or a Pickup Plan. Upon selecting a Fulfillment Plan the Fulfillment details are automatically fetched. This process is covered in detail in the Fulfillment Plan Implementation section below.
2. Fulfillment Plan Types
iVendNext supports two fulfillment plan options to enhance customer convenience:
Home Delivery
Allows customers to receive their purchases directly at their doorstep.
Store Pickup
Enables customers to collect their orders from a selected retail location at their convenience.
3. Steps to create a Fulfillment Plan
This section outlines the step-by-step procedure for creating a Fulfillment Plan in the iVendNext.
Navigation Path:
Go to Home > Retail. Under the Store Operations section, click on the Fulfillment Plan shortcut. This will open the Fulfillment Plan List View screen.
Initiate a New Plan:
Click on the Add Fulfillment Plan button. You will be directed to the New Fulfillment Plan screen.
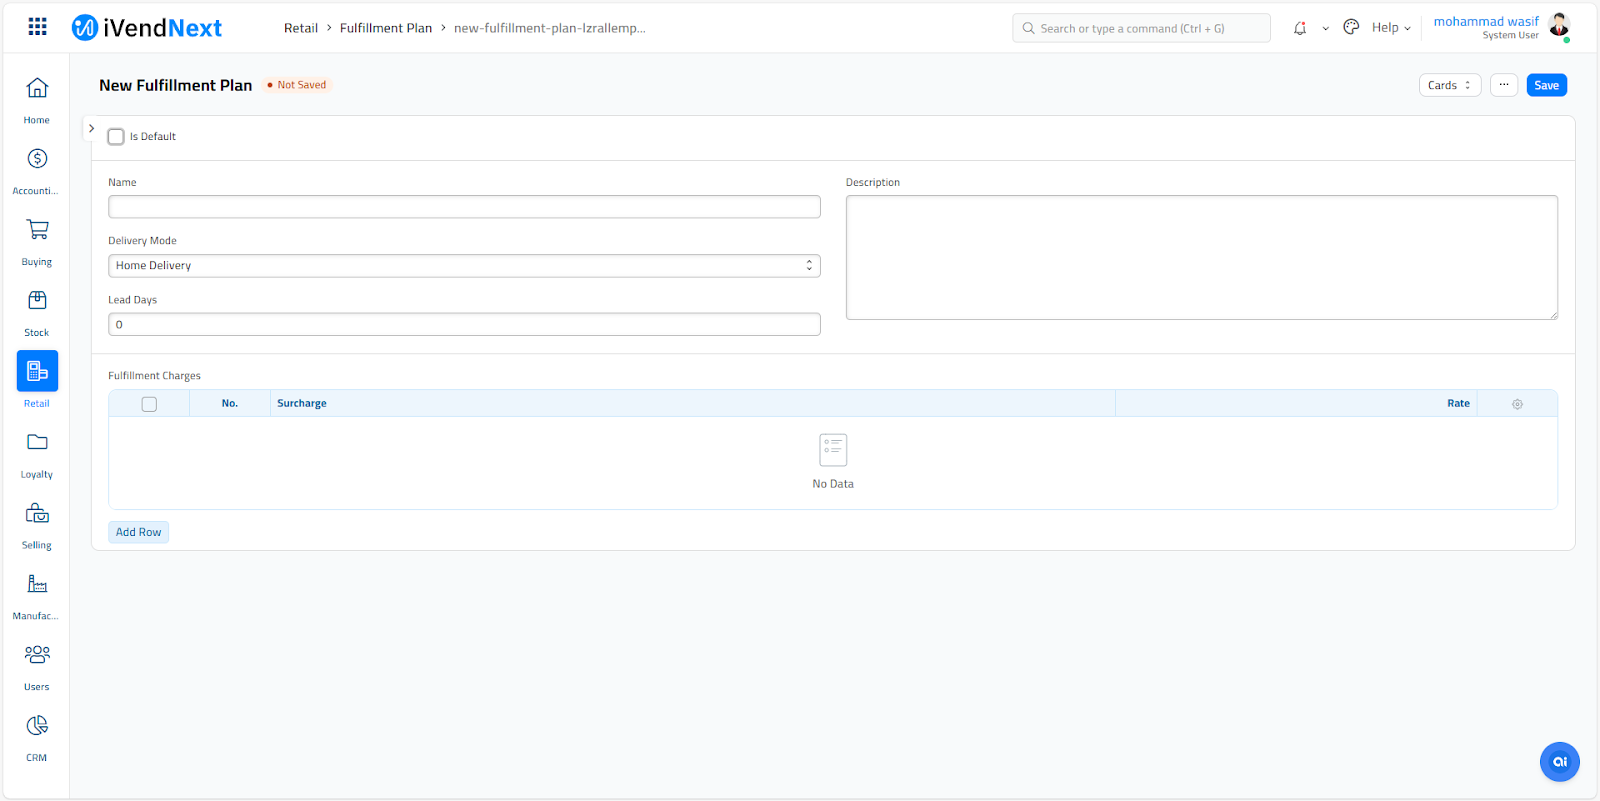
Enter Fulfillment Plan Details:
Specify the plan details.
Fulfillment Plan Name:
Provide a unique name for the plan.
Description:
Enter a brief description to outline the plan’s purpose or scope.
Delivery Mode:
Choose between: Home Delivery and Store Pickup
Fulfillment Charges:
Specify Fulfillment Charges: Surcharge and Rate
Save the Plan:
Click the Save button to store the entered information and exit the screen.
The new Fulfillment Plan will be created and displayed within the Fulfillment Plan List View screen for future reference and management.
4. New Fulfillment Plan Screen
The various fields on the New Fulfillment Plan screen are explained below:
Is Default
Check this box to set the New Fulfillment Plan as the default Fulfillment Plan. A default Fulfillment Plan will be automatically attached to a sale, special order and layaway transactions at POS.
Name
Specify a name for the fulfillment plan.
Description
Specify a description for the fulfillment plan.
Delivery Mode
Select the Delivery Mode as Home Delivery or Store Pickup from the drop down list.
Depending upon the Delivery Mode selected, a fee may be applicable which can be defined using the Fulfillment Charges section. The impact of delivery mode on inventory management is explained below in the section Impact on Inventory.
Lead Days
The time it takes to fulfill an order is called the Lead Time. Specify the minimum lead time (in Days) for delivery of the items. The value displayed by default is 0.
In the retail manufacturing, a business will typically encounter three types of lead times:
Material Lead Time: This is the duration it takes for suppliers to deliver ordered goods to the manufacturer.
Production Lead Time: This is the duration from submitting a manufacturing order to receiving the finished product into stock.
Customer Lead Time: This is the duration it takes for the company to produce the goods and/or deliver them to their customers, from order until fulfillment.
Fulfillment Charges
The retailer may charge a fee based on the Fulfillment Plan selected. Delivery charges, Installation charges, etc are some of the examples
5. Home Delivery Implementation
This section outlines the step-by-step procedure for implementing a Home Delivery in the iVendNext.
Launch iVendNext POS
Navigate to: Home > Retail. Click on the iVendNext POS shortcut to launch the iVendNext POS application.
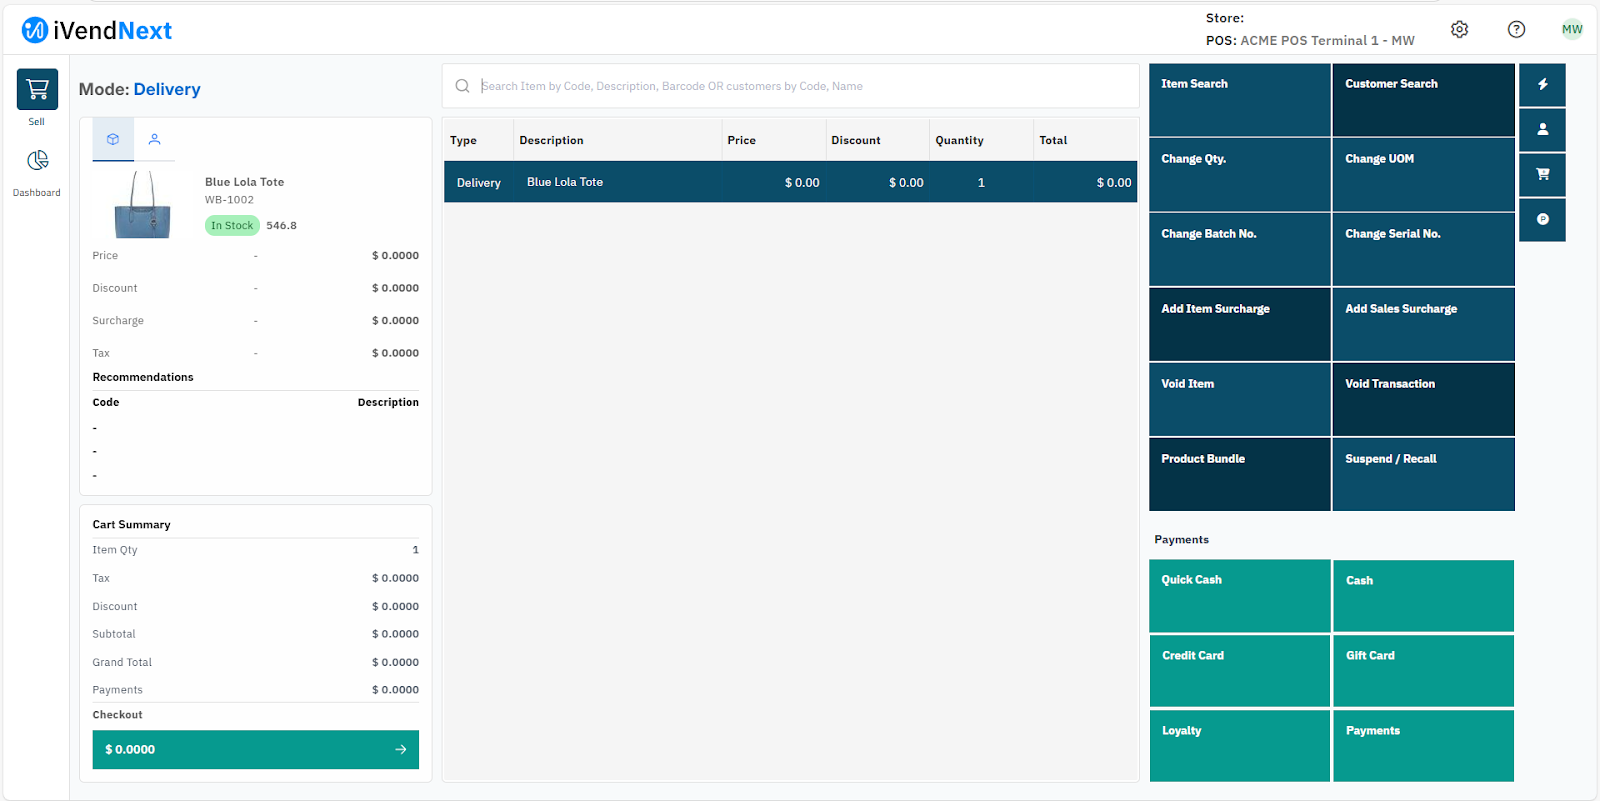
Add Item(s)Begin by adding the required item(s) to the cart.
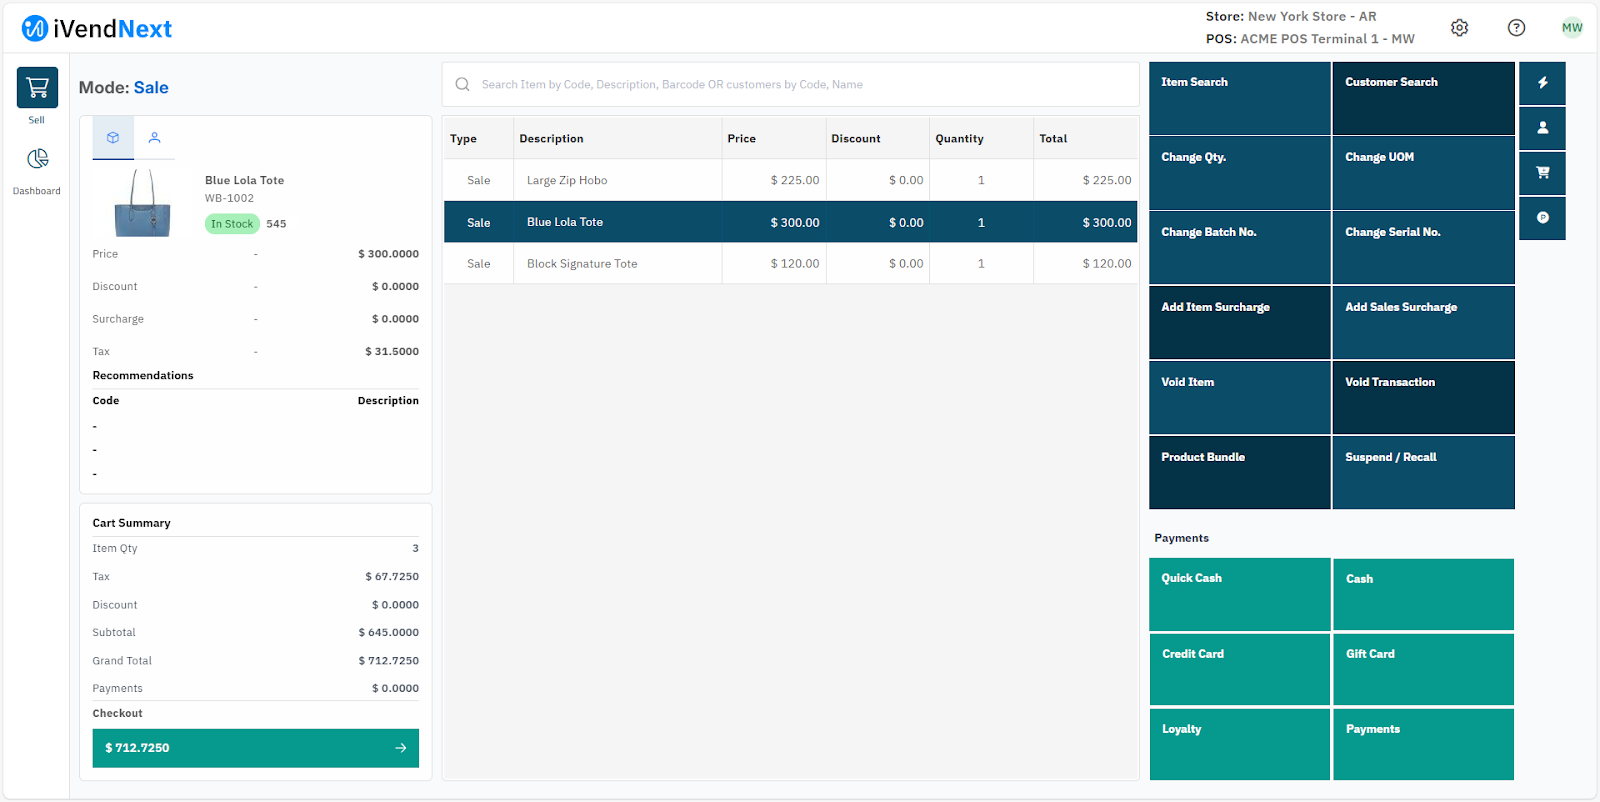
Select a Customer (Mandatory)Assign the transaction to a specific customer. Fulfillment Plans can only be attached to the sale transactions involving Registered Customers and not Cash Customers (Walk In Customers).
Switch to Transaction ModeClick the Transaction button to enter Transaction Mode.

Open Fulfillment Item ListClick the Sales Fulfillment button to access the Fulfillment Item List screen.
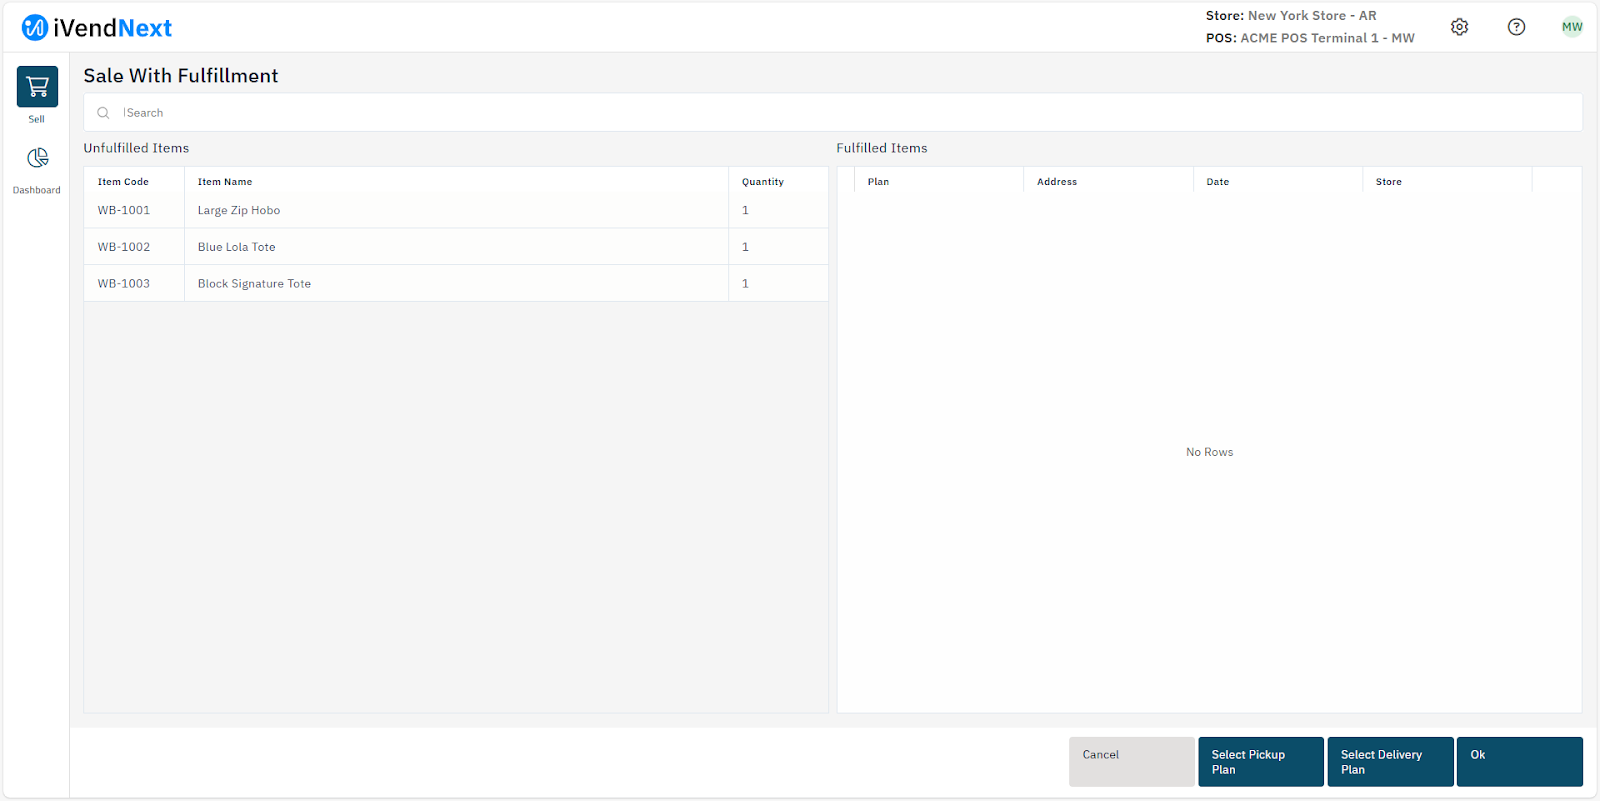
Select Items for Fulfillment PlanChoose the items that need to be linked to a Fulfillment Plan.
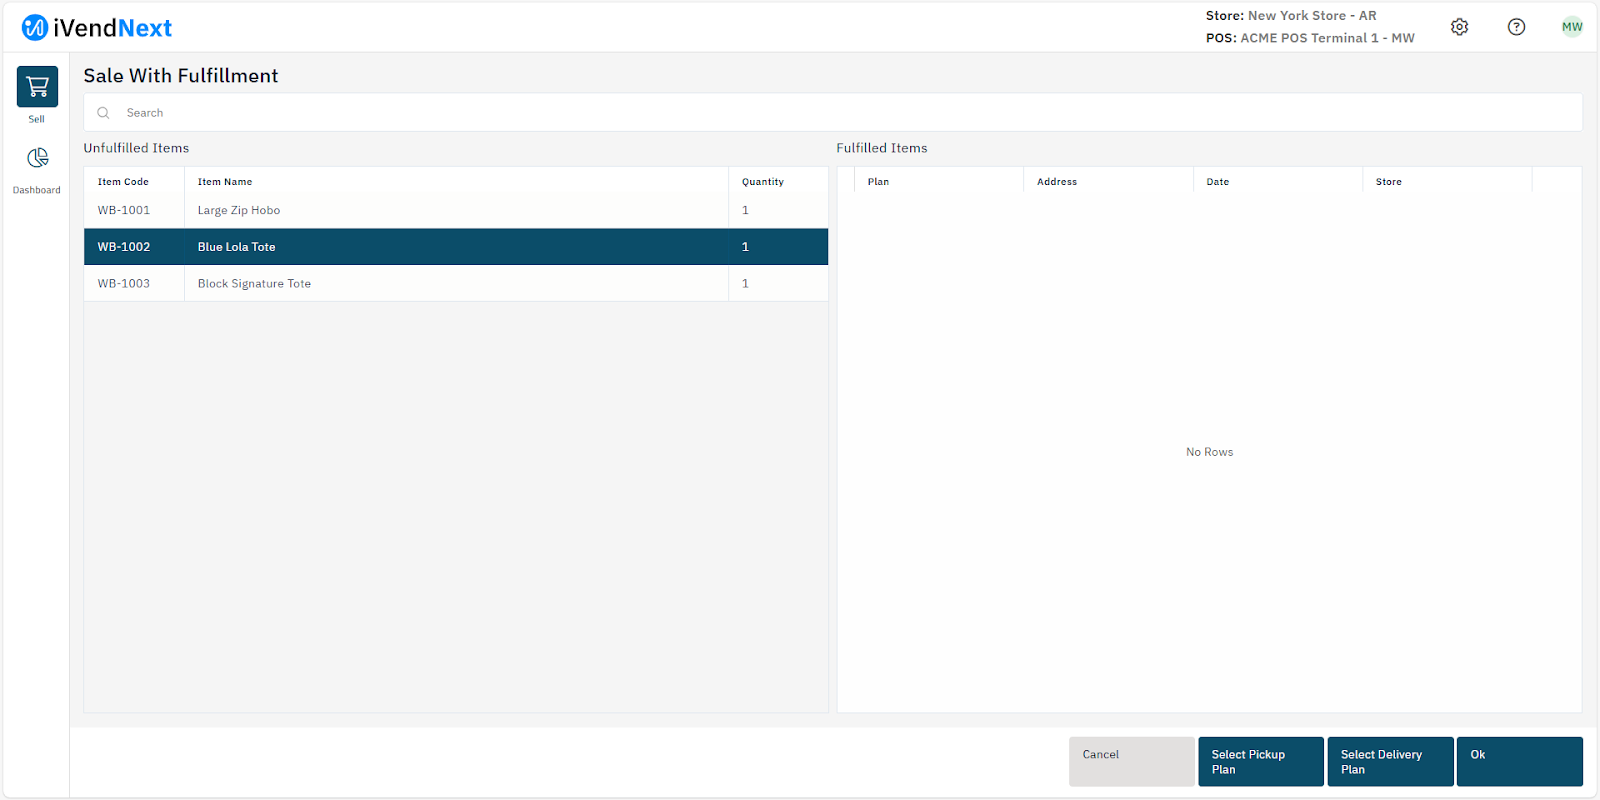
Home Delivery Plan SelectionClick the Select Delivery Plan button to open the Choose Delivery Plan popup screen.
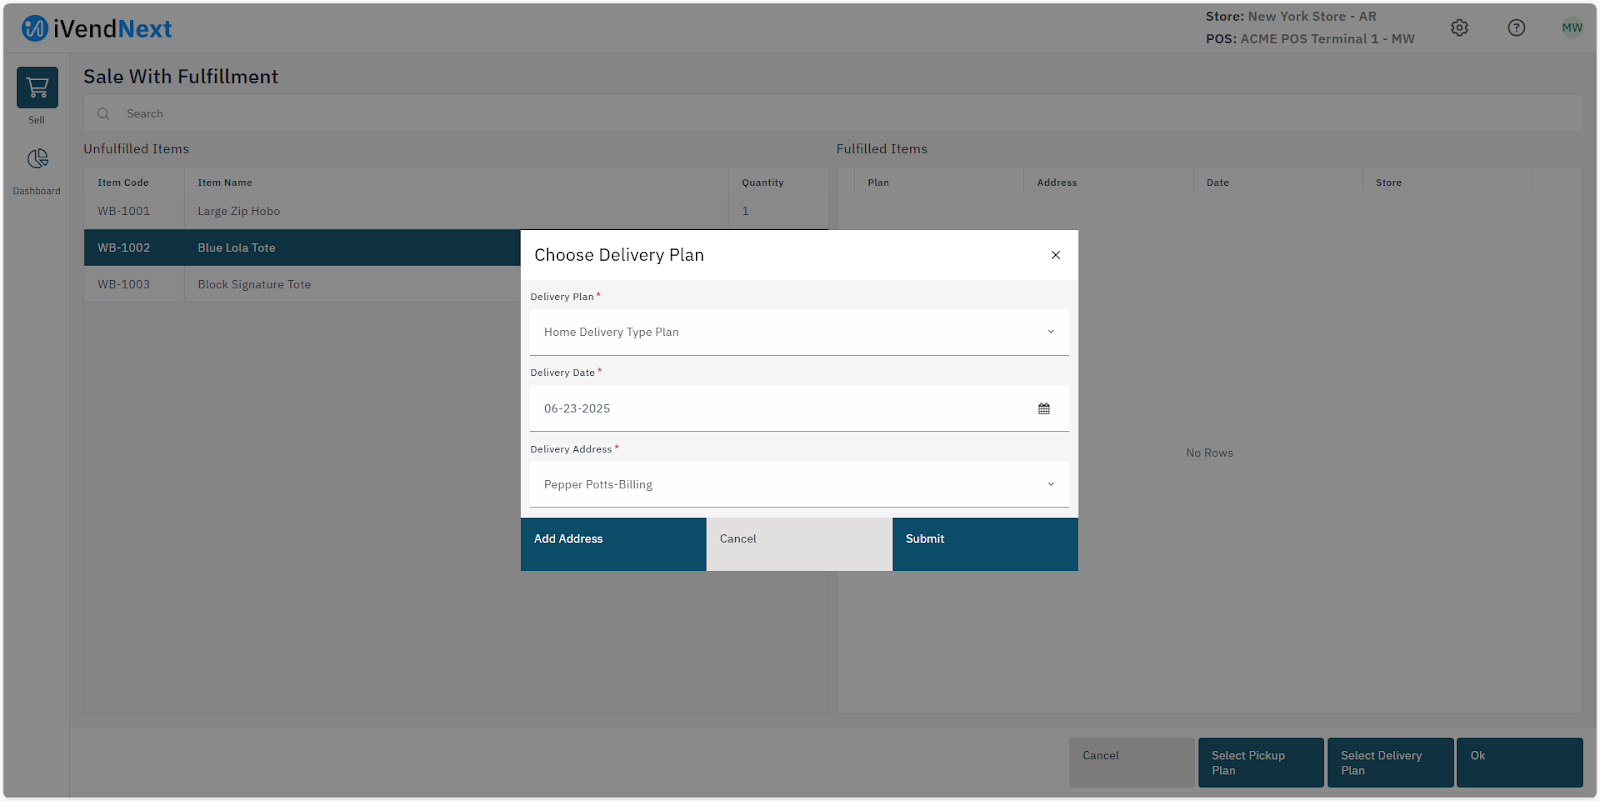
Choose and Configure Fulfillment Plan
Select a Delivery Plan
Specify the Delivery Date
Set the Delivery Address
Click the Submit button
Delivery Plan
A default Delivery Plan will be automatically attached to a sale, special order and layaway transactions at POS. This means that when you reach the Choose Delivery popup screen the default Delivery Plan would be preselected. However, the application gives you the flexibility to select a different Plan from the drop down list.
Delivery Date
The date will automatically populate based on the Delivery Plan selected above. However, the application gives you the flexibility to select a different date.
Select Address
The address should automatically populate based on the Customer selected on the Transaction screen. The application gives you the leverage to change the Delivery Address. This is useful in case the Customer wants the items to be delivered at a different address other than the default address.
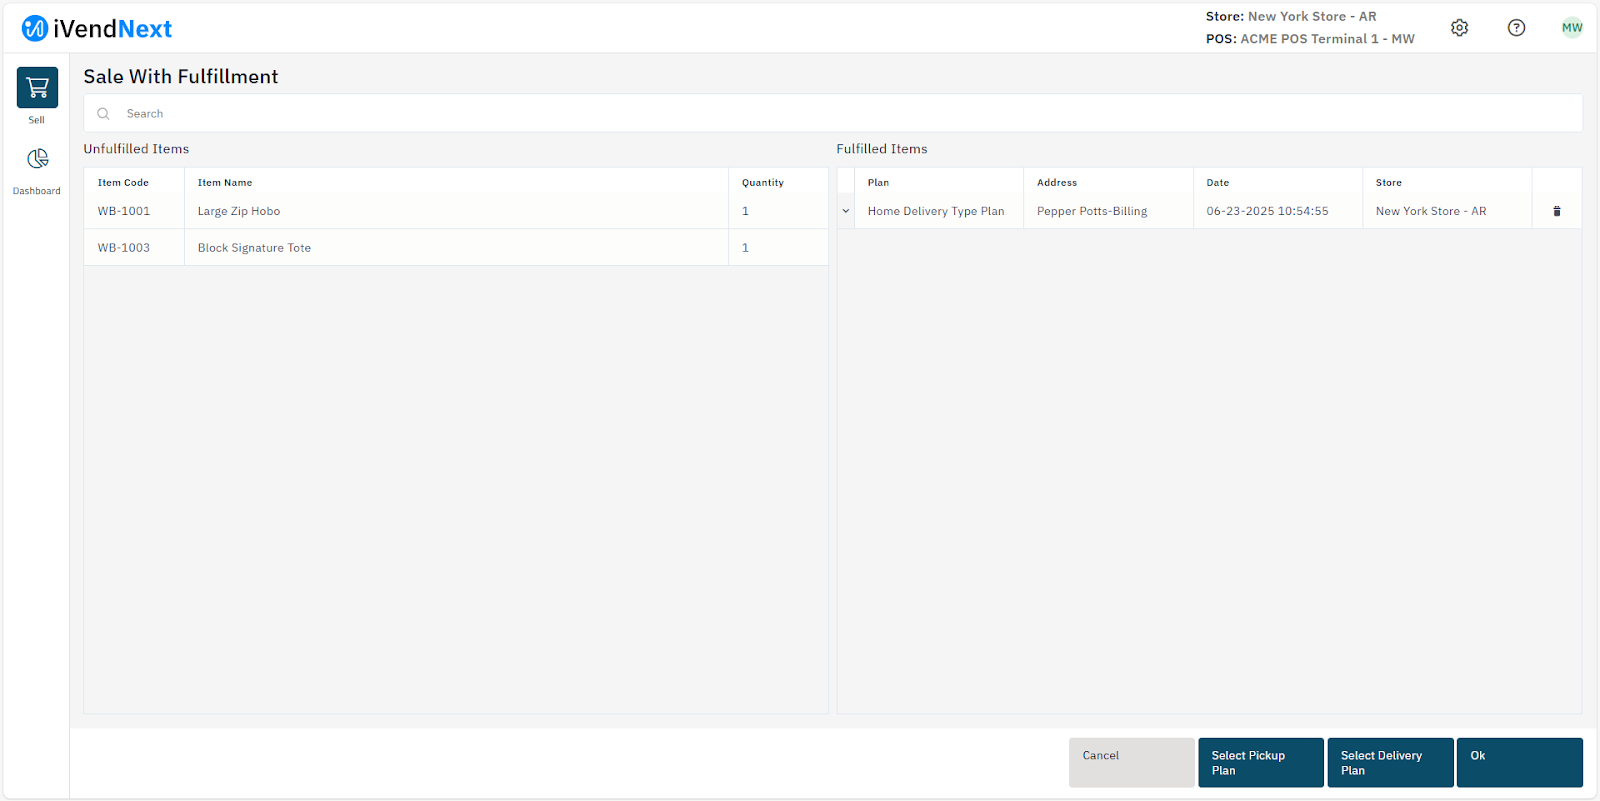
Confirm Fulfillment ItemsClick the OK button on the Fulfillment Items Screen.

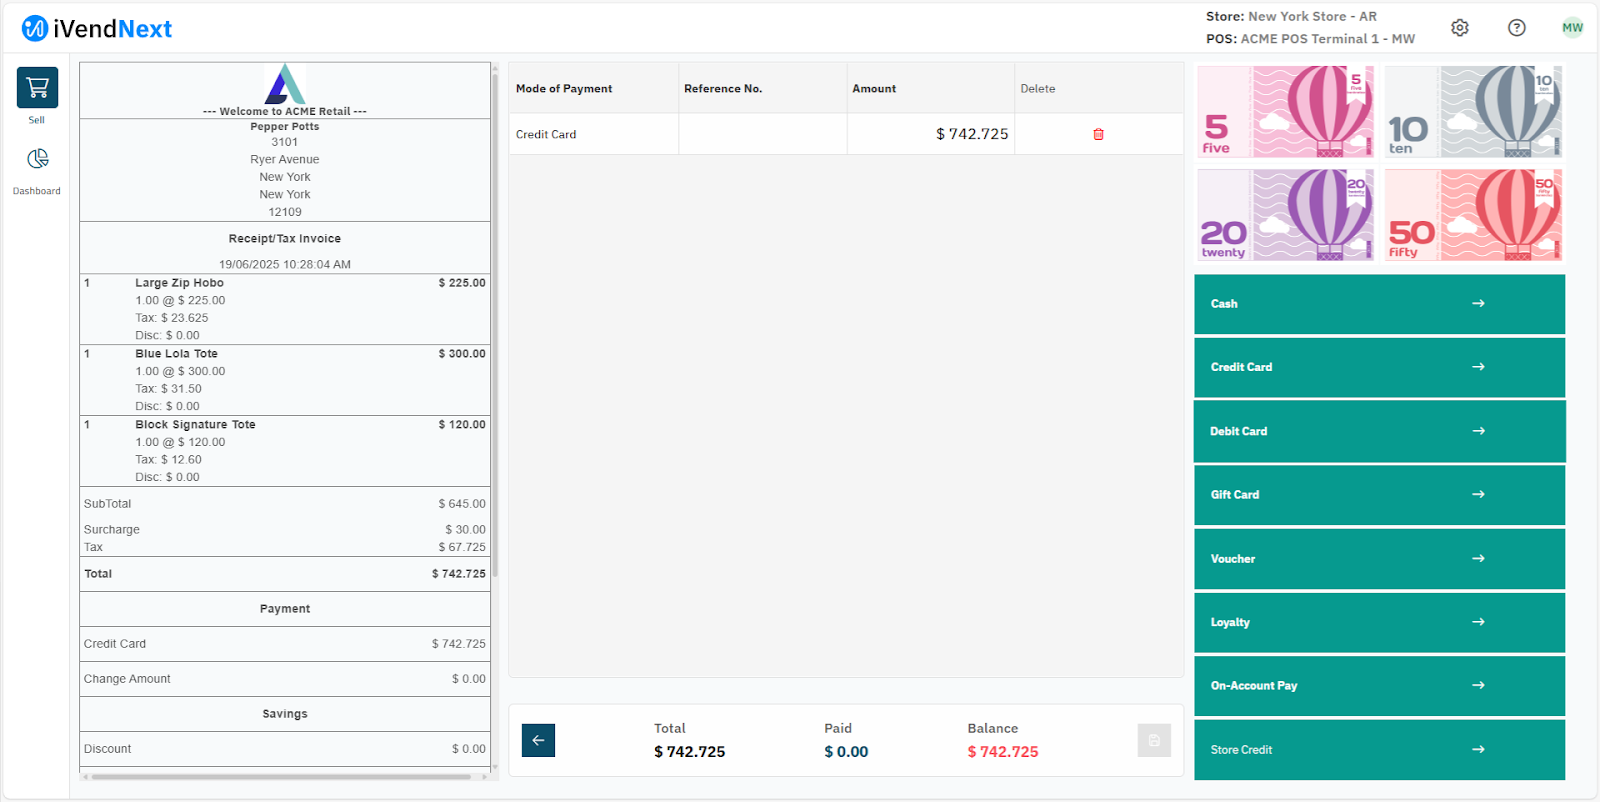
Conclude Initial TransactionClick the Checkout button. Select a Payment Method and make the payment to conclude the sale.
6. Home Delivery Fulfillment
This section outlines the step-by-step procedure for Home Delivery fulfillment in the iVendNext.
Locate the TransactionReturn to the Transaction Screen and click on the Transaction Search button.Perform a search to locate and select the desired transaction. Click the Show Details button.
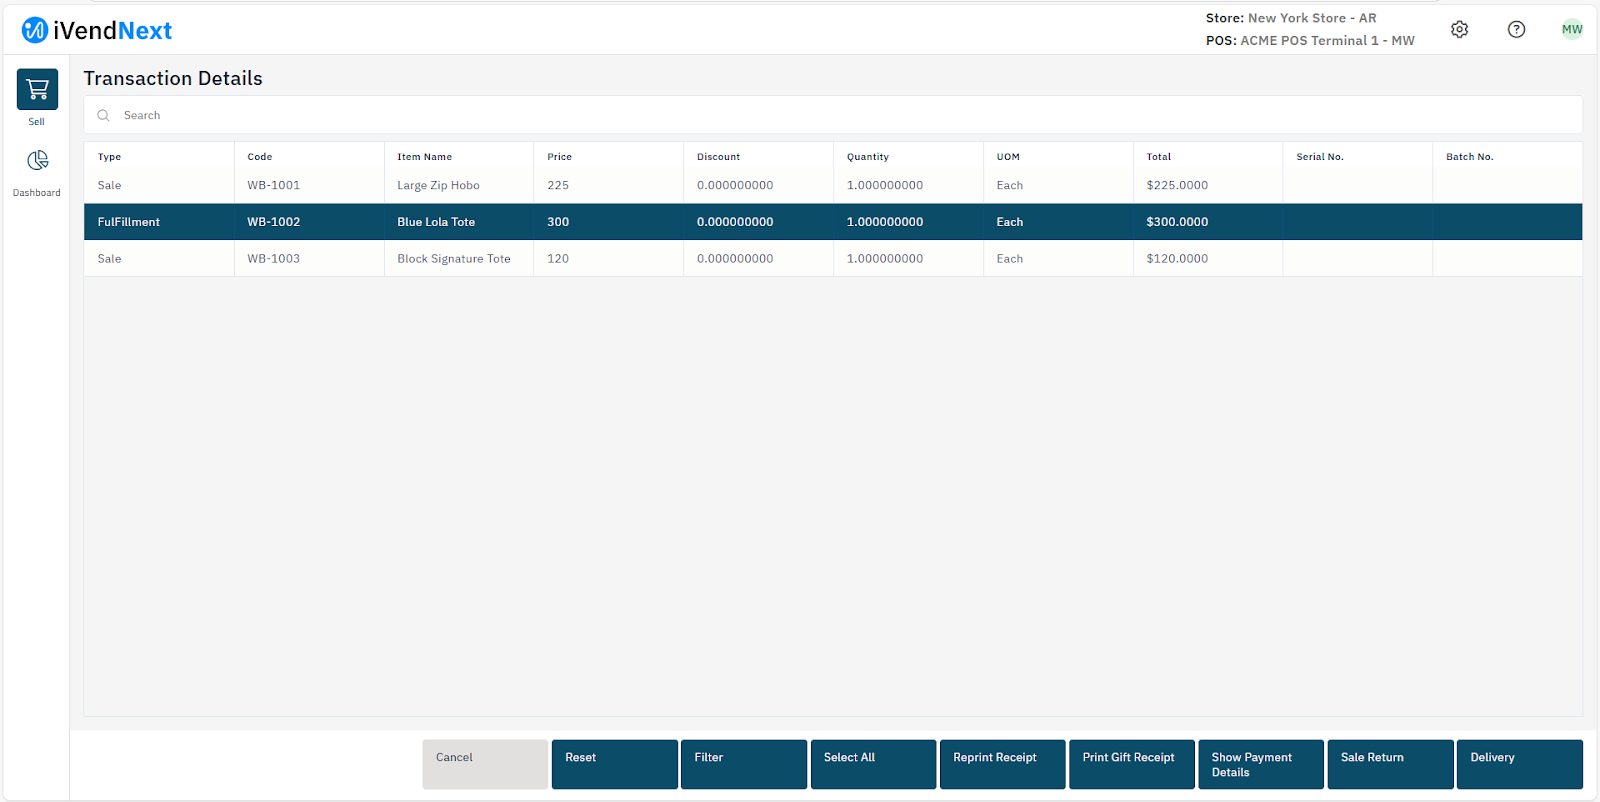
Process Delivery StepClick the Delivery button.

Complete FulfillmentClick the Quick Cash button again to finalize the fulfillment.
Confirm the FulfillmentReturn to the Transaction Screen and click on the Transaction Search button.Perform a search to locate and select the desired transaction. Click the Show Details button.

7. Store Pickup Implementation
This section outlines the step-by-step procedure for implementing a Store Pickup in the iVendNext.
Launch iVendNext POS
Navigate to: Home > Retail. Click on the iVendNext POS shortcut to launch the iVendNext POS application.
Add Item(s)Begin by adding the required item(s) to the cart.
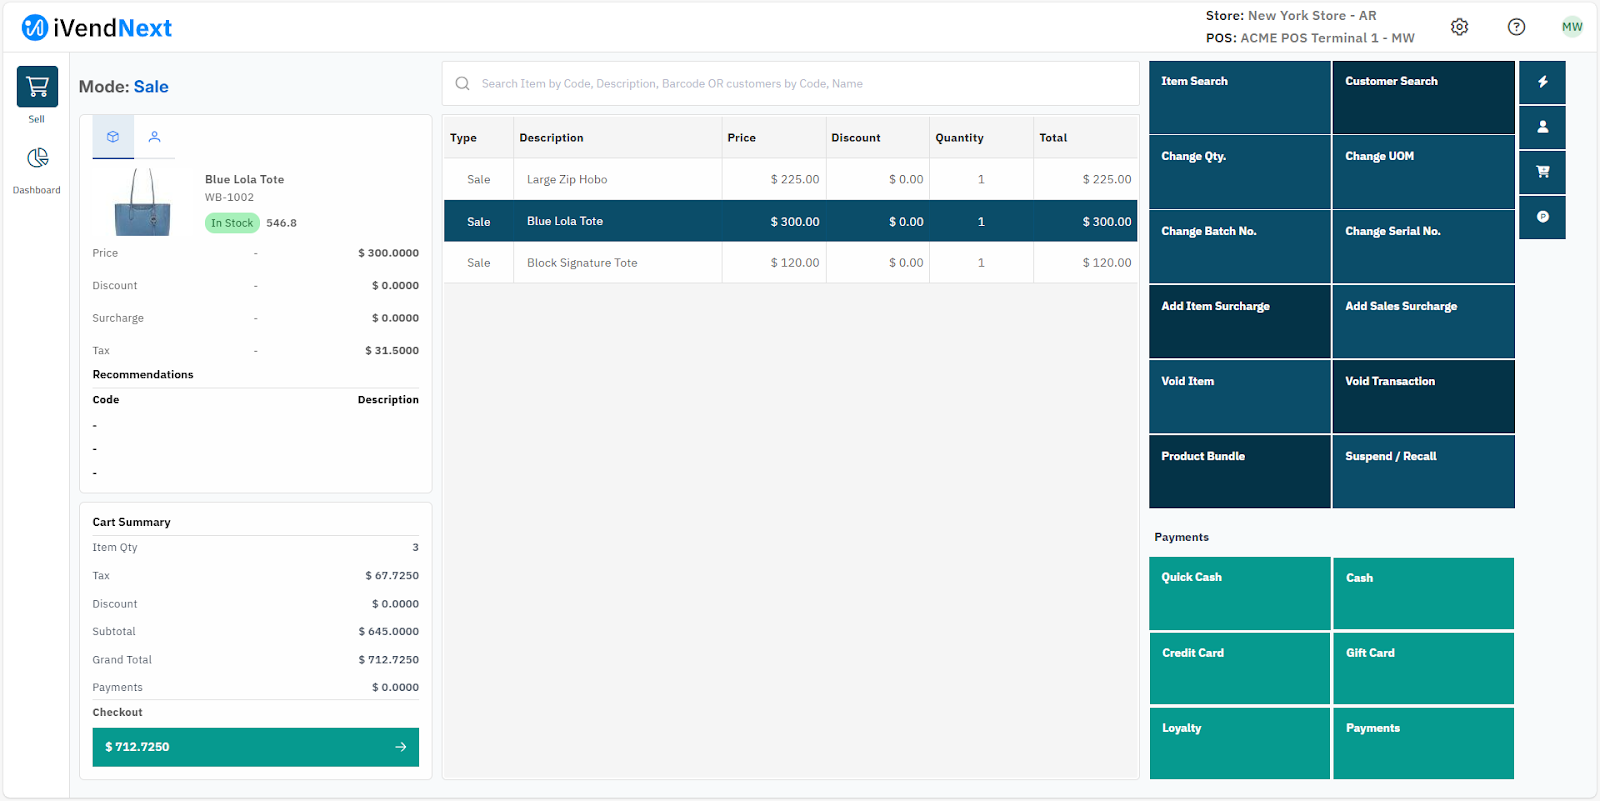
Select a Customer (Mandatory)Assign the transaction to a specific customer. Fulfillment Plans can only be attached to the sale transactions involving Registered Customers and not Cash Customers (Walk In Customers).
Switch to Transaction ModeClick the Transaction button to enter Transaction Mode.
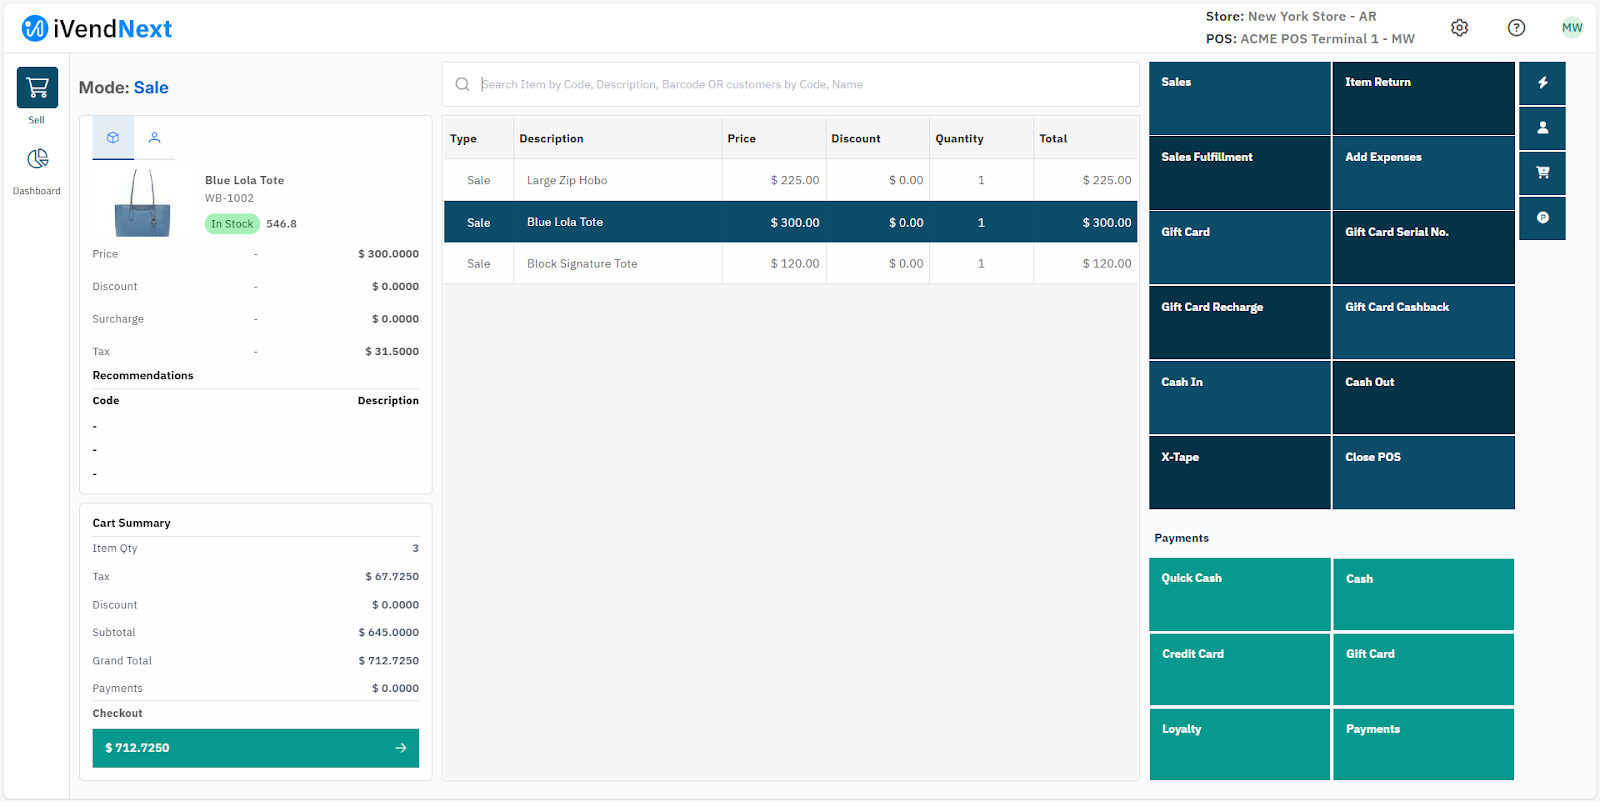
Open Fulfillment Item ListClick the Sales Fulfillment button to access the Fulfillment Item List screen.

Select Items for Fulfillment PlanChoose the items that need to be linked to a Fulfillment Plan.

Pickup Plan SelectionClick the Select Pickup Plan button to open the Pickup Popup Screen.
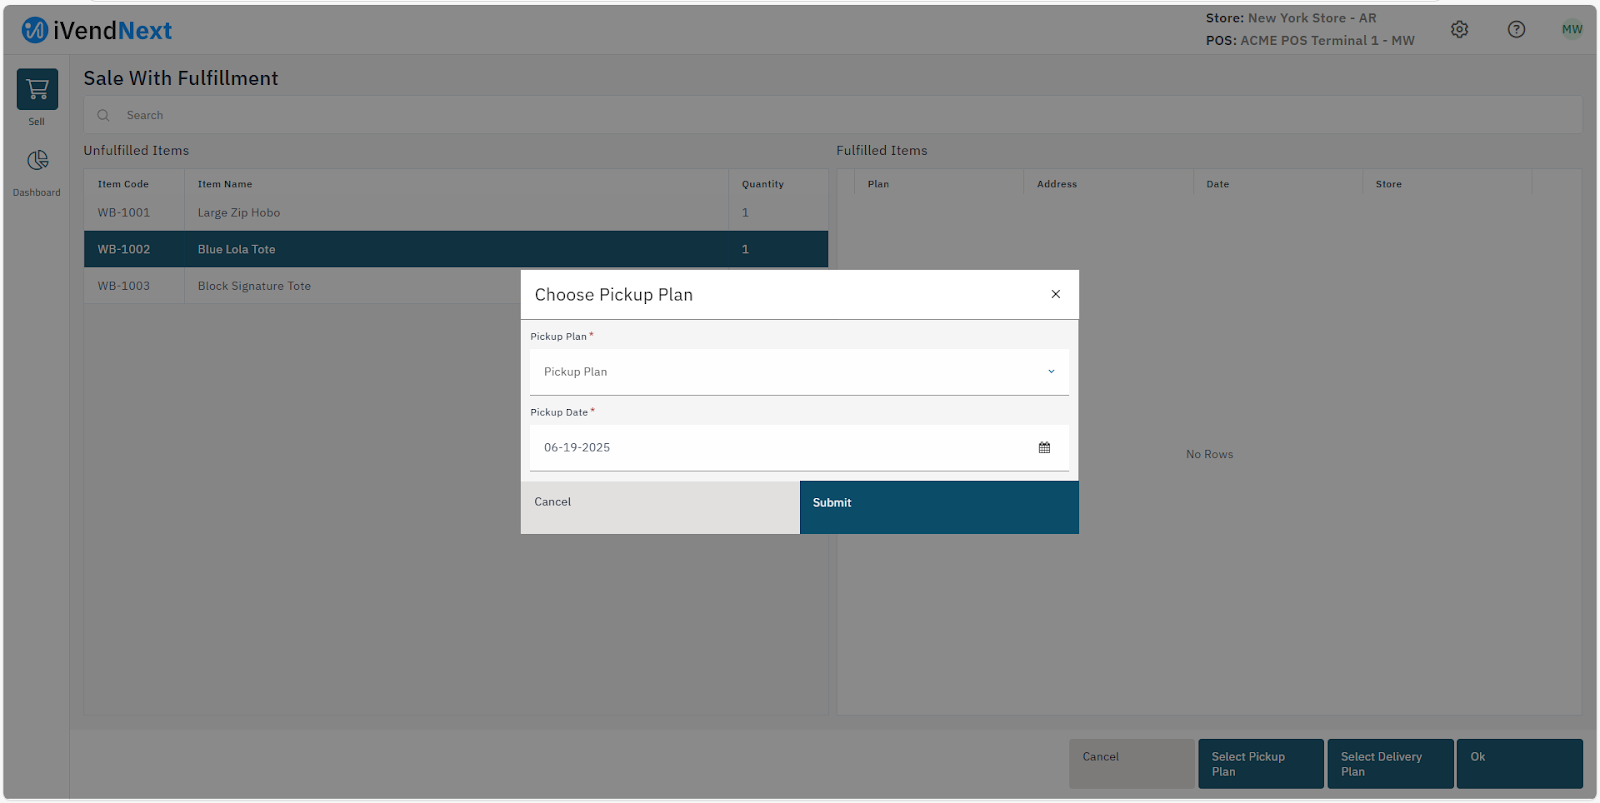
Choose and Configure Fulfillment Plan
Select a Pickup Plan
Specify the Pickup Date
Click the Submit button
Pickup Plan
A default Pickup Plan will be automatically attached to a sale, special order and layaway transactions at POS. This means that when you reach the Pickup Popup Screen the default Pickup Plan would be preselected. However, the application gives you the flexibility to select a different Plan from the drop down list.
Pickup Date
The date will automatically populate based on the Pickup Plan selected above. However, the application gives you the flexibility to change the date.

Confirm Fulfillment ItemsClick the OK button on the Fulfillment Items Screen.

Conclude Initial TransactionClick the Checkout button. Select a Payment Method and make the payment to conclude the sale.

8. Store Pickup Fulfillment
This section outlines the step-by-step procedure for fulfilling a Store Pickup in the iVendNext.
Locate the TransactionReturn to the Transaction Screen and click on the Transaction Search button.Perform a search to locate and select the desired transaction. Click the Show Details button.

Process Delivery StepClick the Delivery button.
Complete FulfillmentClick the Quick Cash button again to finalize the fulfillment.
Confirm the FulfillmentReturn to the Transaction Screen and click on the Transaction Search button.Perform a search to locate and select the desired transaction. Click the Show Details button.

9. Impact on Inventory
When you place an order in iVendNext, you have the option to select a preferred delivery method. You can either choose to pick up the order placed by walking into a nearby store or choose to get the order delivered at your doorstep. Depending upon the selection made, the order is then processed. Whatever the case maybe “Home Delivery” or “Store Pickup”, it has a direct impact on your inventory. All this impact on Inventory can be well seen in the Stock Projected Quantity report.
Let us try to understand the impact of “Home Delivery” and "Store Pickup” on inventory with an example.
When an Order is Booked in iVendNext
When an order is placed in iVendNext, the “Quantity Ordered” is kept aside and marked as “Reserved Quantity” and the “Quantity Available To Sell” is reduced by the “Quantity Ordered”. For example, let's say that you have an item WB-1001 (Brook Large Zip Hobo). The stock in hand for this item is 100 units. An order was placed requesting 15 units. Though the item is still lying with you, you keep aside 15 units of the item and mark them as “Reserve Stock”. Now the actual units of the item that you are left with, that you can sell is 100 units minus 15 units (Reserved) = 85 units.
When an Order is Delivered in iVendNext
When an order is delivered in iVendNext, be it Home Delivery or Store Pickup, the “Stock in Hand” is reduced by the units equivalent to the number of units delivered or picked up. There is a possibility that though the order was placed for 15 units of WB-1001 (Brook Large Zip Hobo), the customer requested delivery of only 7 units. This will result in the following impact:
1. The “Stock in Hand” is reduced by 7 units (100 - 7 = 93 units)
2. The “Reserved Quantity” is reduced by 7 units. (15 - 7 = 8 units)
When an Order is Returned in iVendNext
When an order is delivered in iVendNext, be it Home Delivery or Store Pickup, the “Stock in Hand” is increased by the units equivalent to the number of units returned. The customer who was delivered 7 units has returned 3 units. This will result in the following impact:
1. The “Stock in Hand” is increased by 3 units (93 + 3 = 96 units)
2. The “Reserved Quantity” remains at 8 units. (15 - 7 = 8 units)
10. Additional Information
You can create a single transaction that includes both Home Delivery and Store Pickup.
When you place an order in iVendNext, be it “Home Delivery” or “Store Pickup”, it has a direct impact on your inventory. All this impact on Inventory is recorded in the Stock Projected Quantity report.