Loyalty Plan
Introduction
iVendNext Loyalty is a comprehensive points and rewards application designed to enhance customer acquisition, engagement, and retention. It is part of the iVendNext Retail suite and offers a flexible system for managing loyalty points, which can be accrued through purchases, visits, or other activities. These points can be redeemed for various rewards, such as discounts or gift items, across different channels.
Loyalty Plan Features
A loyalty program is a marketing strategy used by retailers, airlines, hotels, and many other businesses to encourage customers to build a loyal customer base and enhance customer satisfaction. Here are some of the key features of iVendNext Loyalty:
Rewards and Discounts:
Customers earn points or receive discounts for their repeat business.
Special Incentives:
Early access to sales, exclusive products, or free shipping.
Customer Retention:
Helps businesses keep existing customers, which is often more cost-effective than acquiring new ones.
Data Collection:
Provides businesses with valuable data on customer preferences and spending habits.
Loyalty Plan Types
A loyalty program is a marketing strategy used by retailers to encourage customers to continue purchasing their products or services. These programs offer rewards, discounts, and other special incentives to attract new customers and retain existing customers. As of now, iVendNext allows you to create the following types of Loyalty Plan:
Points-Based
Tiered
Points-Based:
Customers earn points for purchases and can redeem them for rewards.
Tiered:
Different levels of rewards are based on customer spending.
Steps to create a Loyalty Plan in iVendNext
A loyalty program is a marketing strategy used by retailers to encourage customers to continue purchasing their products and services. This is done to attract new customers and retain existing customers. The steps to create a Loyalty Plan in iVendNext are explained below:
Navigate to: Home > Loyalty. Then under the Loyalty Program section click on the Loyalty Plan shortcut.

This will open the Loyalty Plan List View screen.

Click on the Add Loyalty Plan button. This will take you to the New Loyalty Plan screen. Fill in the required information including the mandatory fields on the New Loyalty Plan screen. All the mandatory fields are marked with red asterisks.

Specify a name and code for the Loyalty Plan, select the Plan Type and then pick a Start Date.
Once you have filled in the required information including the mandatory fields on the New Loyalty Plan screen click the Save button, to save the data and exit the screen.
This will create a New Loyalty Plan and will start to appear on the Loyalty Plan List View screen.
Loyalty Plan Screen
The New Loyalty Plan screen is split into the following sections.
General
Plan Details
Applicable Stores
Loyalty Exception Rule
General
The various fields in this section are explained below:
Code
Specify a code for the loyalty plan. This code is unique and can comprise of 20 alphanumeric characters or less.
Description
Specify a description for the loyalty plan. This description can comprise of 50 alphanumeric characters or less.
Start Date
Pick a start date from the calendar pop up. The date is displayed in the MM/DD/YYYY format. The Loyalty Plan is set to begin from this date.
End Date
Pick an end date from the calendar pop up. The date is displayed in the MM/DD/YYYY format. The Loyalty Plan is set to end on this date.
Active
Check this box to mark the loyalty plan as active. Only active plans would be able to awards points at POS to loyalty customer
Loyalty Program
Select a Loyalty Program from the drop down list. In case you don’t see your preferred Loyalty Program in the list displayed, you can choose to create a new Loyalty Program by clicking on the option - Create a New Loyalty Setup.
Plan Type
Select a plan type from the drop-down list. Depending on the selected plan type, some existing fields may be removed, and new fields may appear. Valid values are:
Normal Plans: These plans are regular plans that are executed whenever a loyalty transaction occurs at the POS. There can be more than one normal plan active in the system.
Special Days Plans: These plans are those which get executed on special days defined in the system. There can be more than one special day plan active in the system. When this Plan Type is selected, an additional section for Special Days starts to appear on the New Loyalty Plan screen.
Special Days for Customers Plans: These plans are those which get executed on days which are special for the customer. For example, Customer’s birthdays or Customer’s anniversary etc. There can be more than one Special Days for Customer Plan active in the system. When this Plan Type is selected, additional fields to input Birth Date and Anniversary start to appear under the General section.
Start Time
Enter the time from which the plan is applicable. By default midnight time is pre-populated.
End Time
Enter the time until which the plan will be active.
Birth Date
Pick a Birth Date from the calendar pop up. The date is displayed in the MM/DD/YYYY format. This field is visible only when the Plan Type selected is Special Days For Customers.
Anniversary Date
Pick an Anniversary date from the calendar pop up. The date is displayed in the MM/DD/YYYY format. This field is visible only when the Plan Type selected is Special Days For Customers.
Plan Details
This section of the New Loyalty Plan screen allows you to manage and control the settings around the Loyalty Plan. You will have to click on the Add Row button displayed below the Plan Details Template to add a new blank row. Then click on the Pencil symbol under the Gear icon to open the Editing Row screen. On the Editing Row screen you can specify the below information.
Applicable
Select the option from the drop down list whether to include or exclude the Loyalty Plan.
Customer Type
When selecting the Customer Type for the loyalty plan, you can choose from the following options:
All: Selecting "All" will execute the loyalty plan for all the loyalty customers as defined in this row.
Customer Code: Choosing "Customer Code" will open the customer search screen when you click on the next field, "Customer Value." From there, you can select a specific customer for whom you wish to define this rule.
Customer Group:
Opting for "Customer Group" will open the customer group search screen when you click on the next field, "Customer Value." You can then select a customer group for whom you wish to define this rule.
Level
Select the Loyalty Level from the drop down list. In case you don't see your preferred Loyalty Level in the list displayed, you can choose to create one by clicking on the option - Create a New Loyalty Level
Criteria Group
The Criteria Group is used to define a plan for a selected group of customers based on different values. The valid values are:
All: Selecting "All" will apply the loyalty plan to all the criteria groups. This is the default value.
Item: Selecting Items will apply the loyalty plan to the item selected in the Criteria Value field.
Item Group: Selecting an Item Group will apply the loyalty plan to the Item Group selected in the Criteria Value field.
Promotion: Selecting Promotion will apply the loyalty plan to the promotion selected in the Criteria Value field.
Layaway: Selecting Layaway will apply the loyalty plan to the Layaway items selected in the Criteria Value field.
Bill Value: Selecting Bill Value will apply the loyalty plan to transactions with a bill value greater than or equal to the value specified in the Criteria Value field.
Bill Quantity: Selecting Bill Value will apply the loyalty plan to transactions with a quantity greater than or equal to the value specified in the Criteria Value field.
Criteria Value
This field is dynamically populated based on the selection made in the previous Criteria Group field.
Tender
Specify the payment type to be associated with this loyalty program. You can choose a tender type, such as Credit Card, Debit Card, or Cash if you wish to allocate points only when that particular payment method is used for a loyalty transaction.
Calculation Basis
This field allows the user to specify the basis on which the points are calculated and awarded. The valid values are: Amount AND Quantity
Amount: If Amount is selected the system calculates the points based on the bill amount value specified in the Calculation Value column. The Amount option is not available when Bill Quantity is selected in the Criteria Group column.
Quantity: If Quantity selected then the system calculates the points based on the quantity value specified in the Calculation Value column. The Quantity option is not available when Bill Value is selected in the Criteria Group column.
Calculation On
This field allows the user to specify the calculation criteria. The valid values are:
Every: When the "Every" option is chosen, points are given for each instance of the specified value in the Criteria Value column. For example, if the Calculation Basis is "Amount," the Calculated On is "Every," and the value in the Calculation Value column is 100, then for every 100 currency units spent by the customer, the system will award points or currency as specified in the Award Value column.
Greater or Equal: If the "Greater or Equal" option is selected, points are awarded when the transaction value is greater than or equal to the value specified in the Calculation Value column.
Calculation Value
This field is used to specify a numeric value based on which the points would be calculated and awarded based on the value selected in the Calculation Basis field.
Award
This field allows the user to select the Reward Type from a drop-down list. The valid values are:
Point: When "Point" is selected, the customer will always be awarded loyalty points.
Currency: When "Currency" is selected, the customer will always be awarded currency units.
Award Value: Specify the number of points or currency units that the customer should be awarded when they qualify for rewards.
Applicable Stores
This section of the New Loyalty Plan screen allows you to select a Store(s). You will have to click on the Add Row button displayed below the Applicable Stores Template to add a new blank row. Then click on the Pencil symbol under the Gear icon to open the Editing Row screen. On the Editing Row screen you can specify the below information.
Store
Select the Store from the drop down list. In case you don't see your preferred Store in the list displayed, you can choose to create one by clicking on the option - Create a New Warehouse. A Warehouse is known as a Store in iVendNext.
Loyalty Exception Rule
Predefined exception rules are provided on this screen that will exclude all items configured in the loyalty plan if they fall under the exception rule. The exception rules are:
Exclude all items on promotion:
All items marked as promotional in the retail database shall not be considered for points/currency award even if they appear in the loyalty scheme.
Example Scenario:
Customers earn 1 loyalty point per ₹100 spent, but "items on promotion are excluded from point calculation".
- 1x Shirt – USD 250 (part of an ongoing 'Buy 1 Get 1 Free' promotion)
- 1x Polo T Shirt – USD 180 (non-promotional item)
- 1x Women Bag – USD 499 (non-promotional item)
- 1x Women Coat – USD 399 (under “Special Offer – 10% Off”)
Points Calculation:
- Shirt → Promotional Item → 0 points
- Women Coat → Promotional Item → 0 points
- Polo T shirt (USD 180) + Women Bag (USD 499) = USD 679 → Eligible for points → 6 points
Even though the Shirt and Women Coat are part of the total purchase and listed in the loyalty scheme's coverage, they are not eligible for loyalty points due to the exclusion rule for promotional items.
Exclude all items with discount greater than X percent:
All items that have already been given a discount (greater than X percent) in the retail database shall not be considered for points/currency award even if they appear in the loyalty scheme. However, when a discount percentage is specified in the exclusion list, items having a lesser discount shall be considered during award of rewards.
Example Scenario:
A customer purchases an item that has been discounted more than 30%, that item is excluded from earning loyalty points, even if it’s part of a promotional or loyalty campaign.
Denim Jeans – Original Price: USD 2,000
- Discount Applied: 35% (Final Price: USD 1,300)
T-Shirt – Original Price: USD 1,000
- Discount Applied: 20% (Final Price: USD 800)
Canvas Sneakers – Original Price: USD 3,000
- No discount applied
Points Calculation:
- Denim Jeans → Discount exceeds 30% → No loyalty points awarded
- T-Shirt → Discount is below 30% → Loyalty points awarded
- Canvas Sneakers → No discount → Loyalty points awarded
This approach ensures the loyalty rewards system doesn’t double-reward customers for heavily discounted items while still incentivizing purchases with modest or no discounts.
Enroll a Customer in a Loyalty Program
The steps to enroll a Customer in a Loyalty Program are as follows:
Navigate to: Home > Selling. Then under the Selling section click on the Customer shortcut. This will open the Customer List View screen.
Search your Customer you want to enroll for a Loyalty Program.
Under the Details Tab, check the following boxes:
Loyalty Member
Loyalty Notification
Then select a Loyalty Program from the drop down list.

Click the Save button to save the changes and exit the screen.
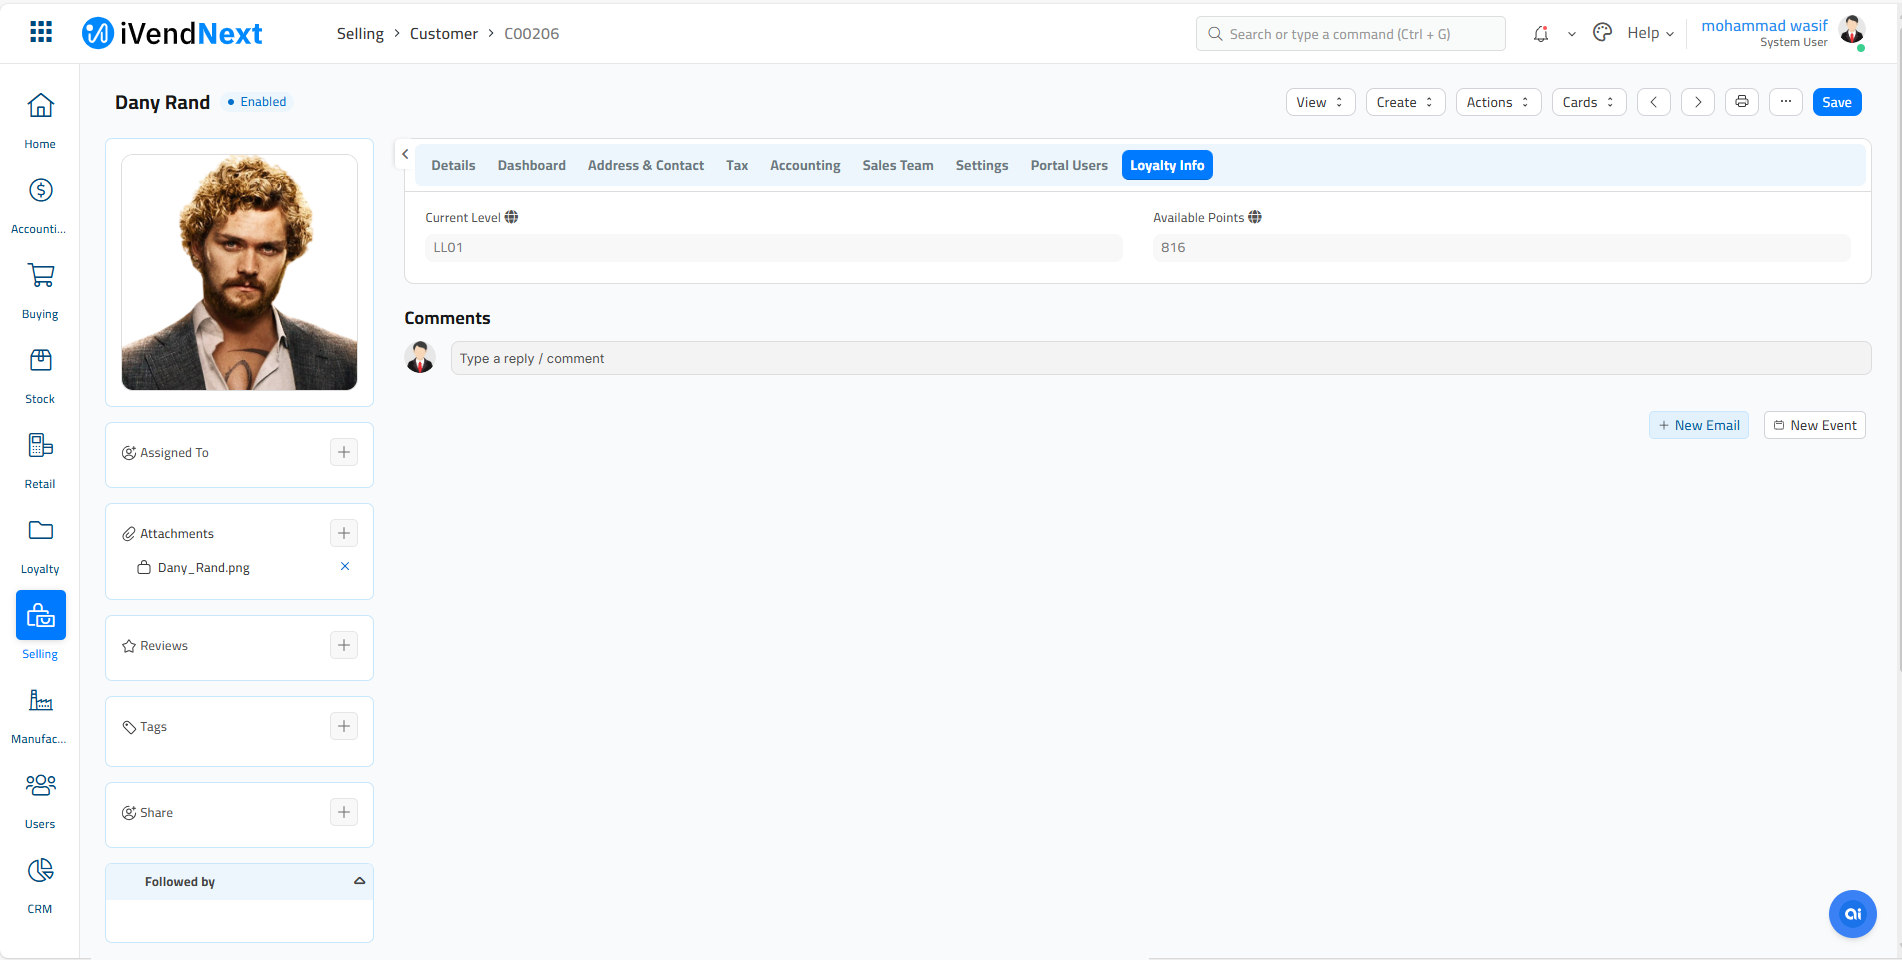
On the Loyalty Info Screen you will be able to see:
Loyalty - Current Level
Loyalty - Available Points