A User's Guide to Retail Module - Basic
This guide is about learning to use the iVendNext POS for daily sales. It starts with getting an iVendNext account, emphasizing the need for a separate Cashier account in addition to the admin account. It outlines setting up a user, including assigning roles, permissions, and a shift profile. You also need to select a store, POS profile, and configure the POS terminal and hardware. Then it covers creating item groups, items (specifically "Standard Item"), and setting prices. The guide also includes requesting and receiving items via Purchase Orders and Purchase Receipts. It mentions how to sell items at the POS, paying for procured items through Purchase Invoices and Payment Entries, and closing the POS and shift. Lastly, it touches on generating various reports like Shift Count, Z Tape, POS Sales, Tender Collection, and Stock Ledger. Essentially, it's a step-by-step guide to use the iVendNext Retail Module for sales operations.
Request for an Account
Reach out to the iVendNext onboarding Team and procure an iVendNext account. You will get a username and a password to log in to your iVendNext application. Note: By default you get access to an administrator account. You must create a separate account for all your non-administrative use.
For illustration we will create a Cashier account and will be using this account across this guide to perform the below activities.
- Create a User
- Select the Role Profile
- Set Retail Permission
- Enable User for POS Operations
- Select the Default Shift Profile
- Select a Warehouse
- Select a POS Profile
- Configure the POS Terminal
- Setup the Hardware Profile
- Create Item Groups
- Create Item
- Set Item Price
- Request Items (Purchase Order)
- Procure Items (Purchase Receipt)
- Sell Items
- Pay for the Items procured
- Create Payment Entry
- Close POS
- Generate Shift Count Report
- Generate Z Tape Report
- Generate POS Sales Report
- Generate Tender Collection Report
- View Stock Ledger
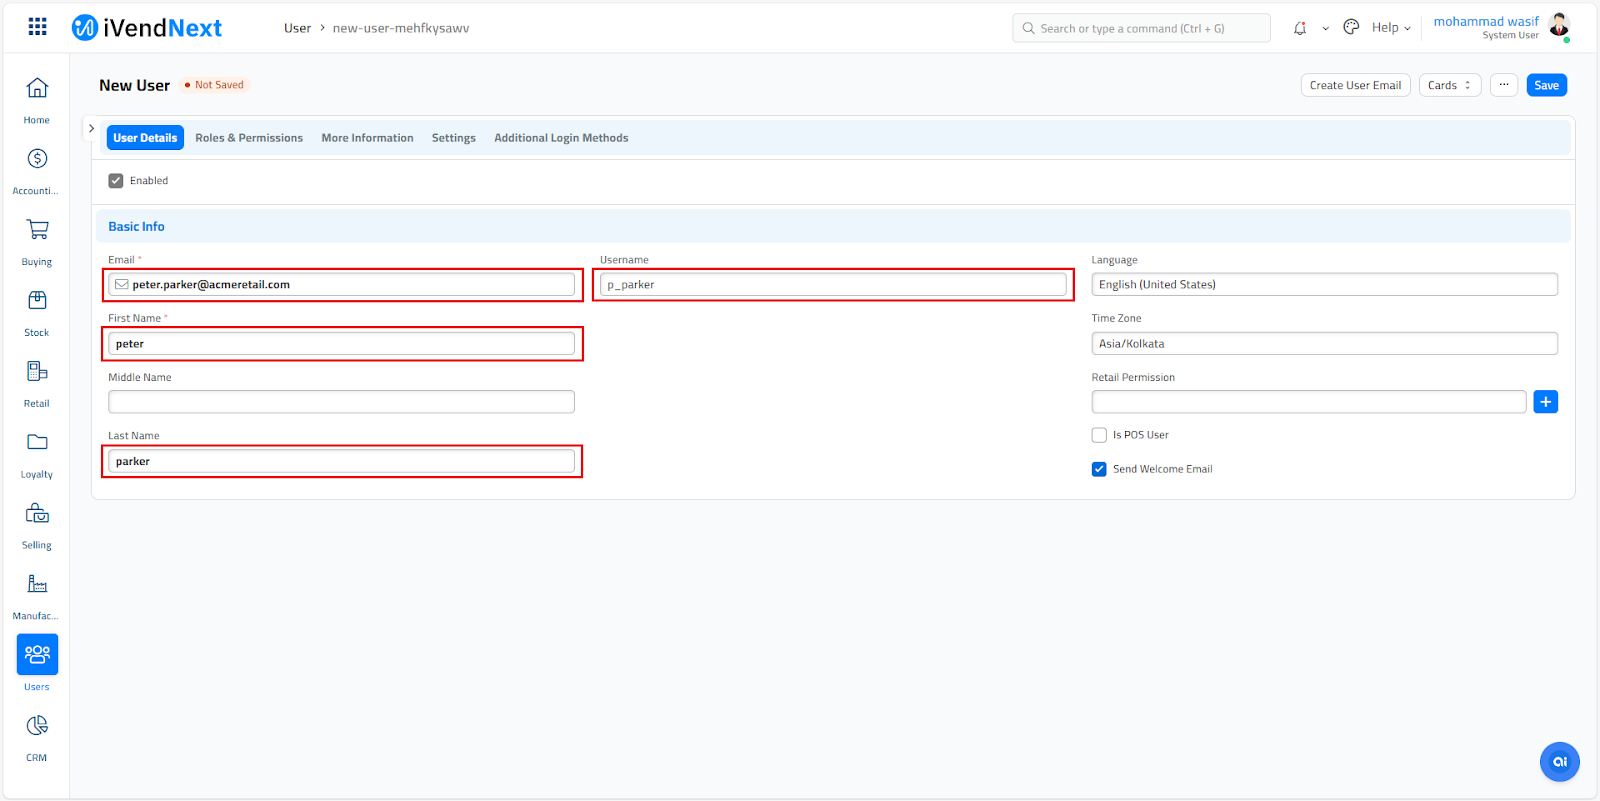
Create a User
Creating a User in iVendNext involves a few key steps. Here's a simplified guide to help you get started:
Path: Home > Users
- Navigate to the User List View Screen
- Click the Add User button to open the New User Creation screen
- Specify the Email address
- Enter the First Name and the Last Name of the user
- Specify the Username
- Click the Save button
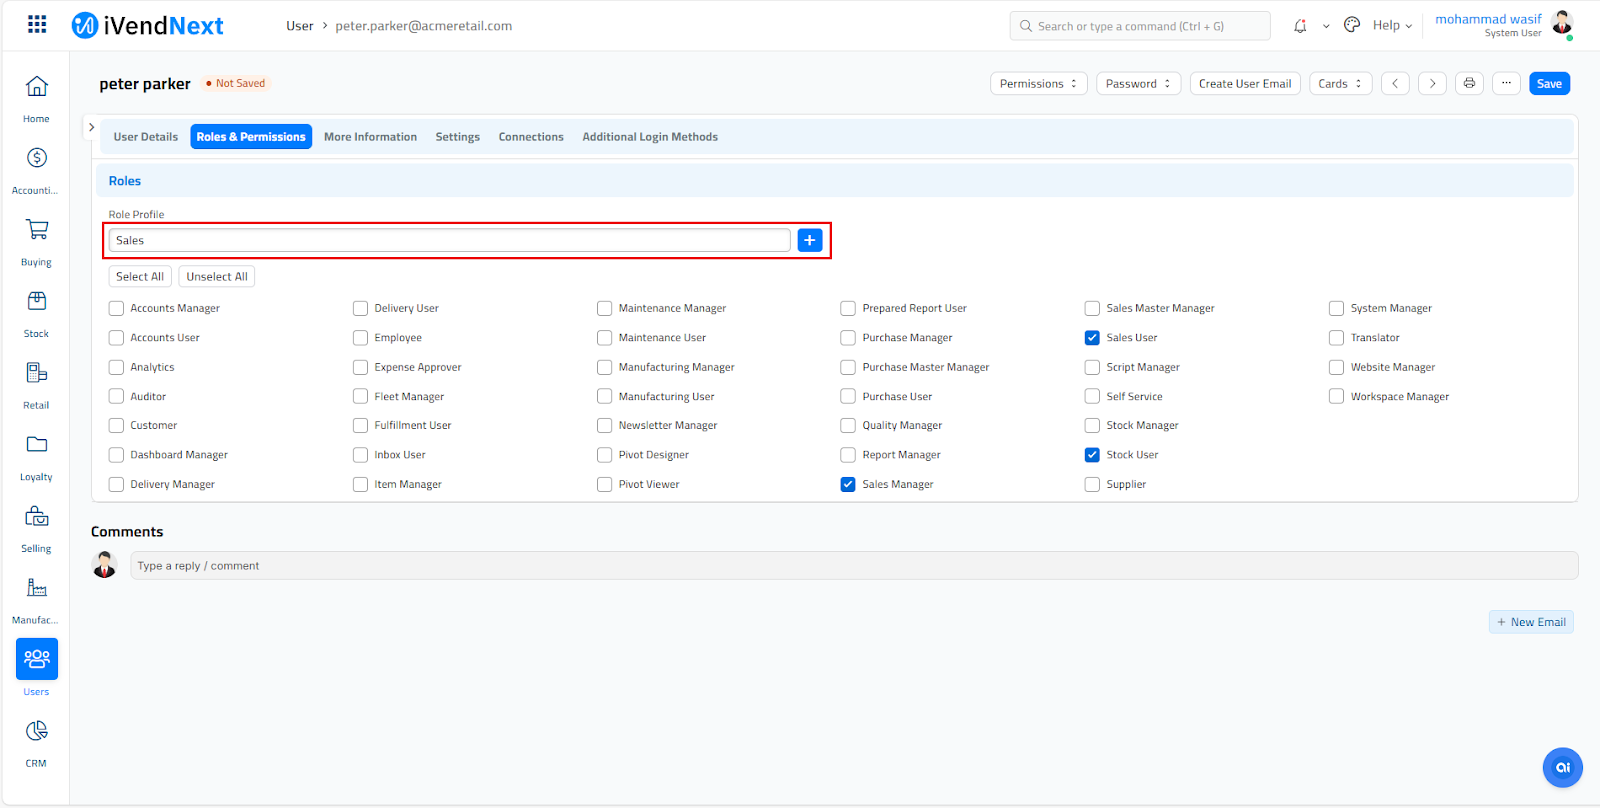
Select the Role Profile
Select the Role Profile from the pre-defined list or choose to create one. For illustration we have selected Sales as the Role Profile.
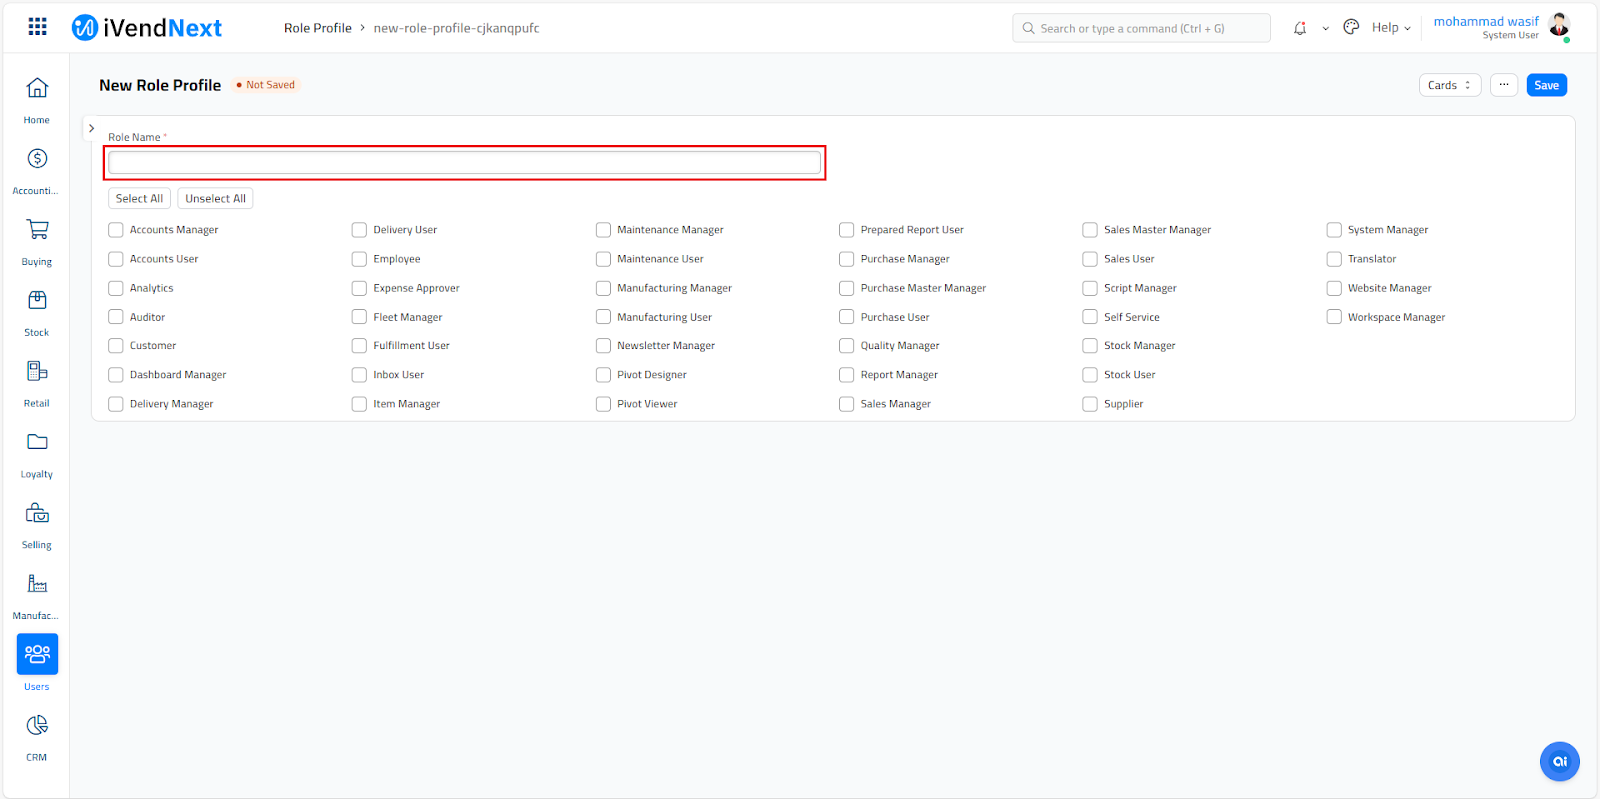
Creating a Role Profile in iVendNext involves a few key steps. Here's a simplified guide to help you get started:
Path: Home > Users > Role Profile
- Access the Role Profile List View Screen
- Click the Add Role Profile button to open the New Role Profile screen
- Specify the Role Name
- Select the Profile
- Click the Save button
Set Retail Permission
Select a Retail Permission from the pre-defined list or choose to create one. For illustration we have selected Cashier.
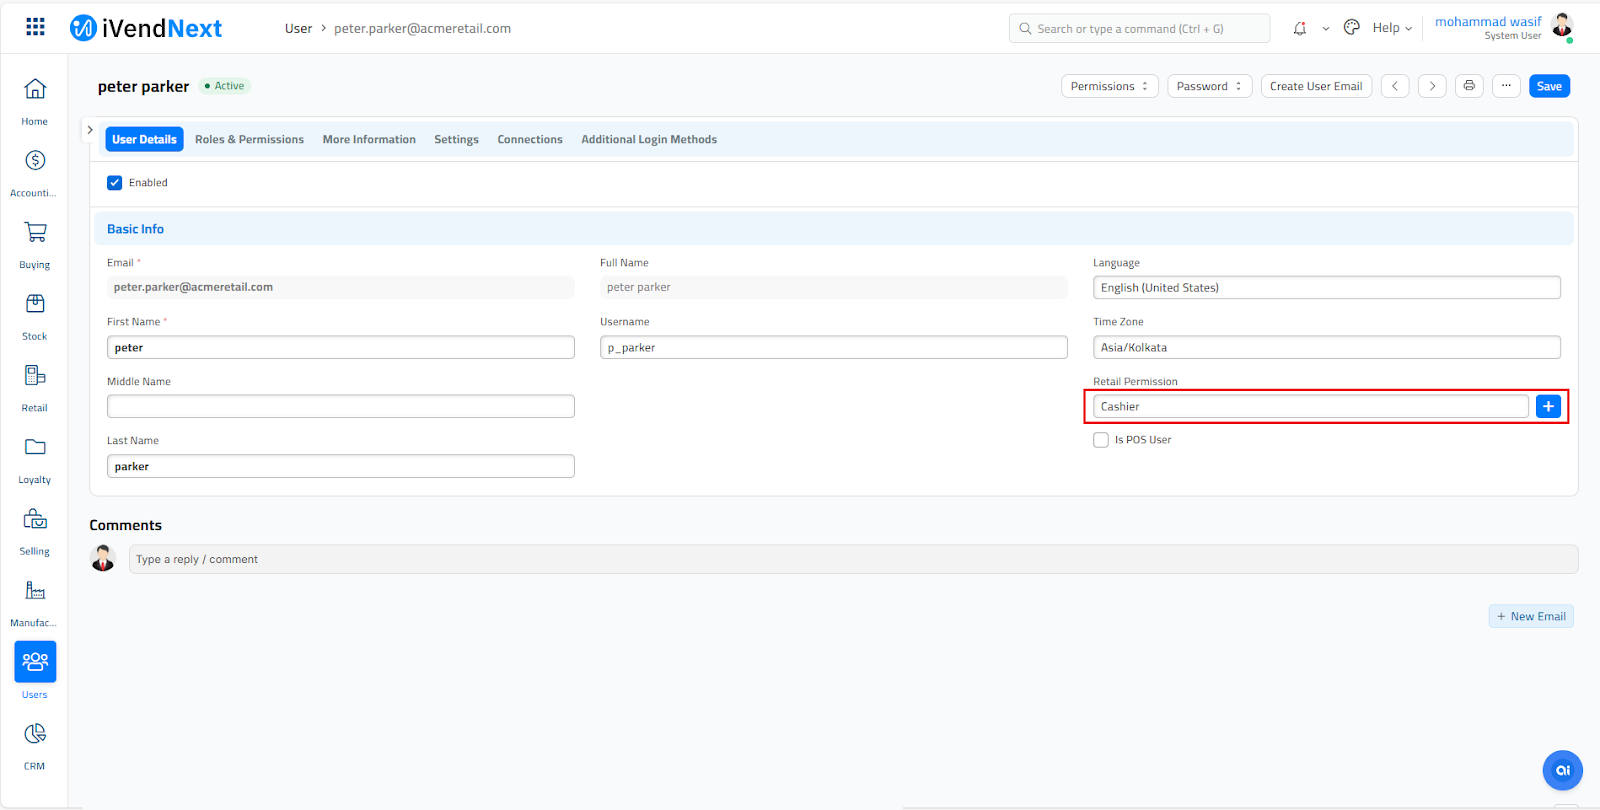
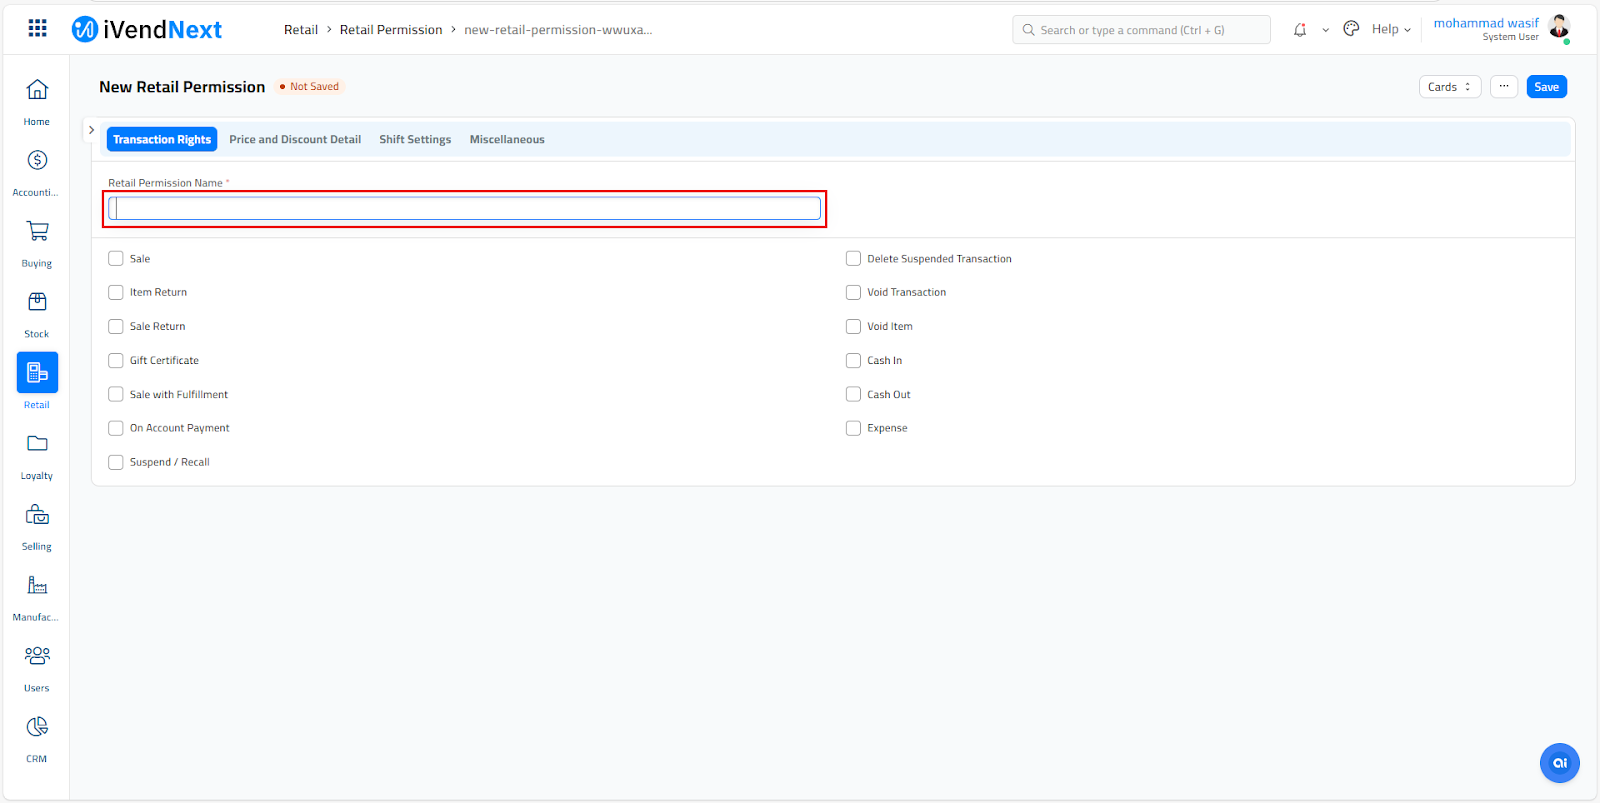
Creating a Retail Permission in iVendNext involves a few key steps. Here's a simplified guide to help you get started:
Path: Home > Retail > Retail Permission
- Access the Retail Permission List View Screen
- Click the Add Retail Permission button to open the New Retail Permission screen
- Specify the Retail Permission Name
- Tick the required permissions
- Click the Save button
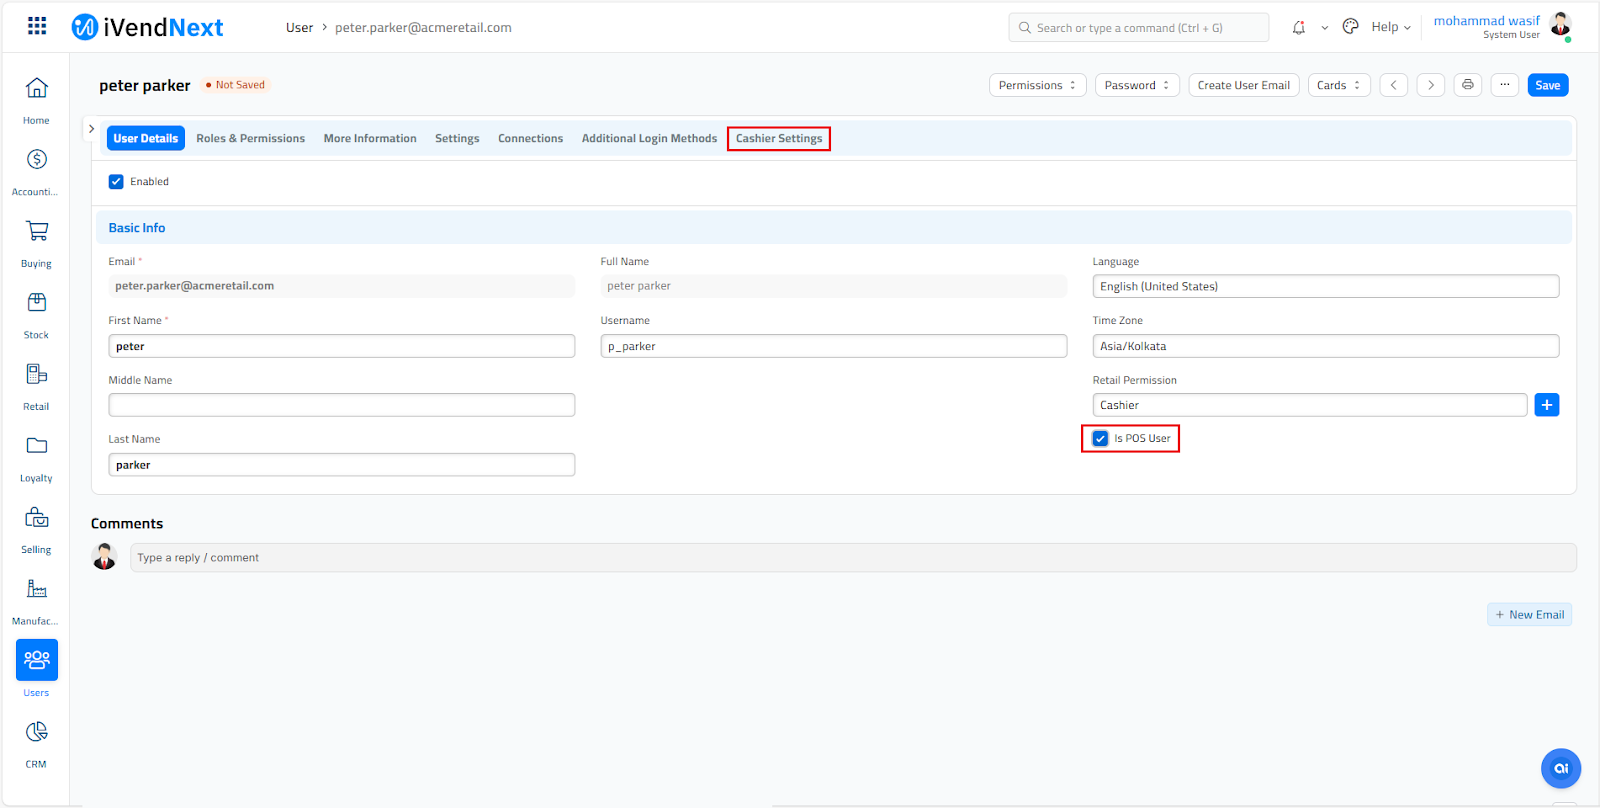
Enable the User for POS Operations
Check the Is POS User box. This will allow this user to be able to perform POS operations. This will unlock a new tab called "Cashier Settings"
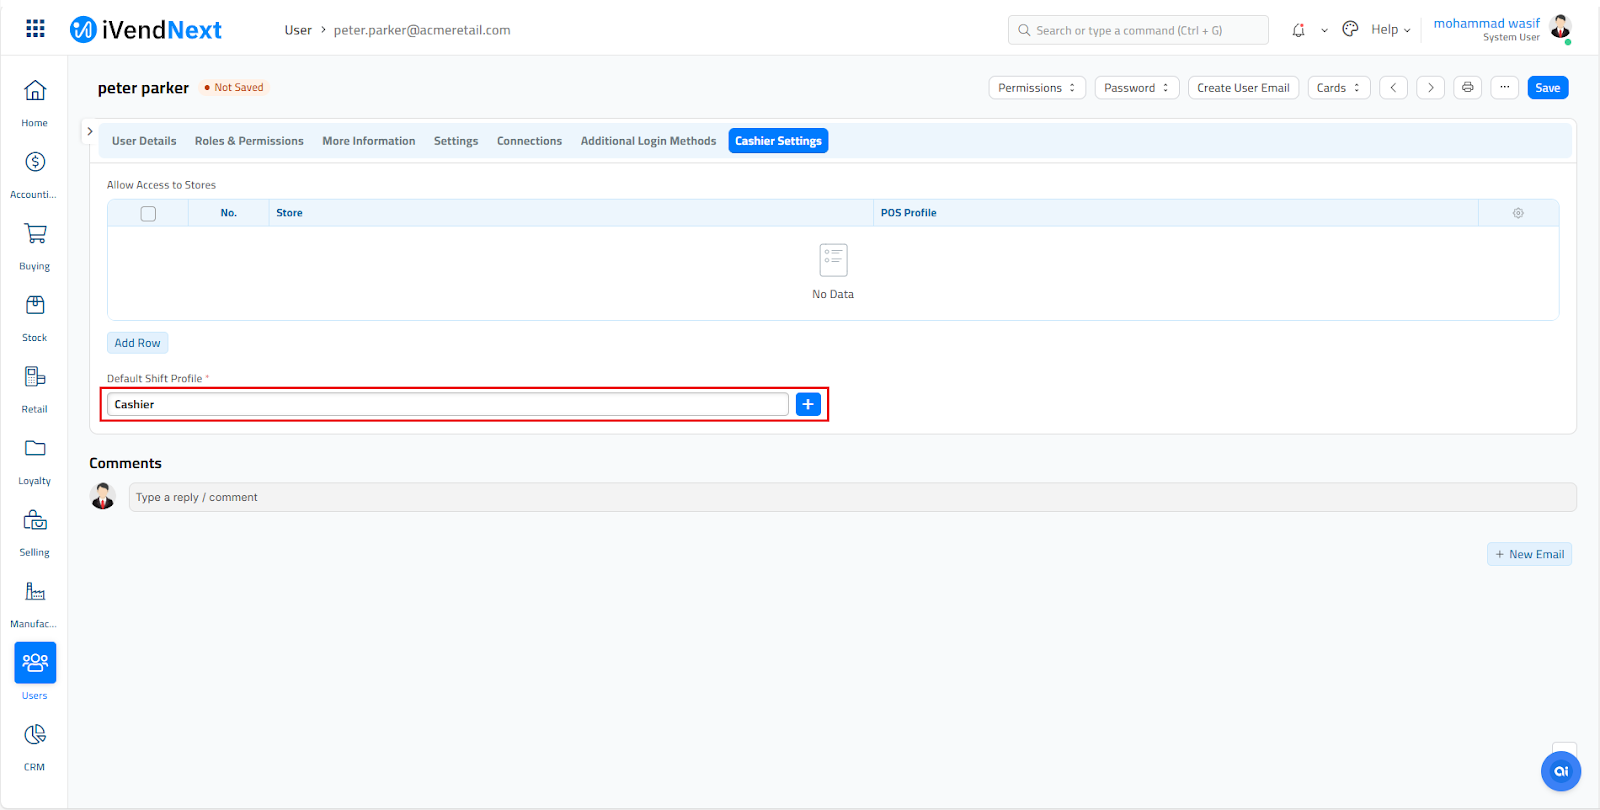
Select the Default Shift Profile
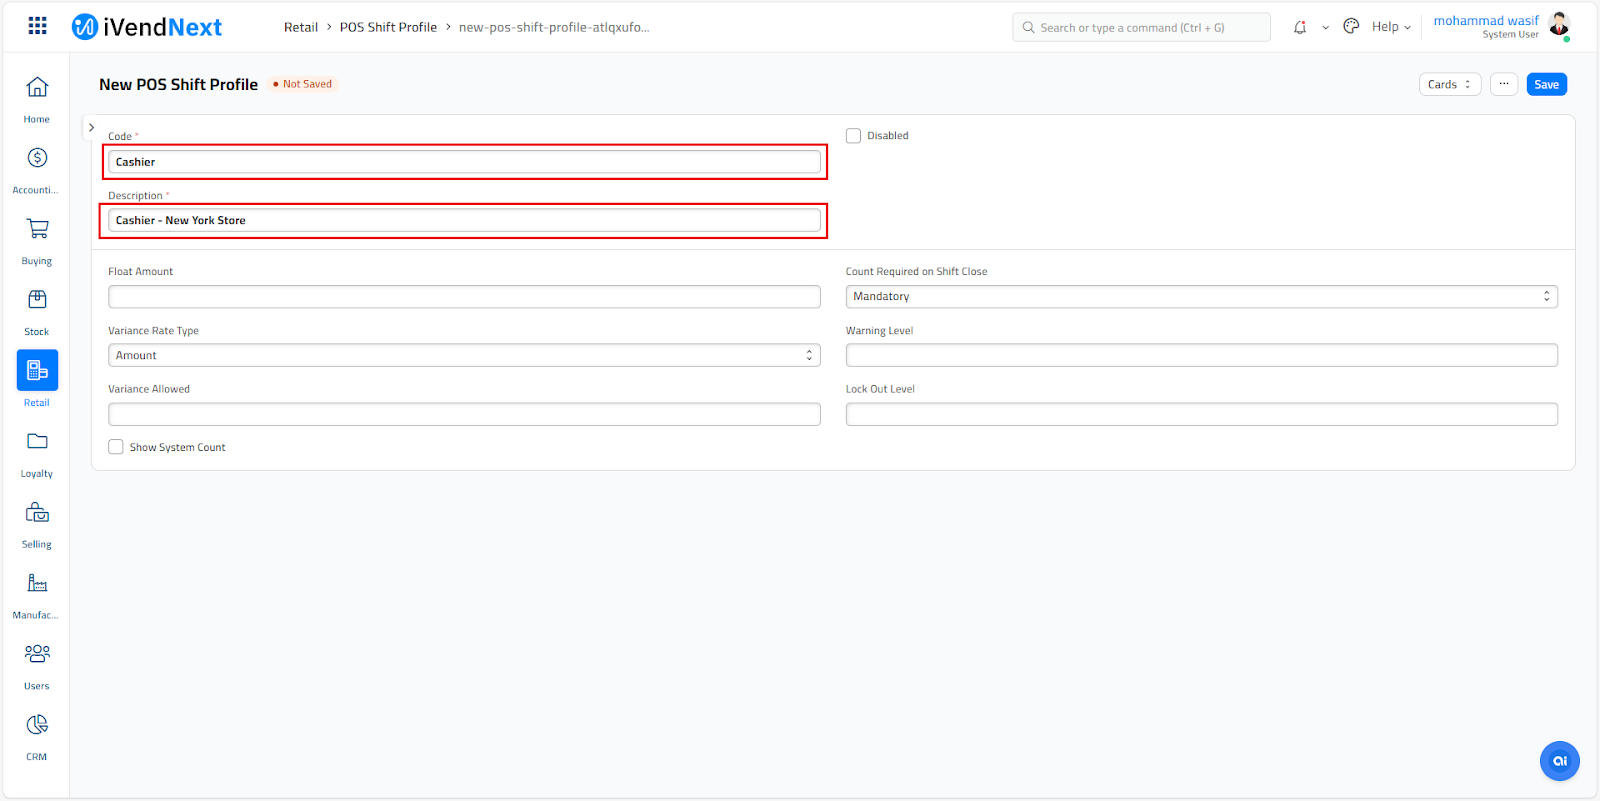
Select the Default Shift Profile from the pre-defined list or choose to create one. For illustration we have selected Cashier.
Creating a Default Shift Profile in iVendNext involves a few key steps. Here's a simplified guide to help you get started:
Path: Home > Retail > Shift Profile
- Access the POS Shift Profile List View Screen
- Click the Add POS Shift Profile button to open the New POS Shift Profile screen
- Specify the Code
- Specify the Description
- Click the Save button
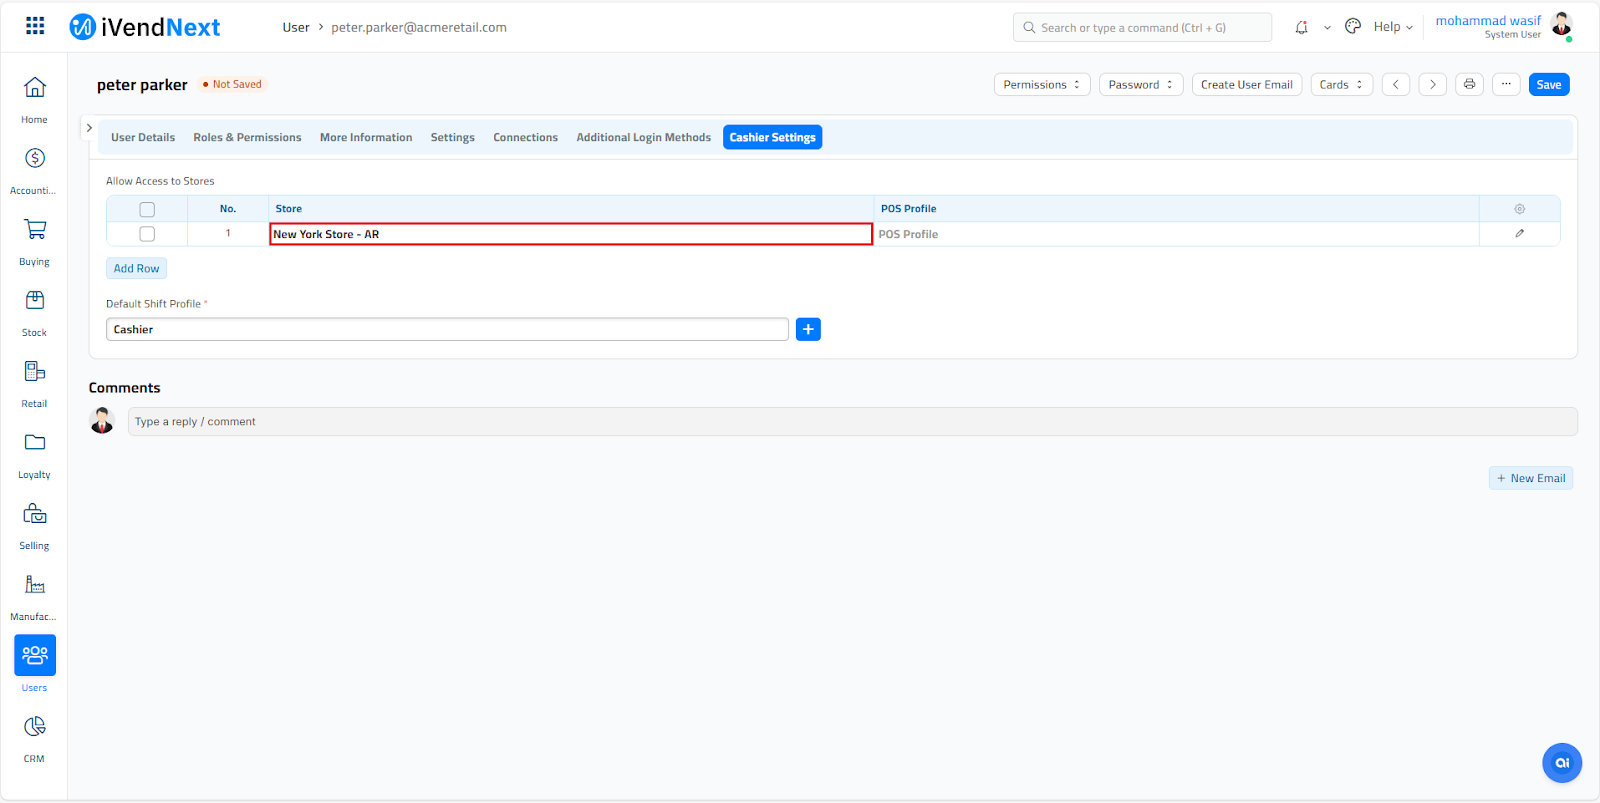
Select Store
Select the Store from the pre-defined list or choose to create one. For illustration we have selected the Brooklyn Store.
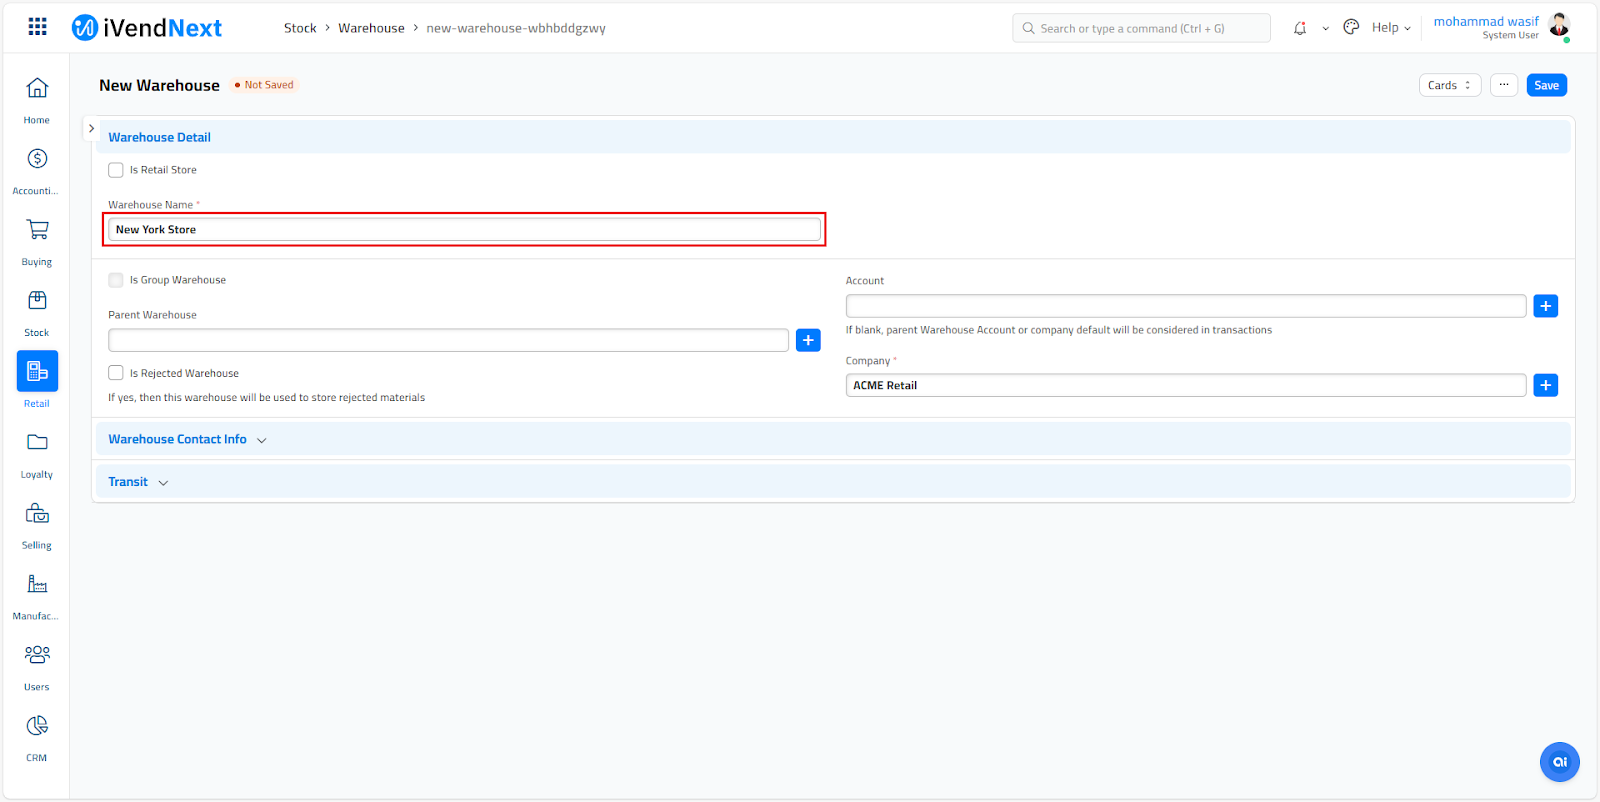
Creating a Store in iVendNext involves a few key steps. Here's a simplified guide to help you get started:
Path: Home > Inventory > Warehouse
- Access the Warehouse List View Screen
- Click the Add Warehouse button to open the New Warehouse screen
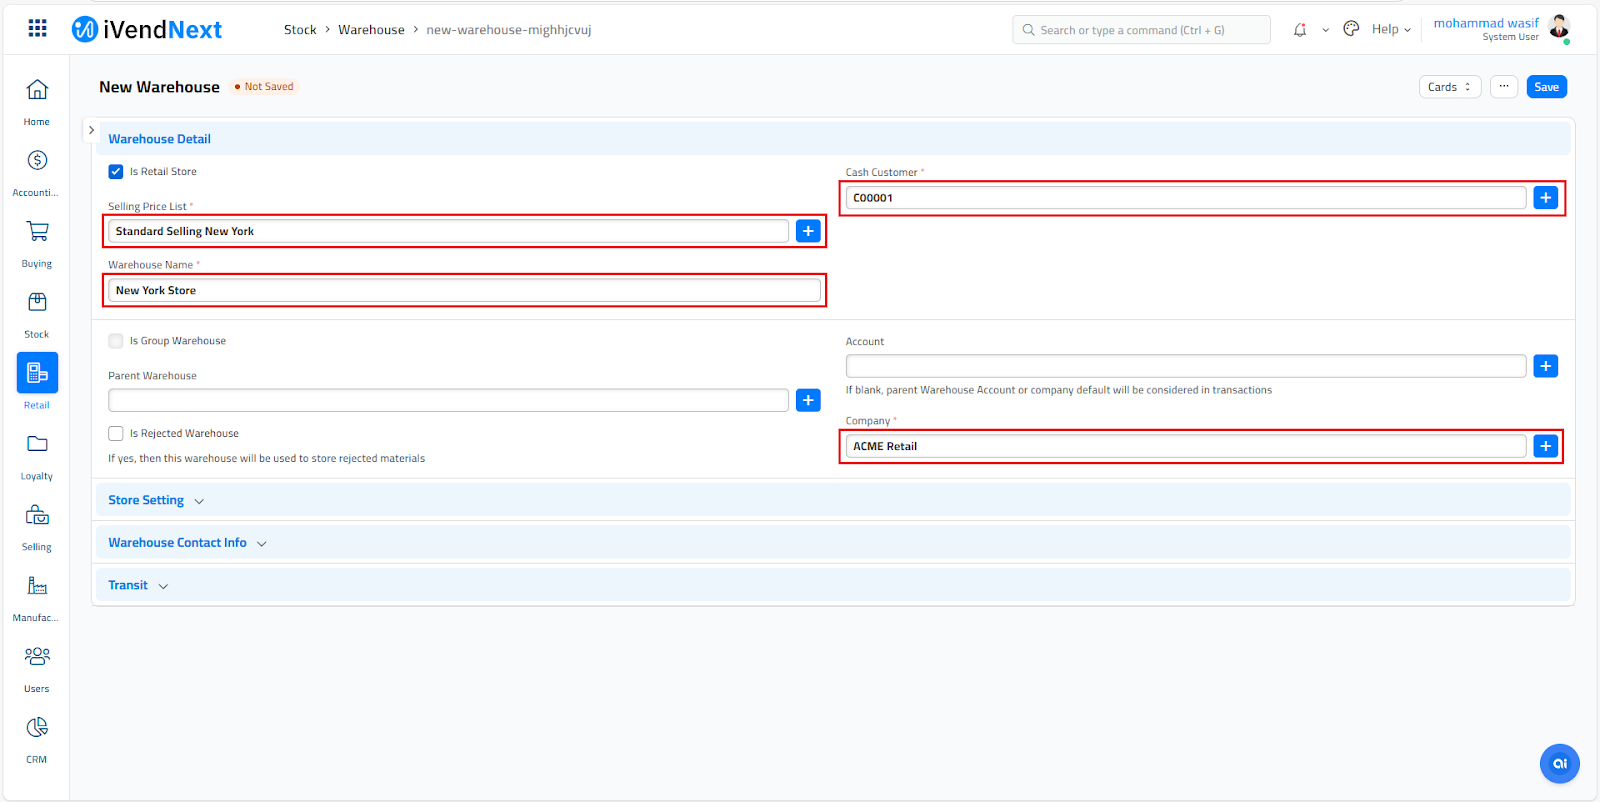
- Specify the Warehouse Name
- Tick the box - Is Retail Store
- Specify the Price List
- Select a Cash Customer
- Specify the Tax Number
- Select the Tax Category
- Specify the Email Account
- Select an Email Template
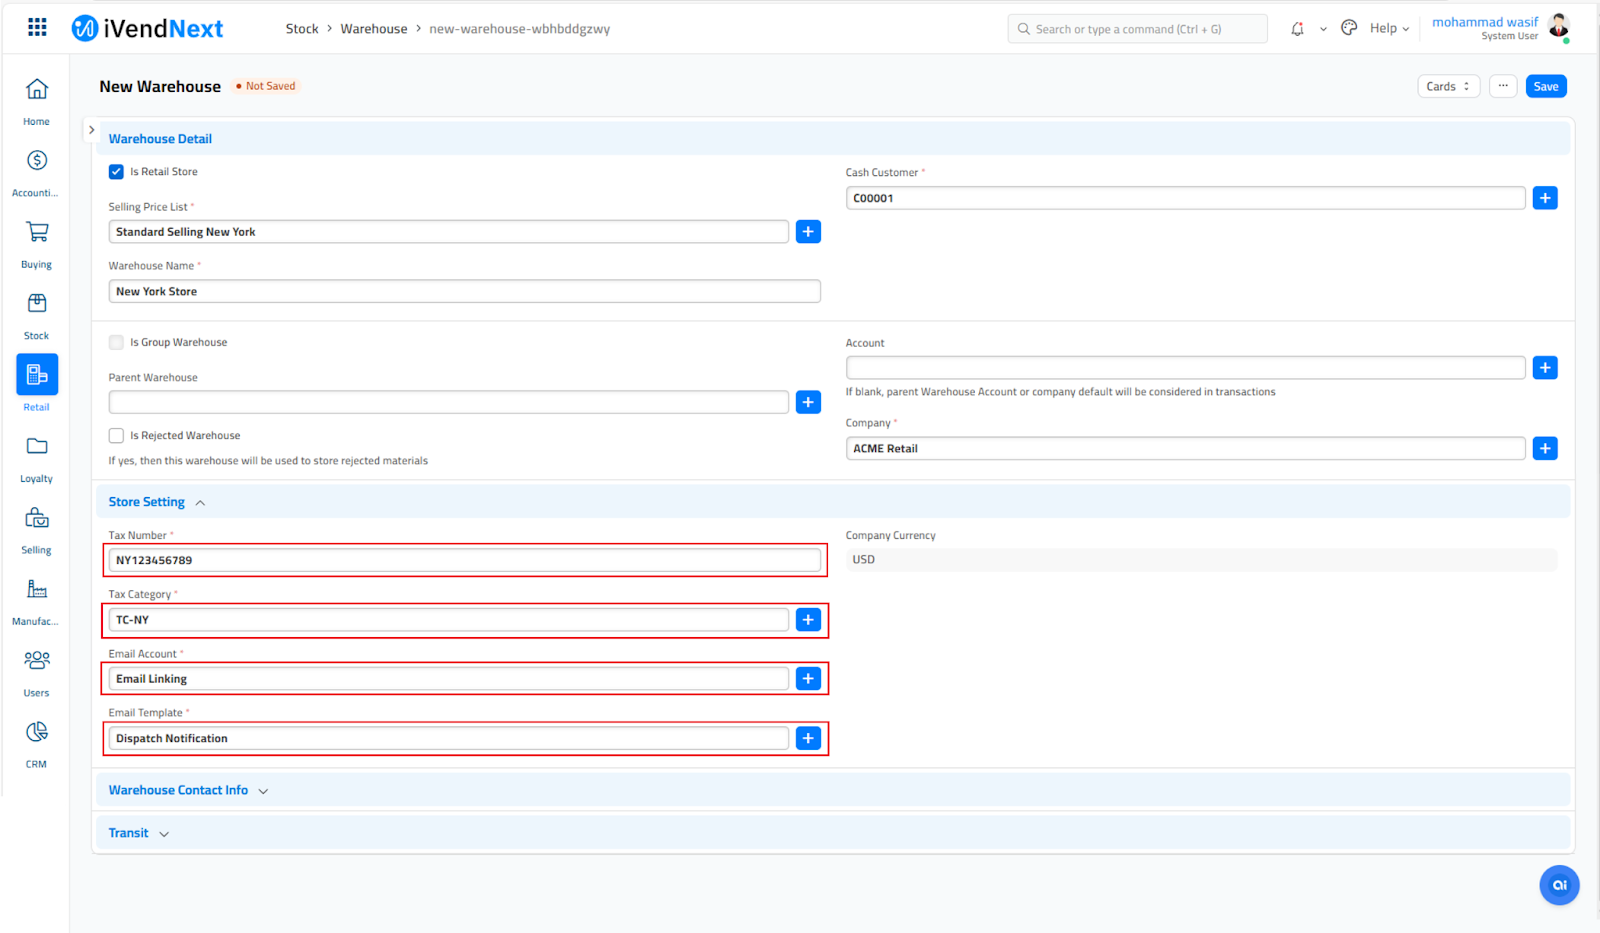
- Specify the Warehouse Contact Information (Optional)
- Click the Save button
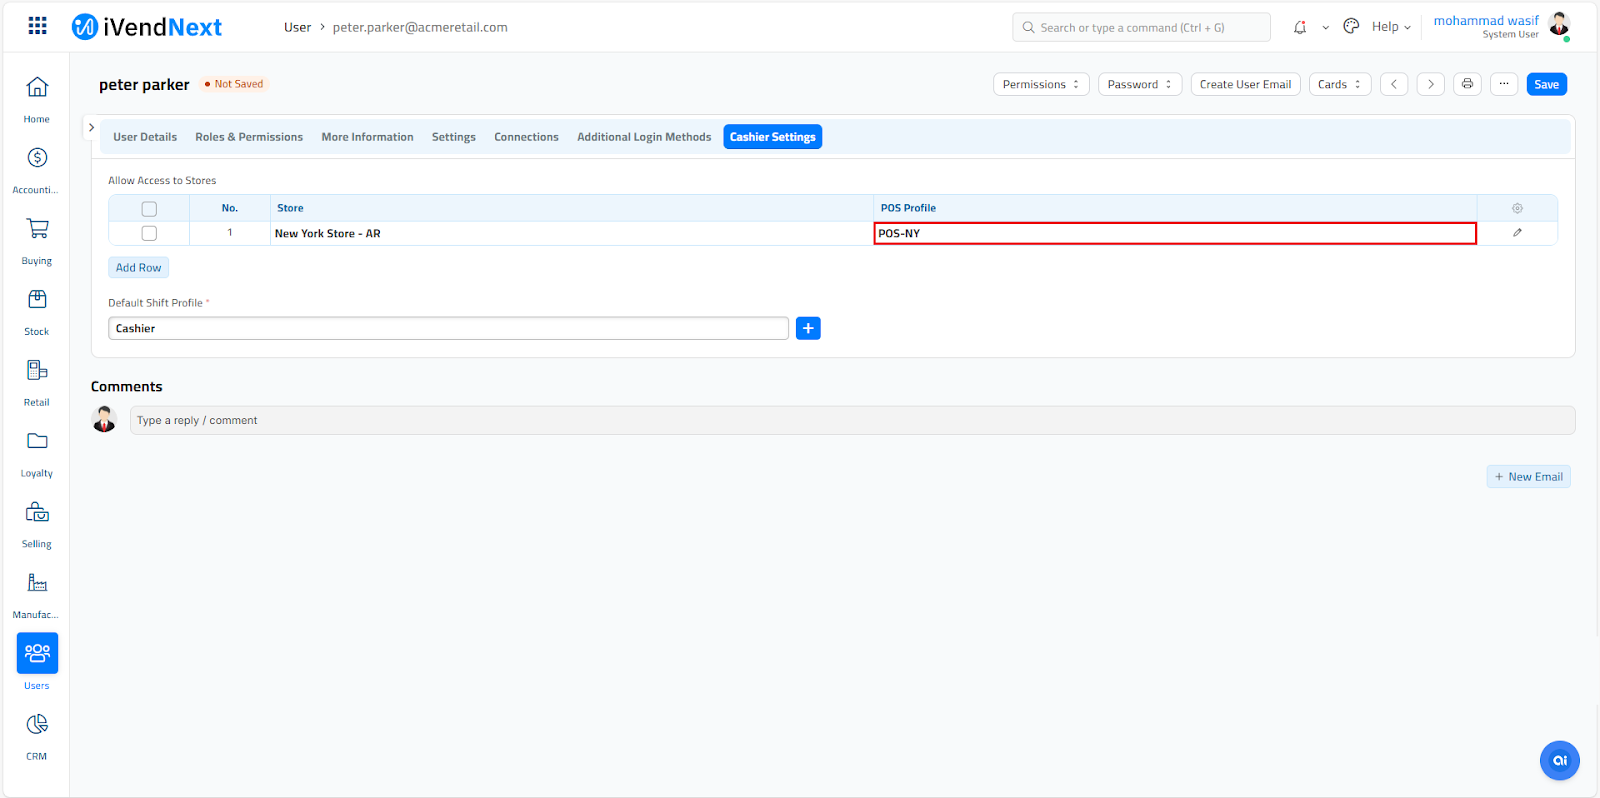
Select POS Profile
Select the POS Profile from the pre-defined list or choose to create one. For illustration we have selected the POS-BK.
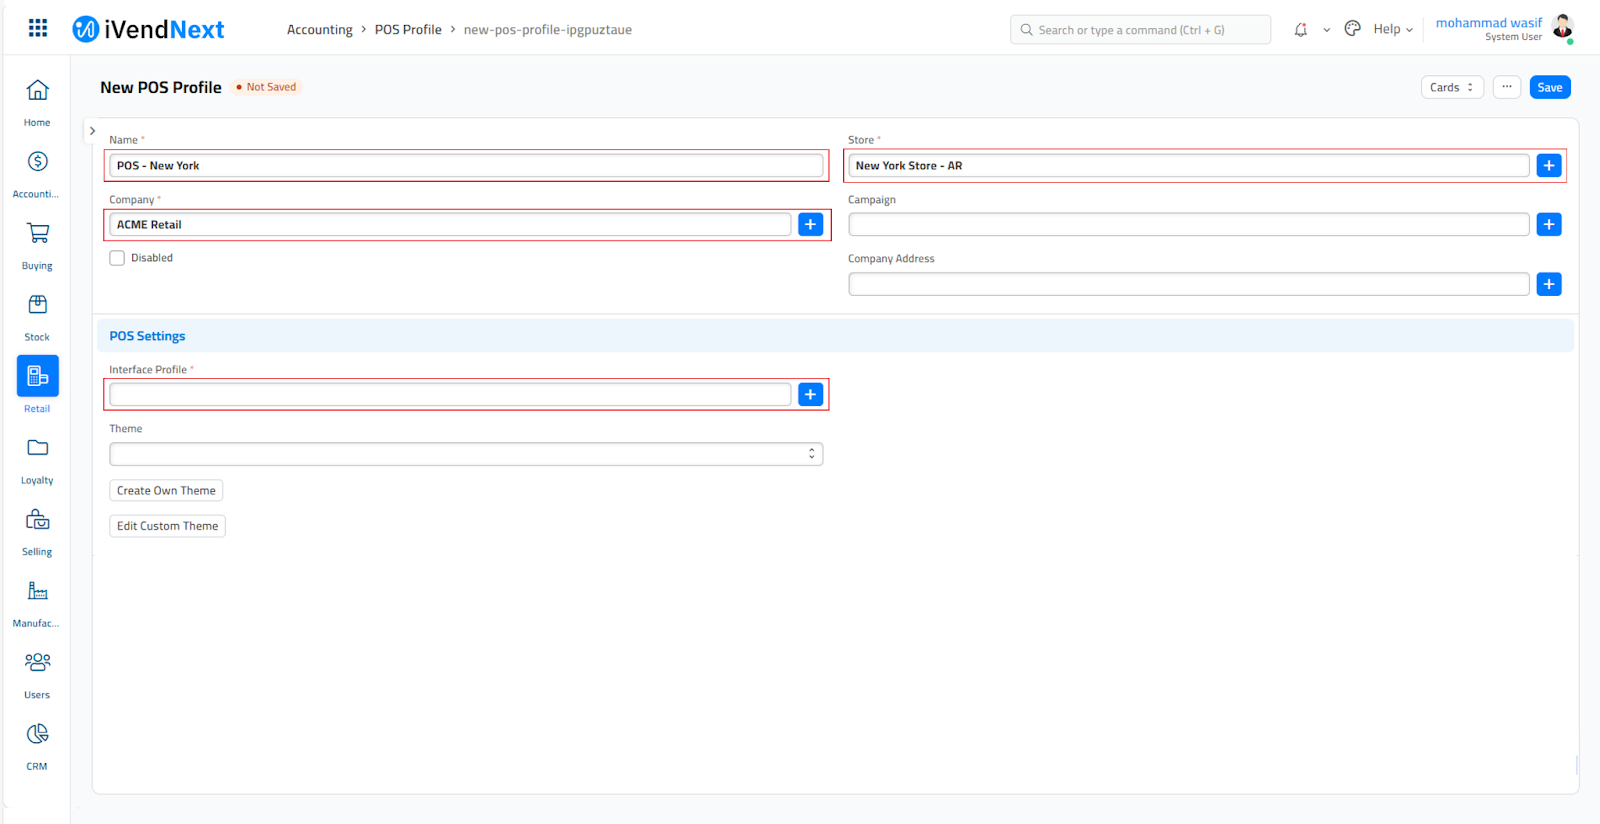
Creating a POS Profile in iVendNext involves a few key steps. Here's a simplified guide to help you get started:
Path: Home > Retail > POS Profile
- Access the POS Profile List View Screen
- Click the Add POS Profile button to open the New POS Profile screen
- Specify the POS Profile Name
- Select the Store. (Manual Selection Required)
- Select the Company. (Should Pre-populate)
- Select the Interface Profile
- Select the Theme
- Specify the Customer Display Settings. (only when you have a CFD installed)
- Use the Payment Template to define the Payment Methods
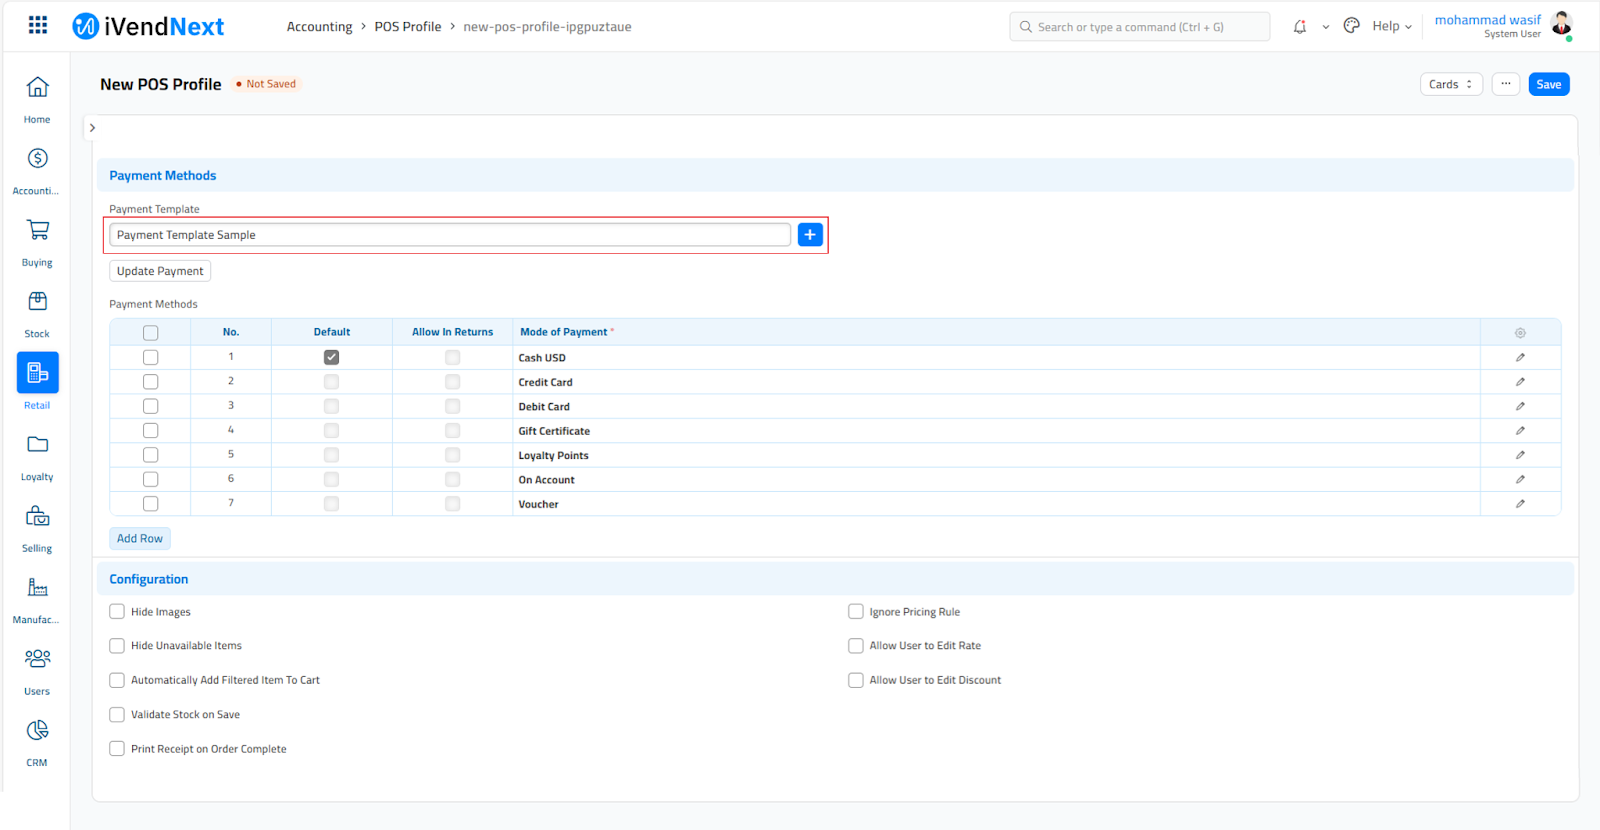
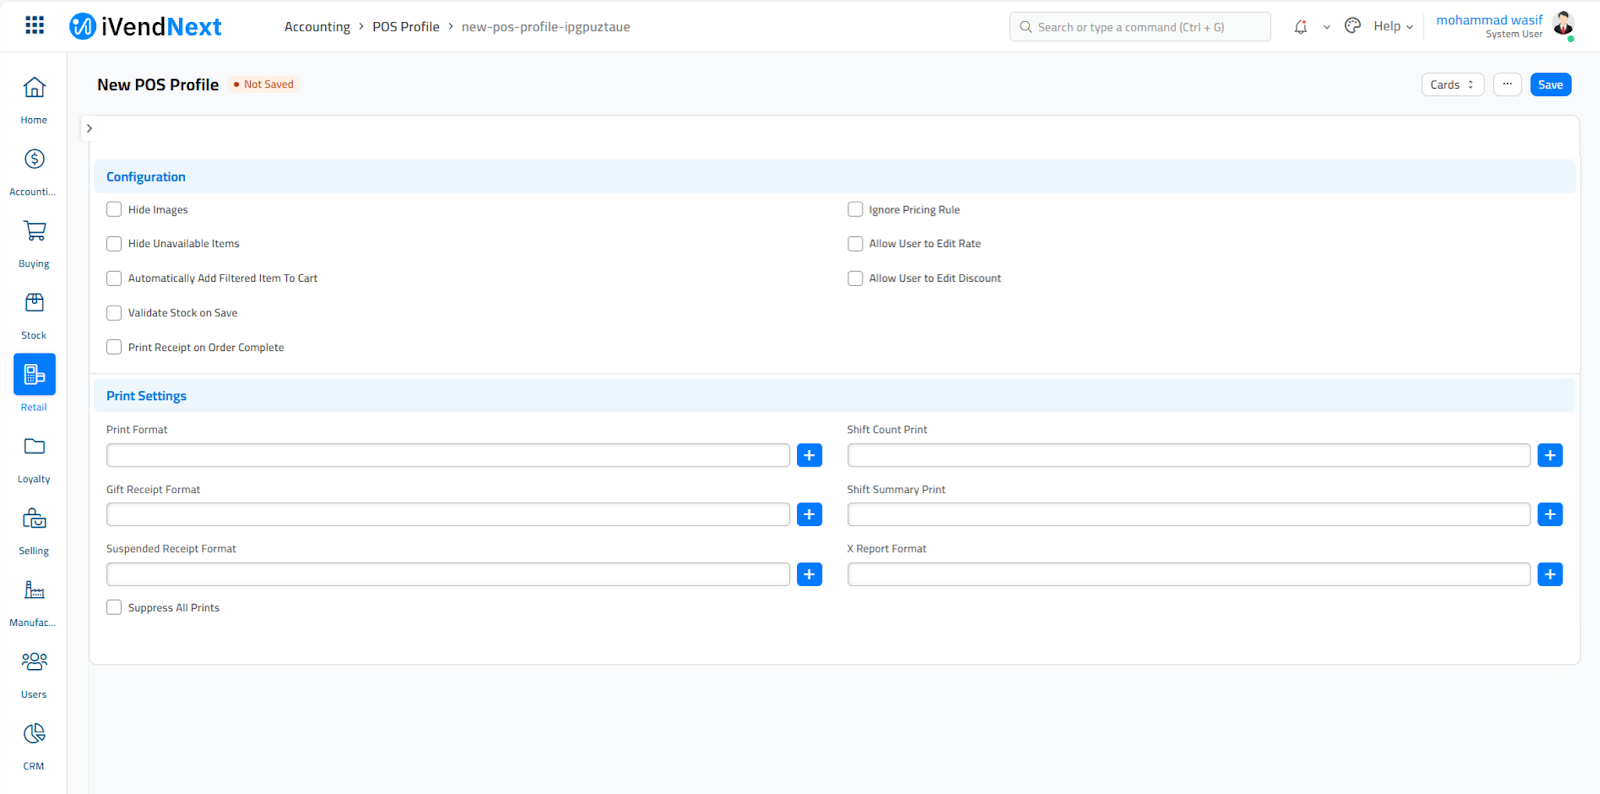
- Specify the Print Settings (Optional but recommended)
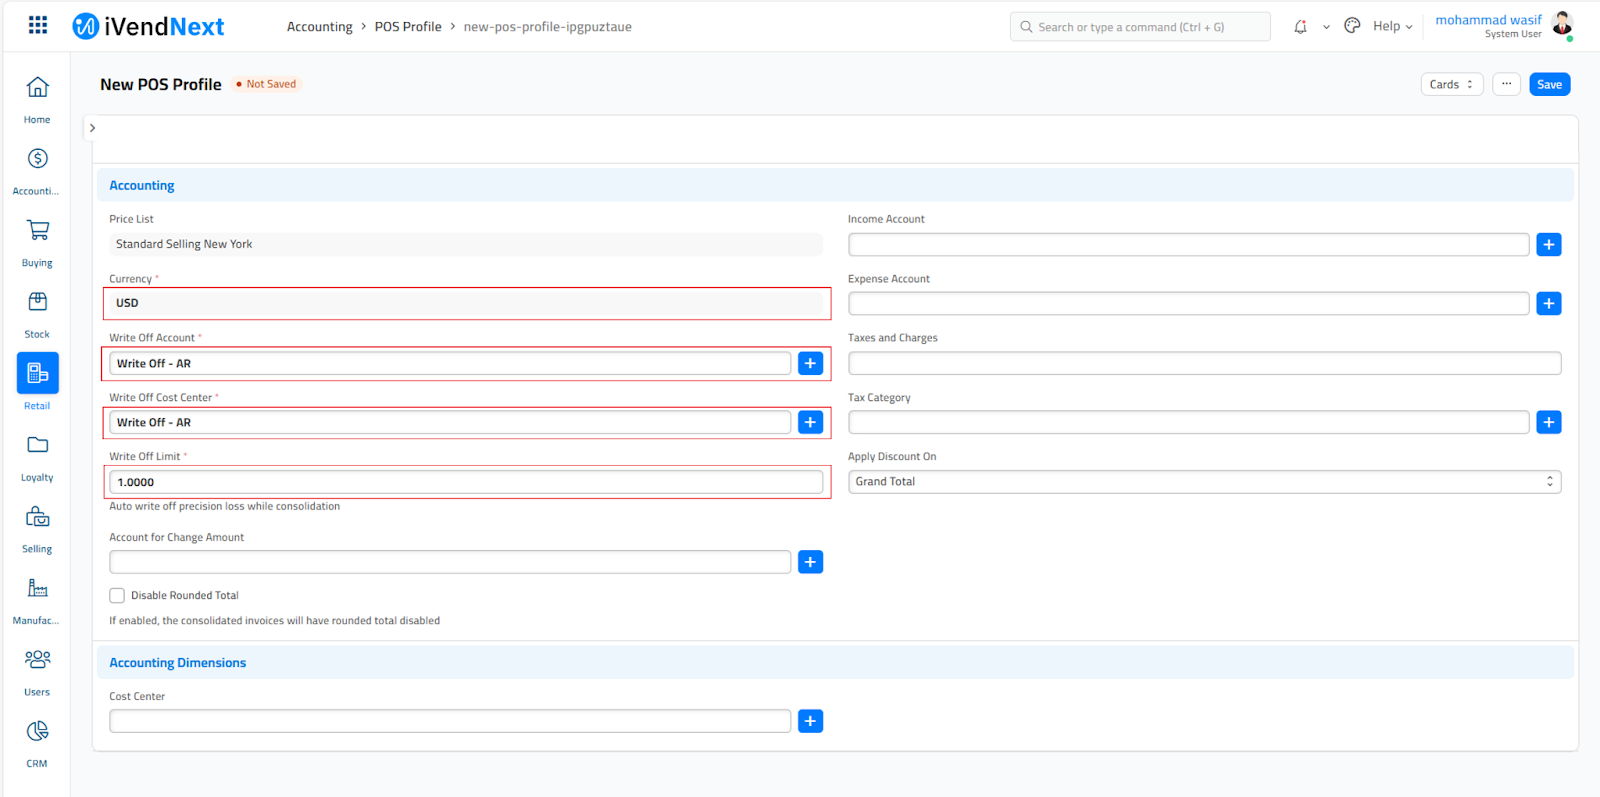
- Specify the Currency
- Specify the Write Off Account
- Select the Write Off Cost Center
- Specify the Write Off Limit
- Click the Save button
Configure the POS Terminal
Setup a POS Terminal.
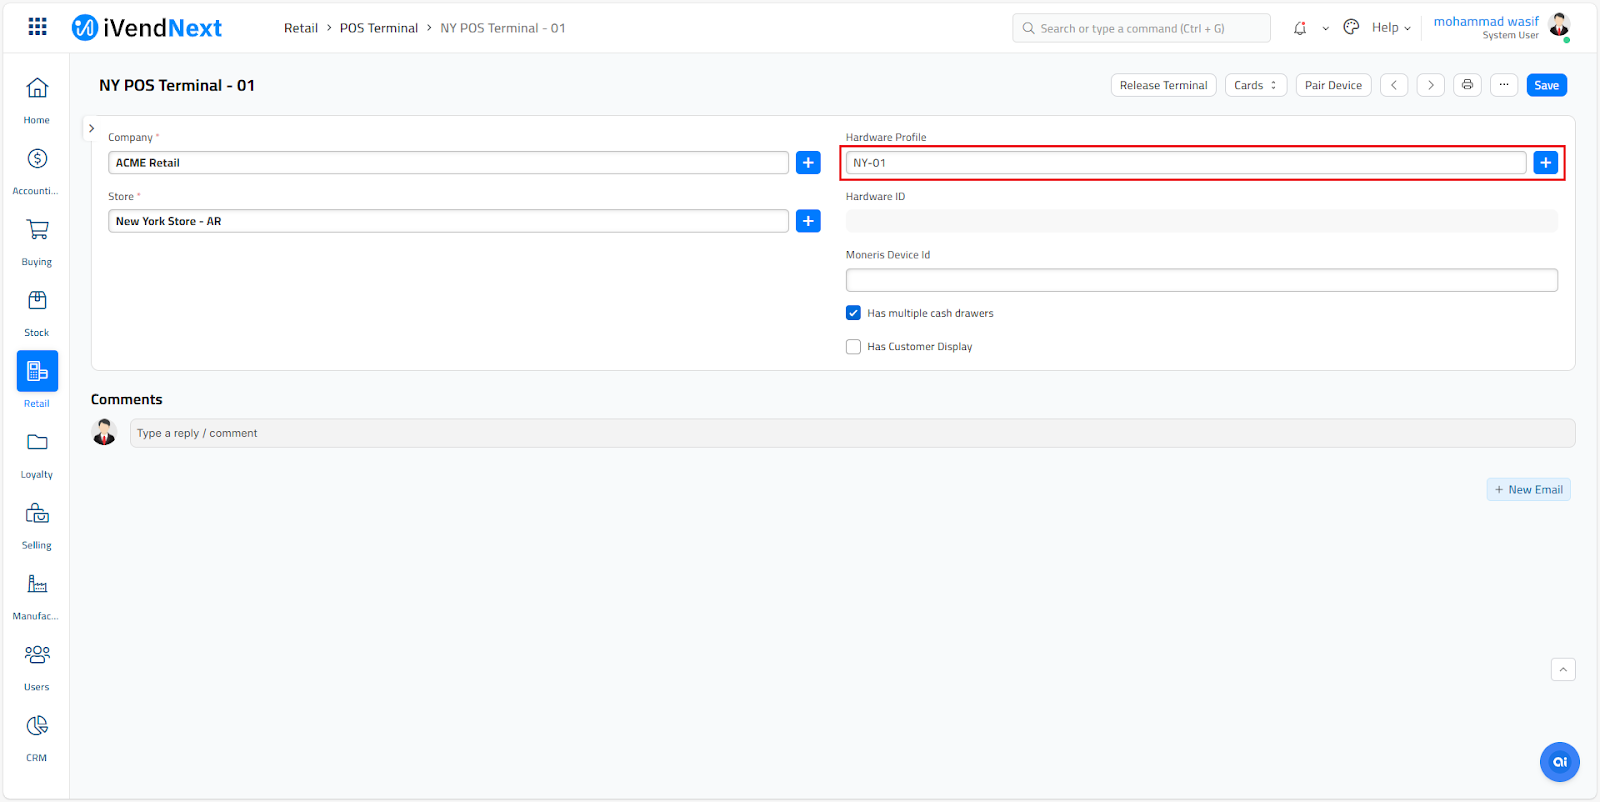
Creating a POS Terminal in iVendNext involves a few key steps. Here's a simplified guide to help you get started:
Path: Home > Retail > POS Terminal
- Access the POS Terminal List View Screen
- Click the Add POS Terminal button to open the New POS Terminal screen
- Specify the POS Terminal Name
- Select the Company (Should be pre-populated)
- Select the Store (Manual Selection Required)
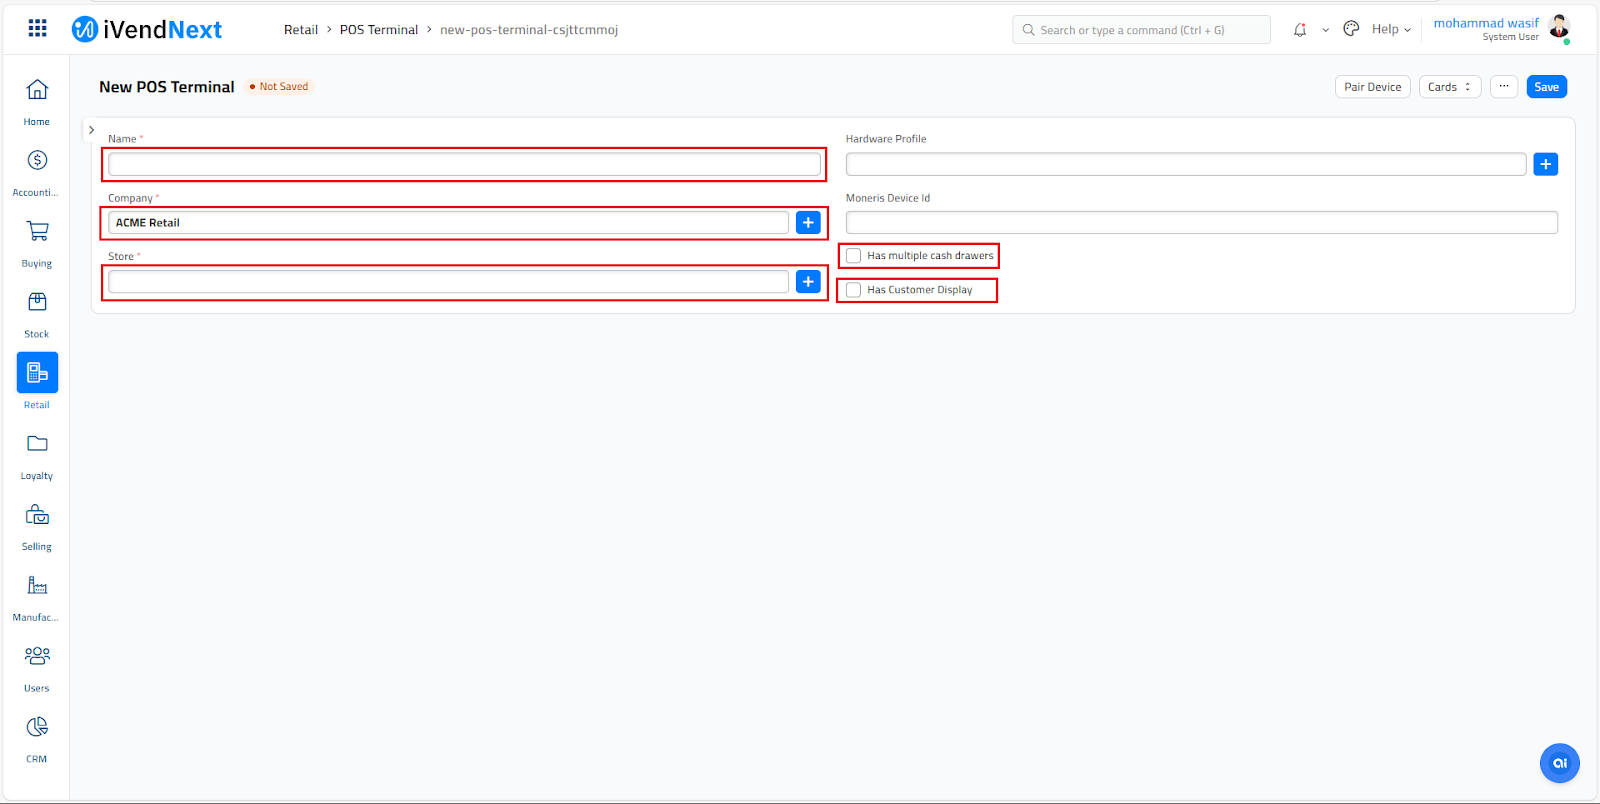
- Tick the box Has Multiple Cash Drawers to be able to attach Cash Drawers
- Tick the box Has Customer Display to be able to attach Customer Displays
- Click the Save button
Configure the Hardware Profile
Setup a Hardware Profile.
Path: Home > Retail > Hardware Profile
- Access the Hardware Profile List View Screen
- Click the Add Hardware Profile button to open the New Hardware Profile screen
- Specify the Hardware Profile Name
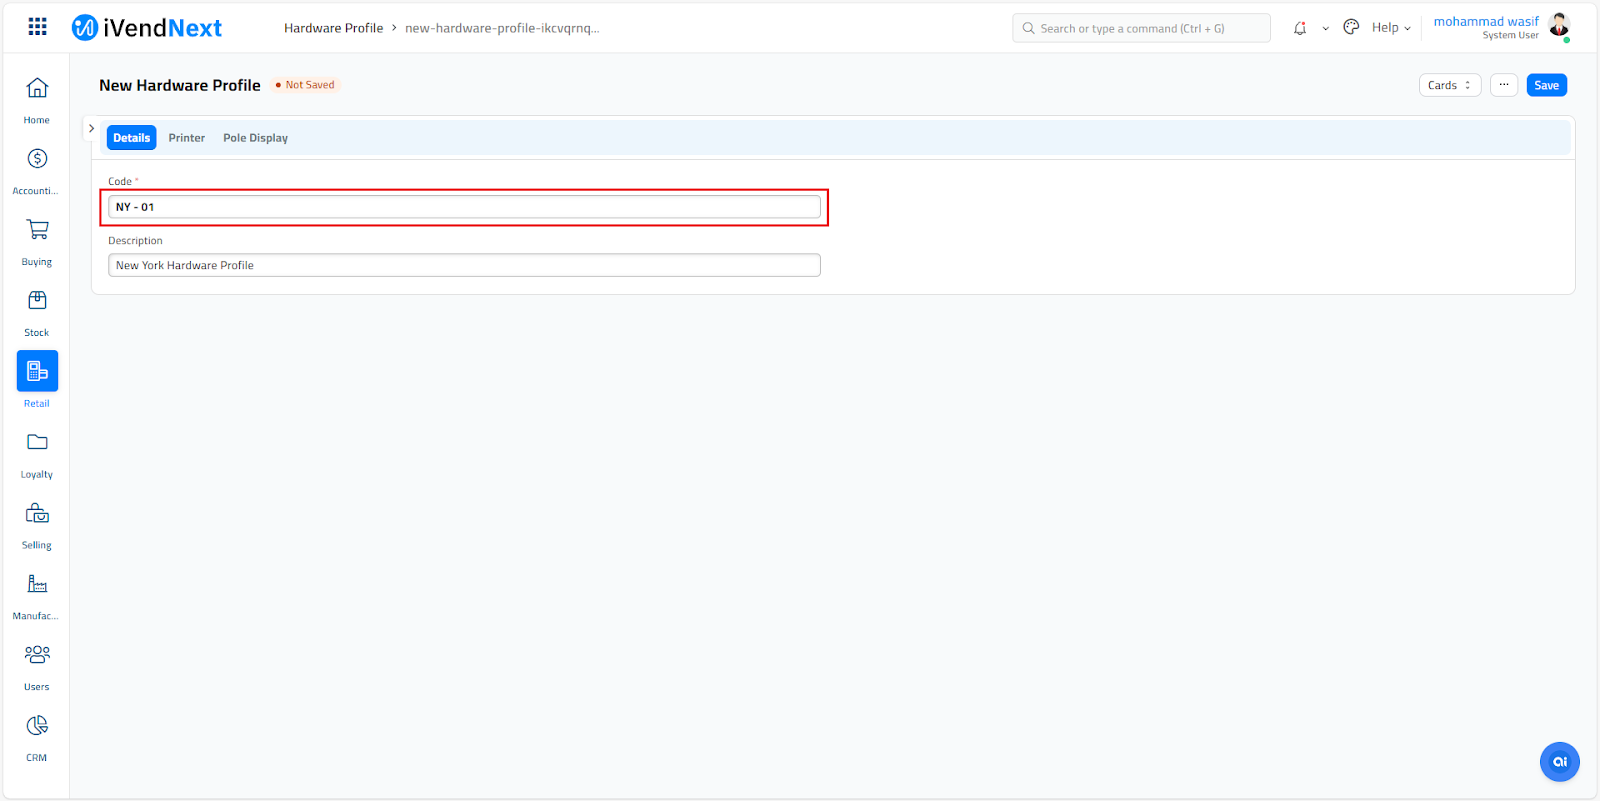
- Specify the Description. (Optional)
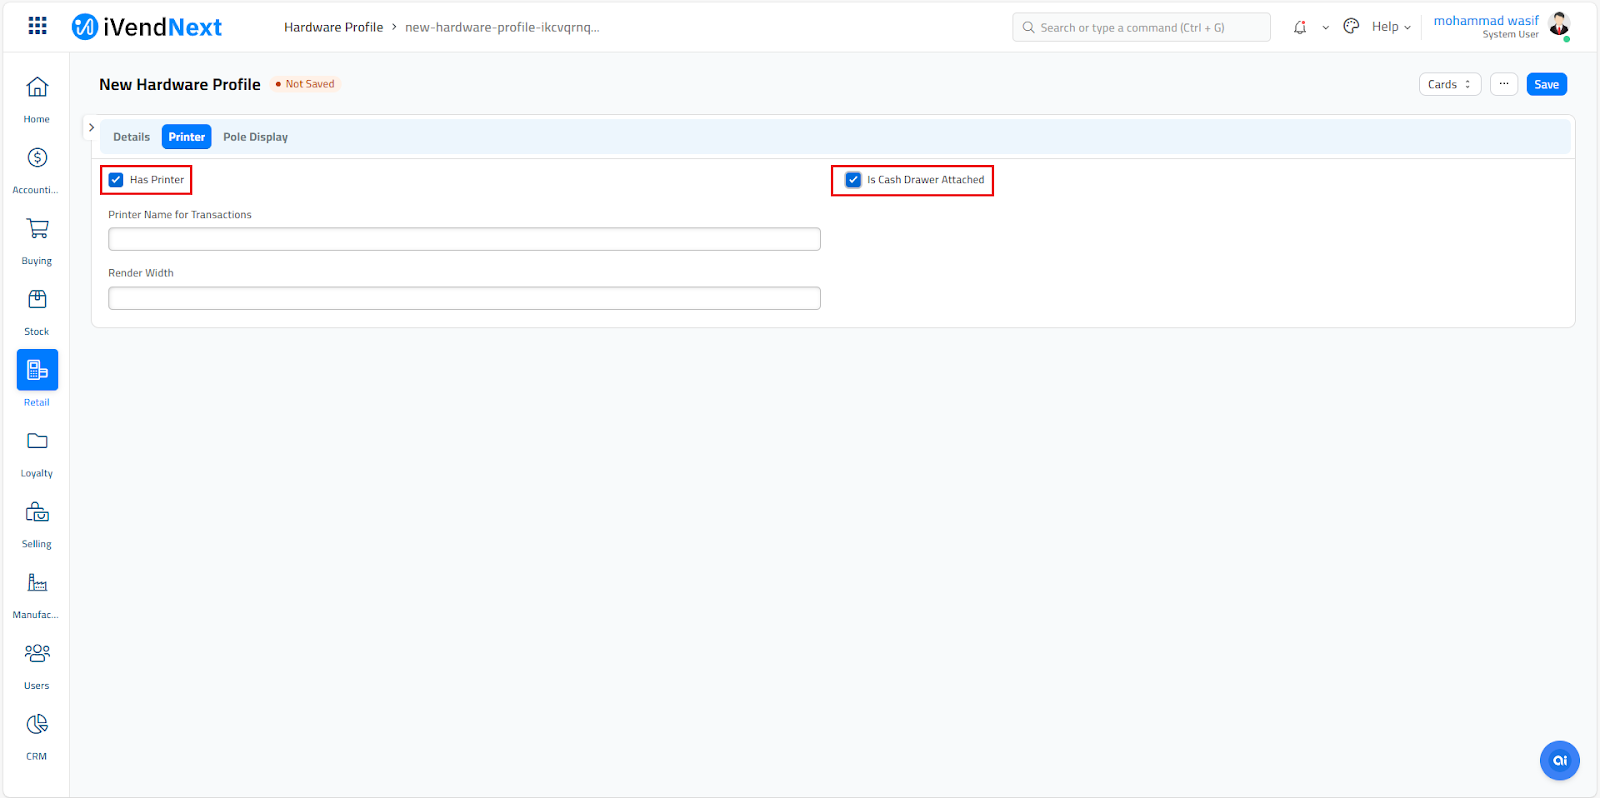
- Tick the Has Printer box on the Printer Tab
- Tick the Is Cash Drawer Attached box on the Printer Tab
- Click the Save button
Create Item Group Entry - (Standard Item)
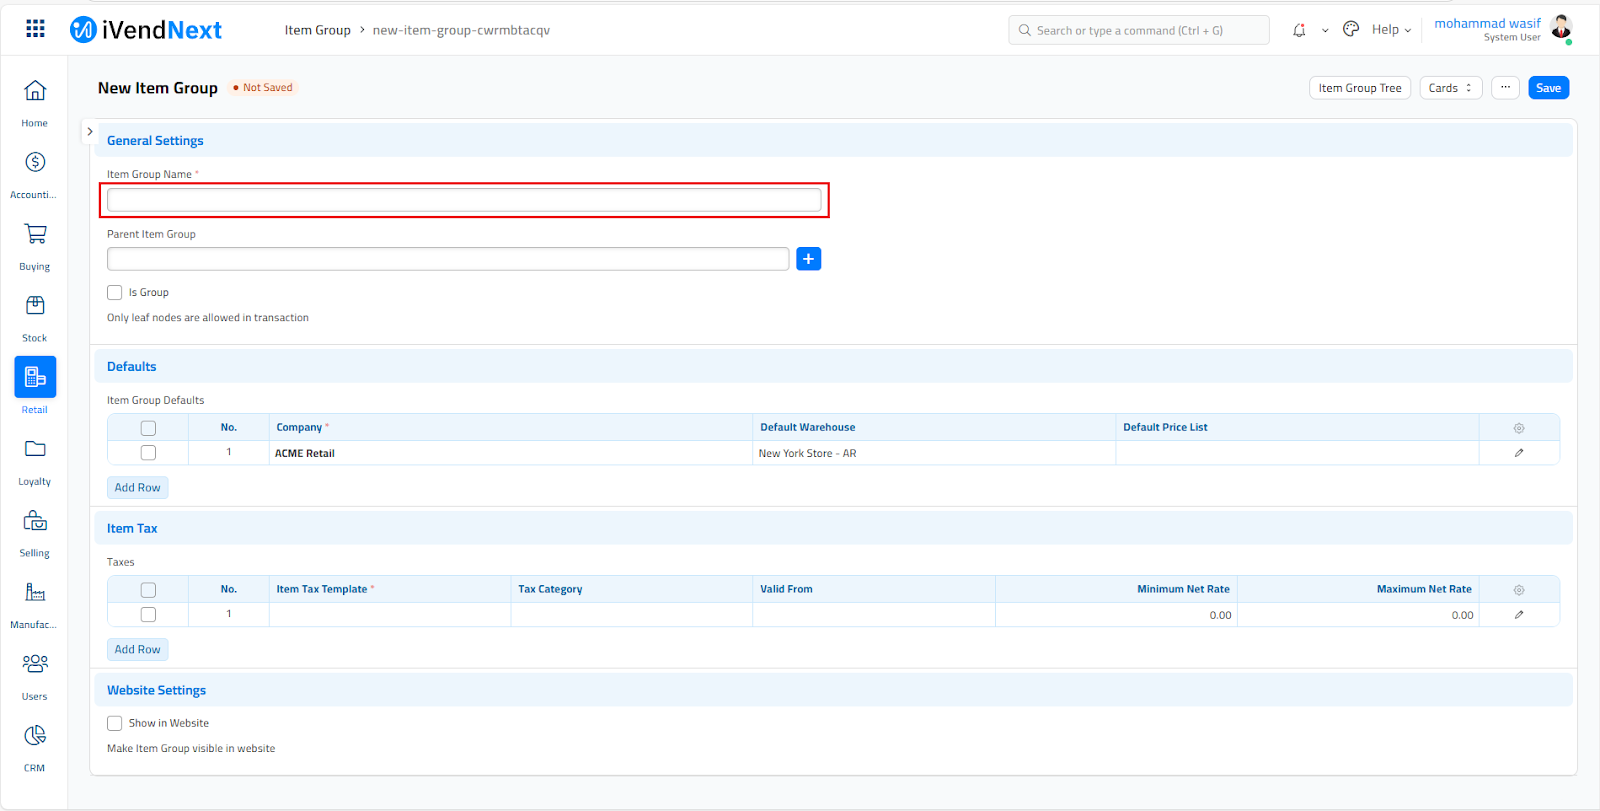
Creating an Item Group in iVendNext involves a few key steps. Here's a simplified guide to help you get started:
Path: Home > Retail > Item Group
- Access the Item Group List View Screen
- Click the Add Item Group button to open the New Item Group screen
- Specify the Item Group Name
- Specify the Item Group Defaults
- Company (Pre Populated)
- Default Warehouse (Optional)
- Default Price List (Optional)
- Click the Save button
Create Item Entry - (Standard Item)
iVendNext allows you to create the below Item Types:
- Standard Item
- Variant Item
- Serial Item
- Batch Item
- Bundle Item
However to keep things simple to understand we will proceed with the creation of a Standard Item.
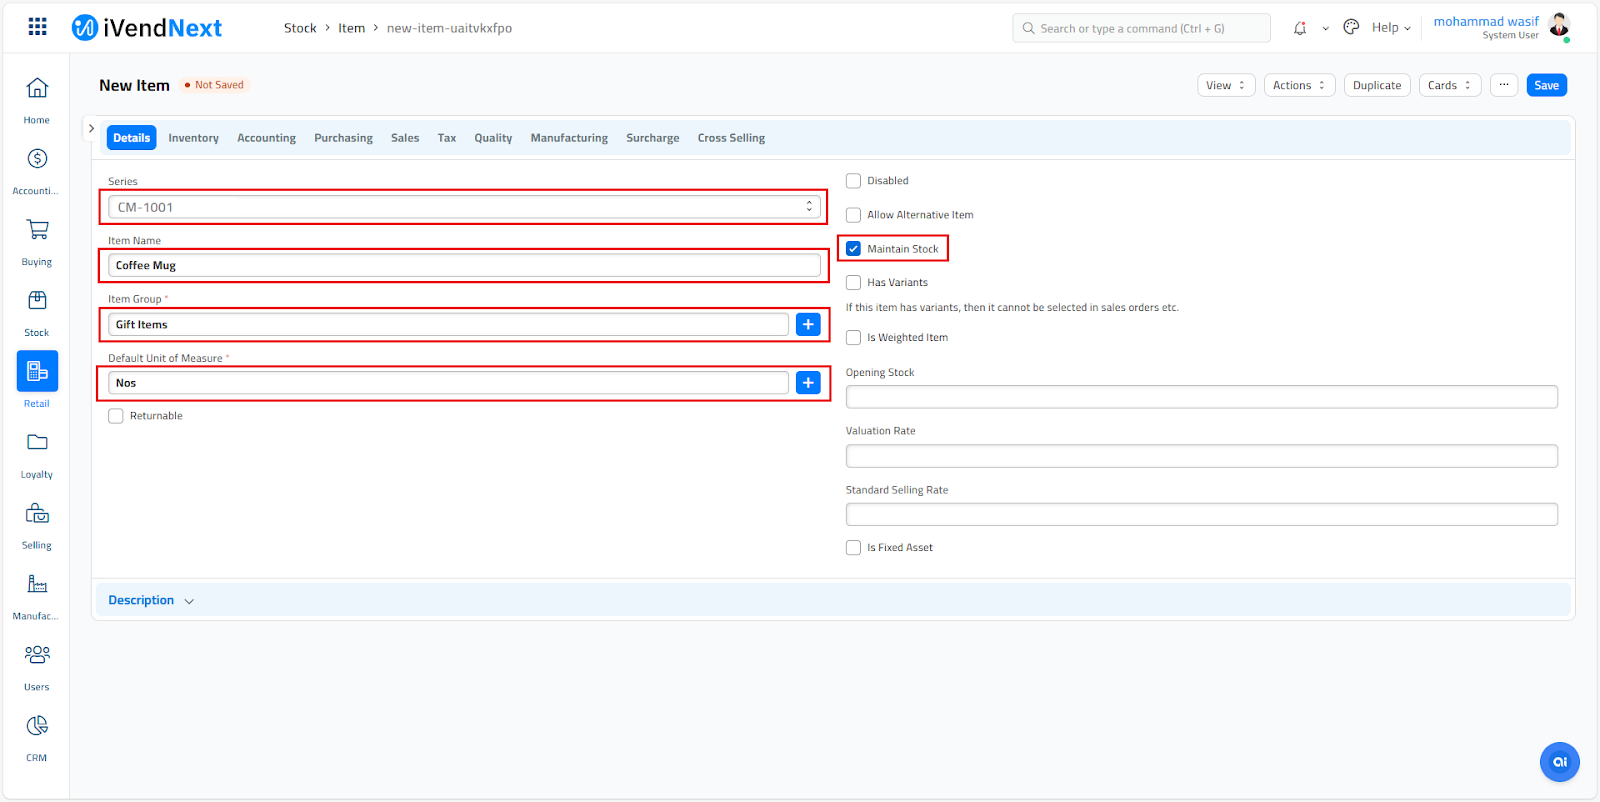
- Item Code - CM-1001
- Item Description - Coffee Mug
Creating an Item in iVendNext involves a few key steps. Here's a simplified guide to help you get started:
Path: Home > Retail > Item
- Access the Item List View Screen.
- Click the Add Item button to open the New Item Group screen.
- Specify the Item Code
- Select the Item Group
- Specify the Default Unit of Measure
- Specify the Purchase Unit of Measure - On the Purchasing Tab
(Optional but Recommended)
- Specify the Sales Unit of Measure - On the Sales Tab
(Optional but Recommended)
- Click the Save button
Specify the Item Price
You can specify the Item Price via the Item Price List. There are multiple ways to approach the Item Price List Screen.
- From the Item Master Screen
- From the Item Price List View Screen
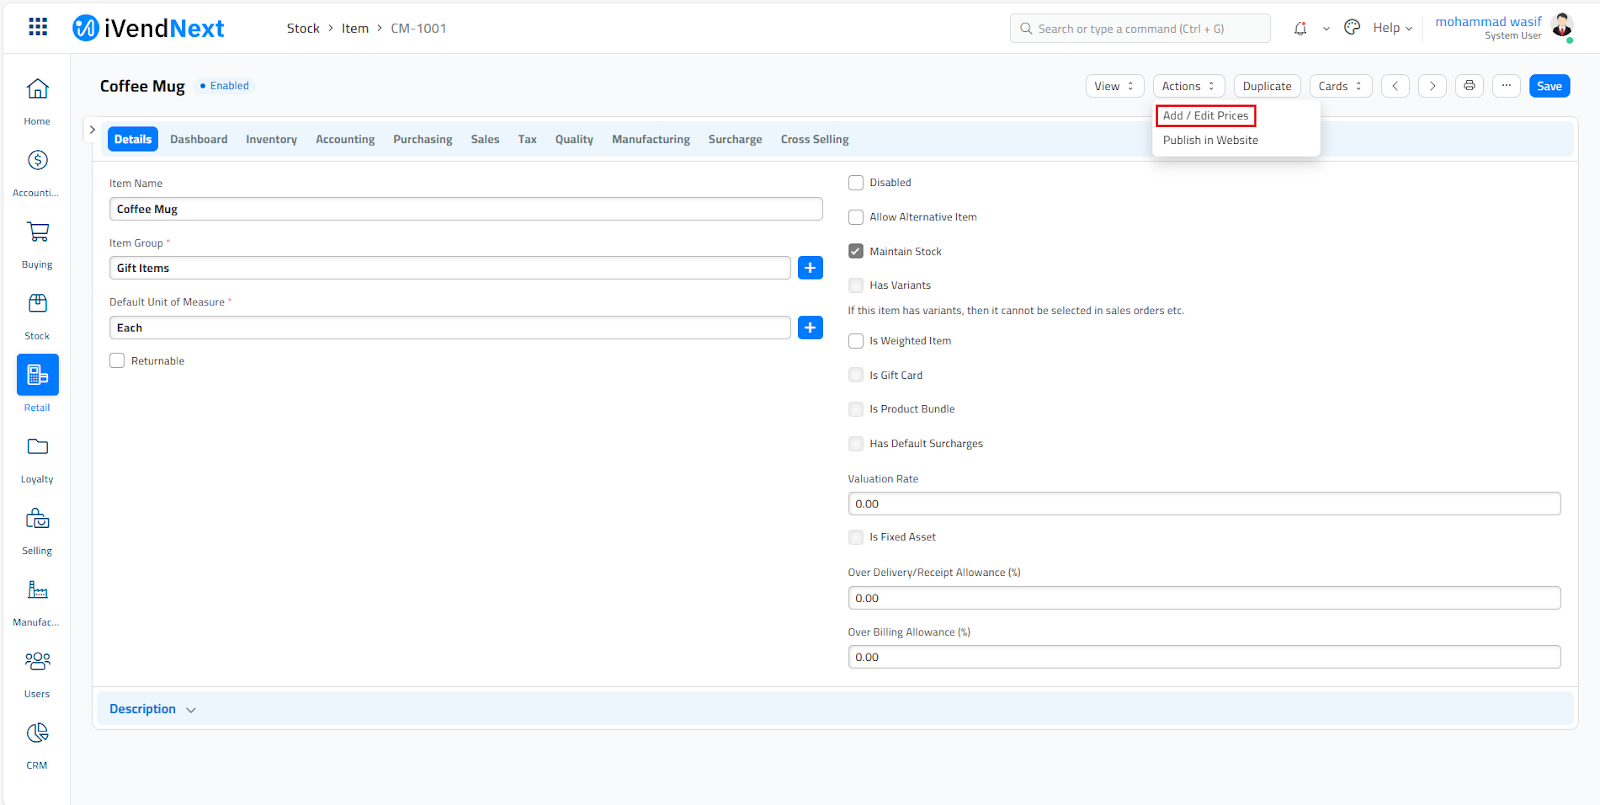
- On the Item Master Screen, under Actions click on the Add/Edit Item Prices option. This will open the Item Price List View Screen
- Click the Add Item Price button
- Specify the Item Code
- Specify the UOM
- Specify the Price List. It is recommended to create both the Standard Selling Price List as well as the Standard Buying Price List
- Specify the Rate
- Click the Save button
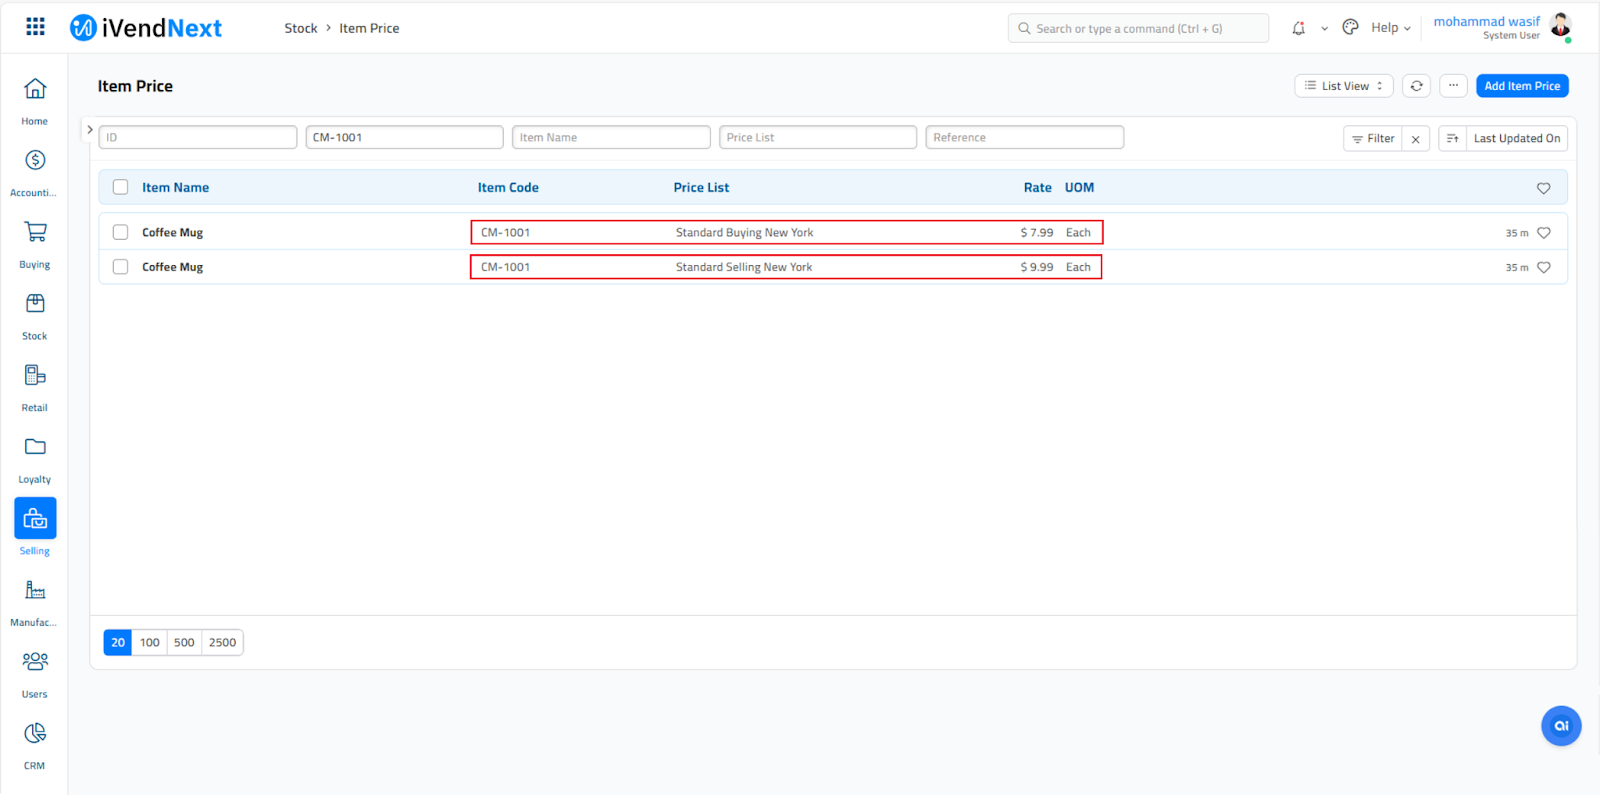
Now that we have created an Item and also defined the Selling Price and the Buying Price, let us buy some quantities from a Supplier.
Request Items - Raise a Purchase Order
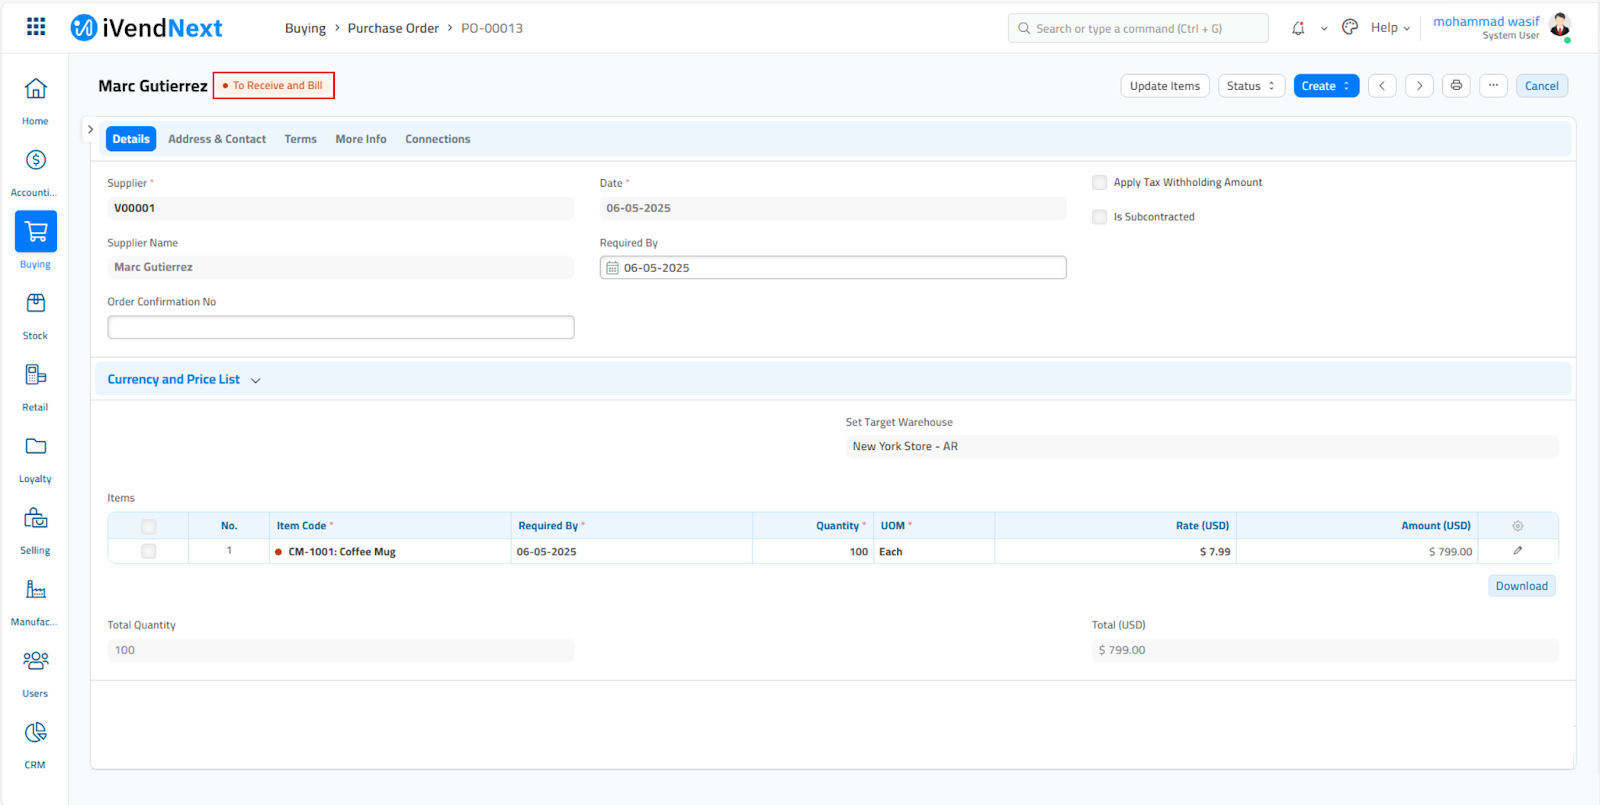
Raise a Purchase Order to request Coffee Mug Item (CM-1001) from a Supplier. Creating a Purchase Order in iVendNext involves a few key steps. Here's a simplified guide to help you get started:
Path: Home > Buying > Purchase Order
- Access the Purchase Order List View Screen
- Click the Add Purchase Order button to open the New Purchase Order screen
- Select Supplier
- Set Required By Date
- Add Items
- Set Item Quantity
- Set Item Price
- Apply Taxes (Optional)
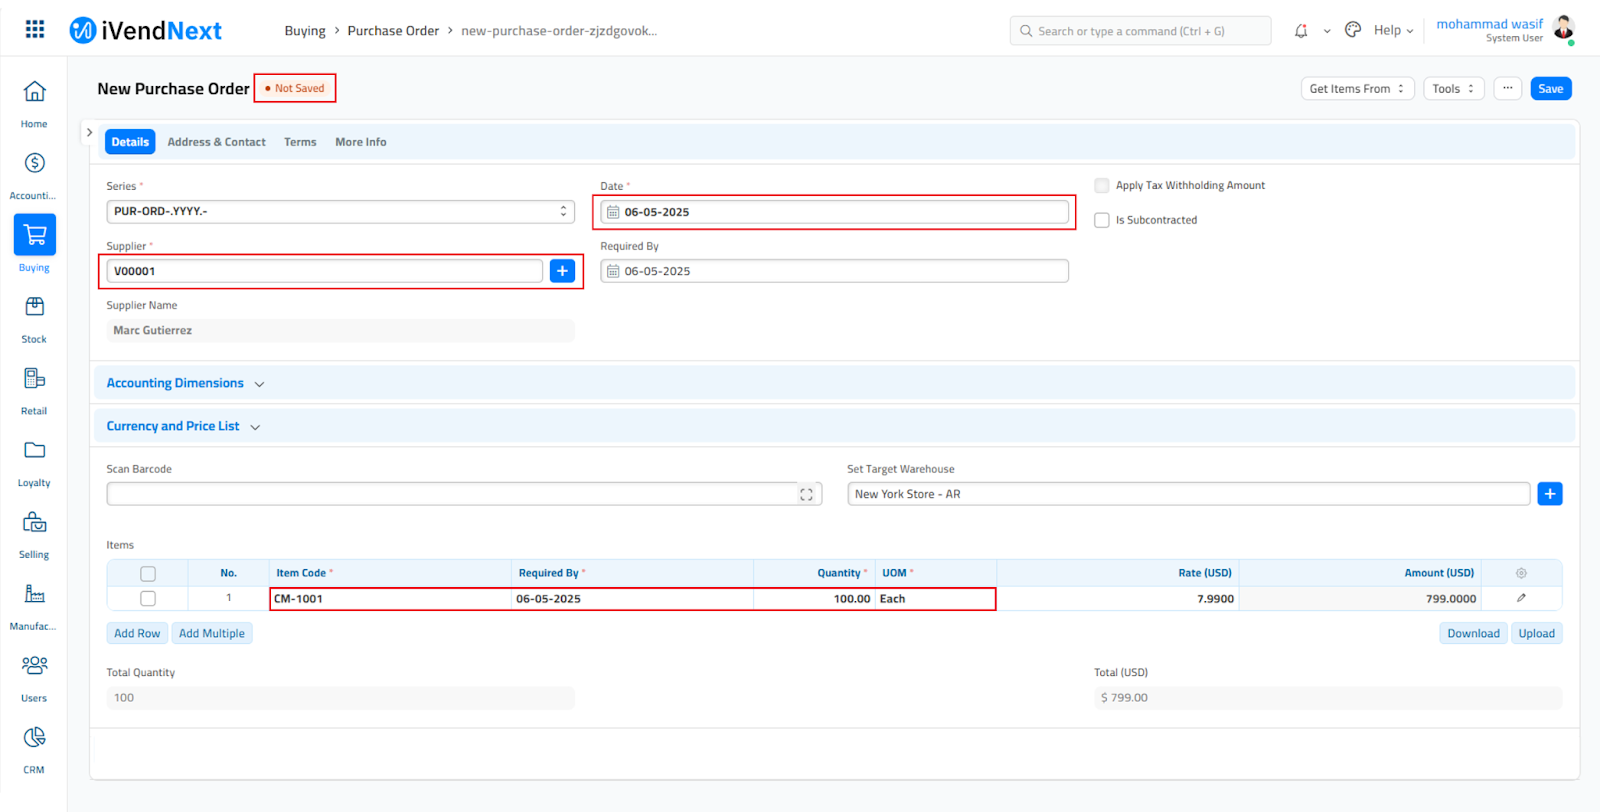
- Save the Purchase Order. The Status will change from Not Saved to Draft
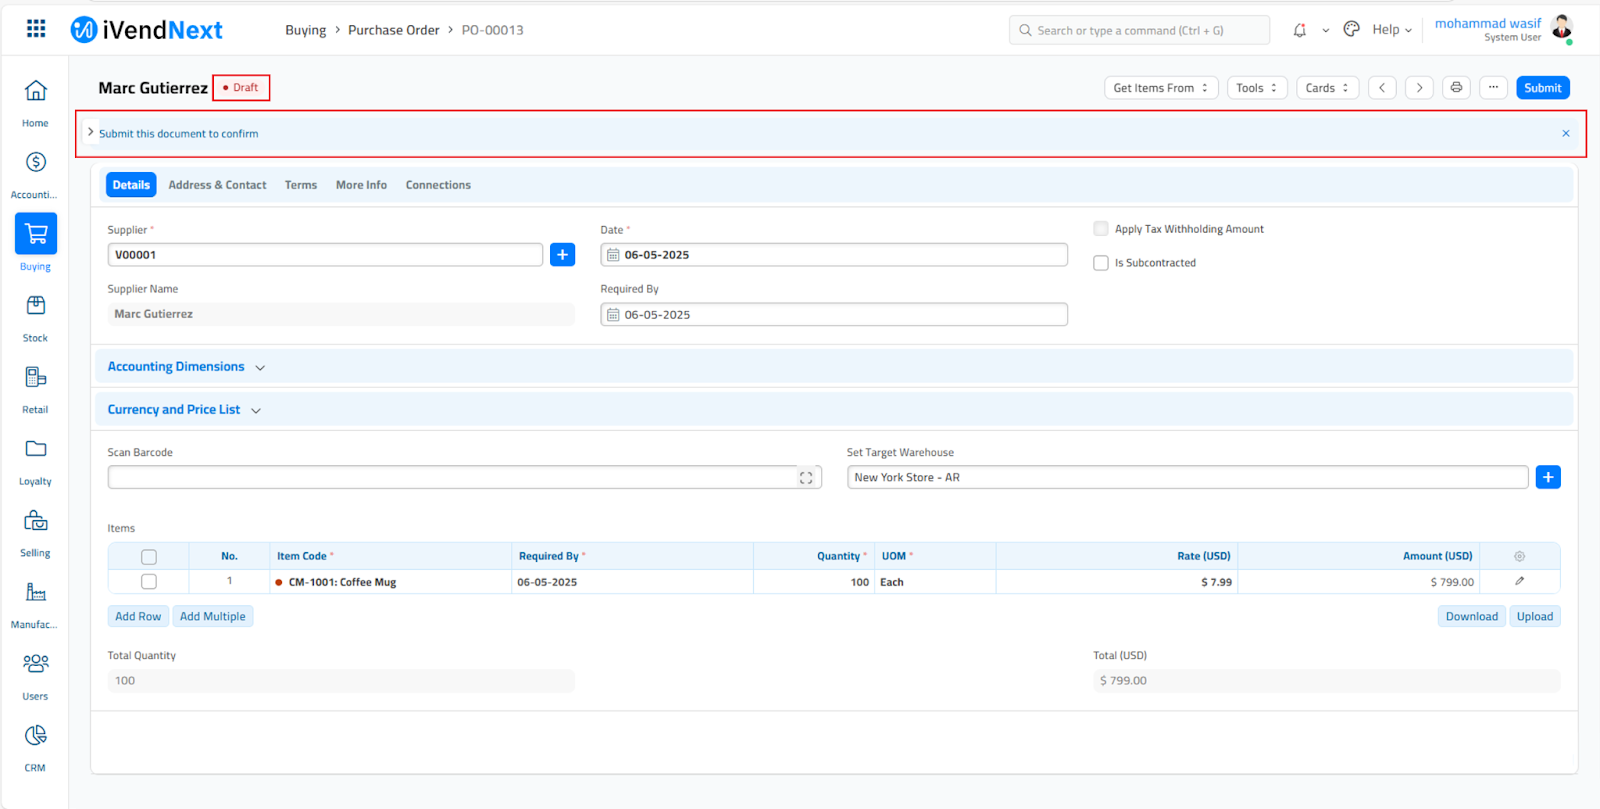
- Submit the Purchase Order. The Status will change from Draft to To Receive and Bill
Now that we have requested some quantities of the Coffee Mug Item (CM-1001) from a Supplier, let us receive the item.
Receive Items - Raise a Purchase Receipt
Raise a Purchase Receipt to receive Coffee Mug Item (CM-1001).
Creating a Purchase Receipt in iVendNext involves a few key steps. Here's a simplified guide to help you get started:
Path: Home > Buying > Purchase Receipt
You can raise a Purchase Receipt via the Purchase Receipt Screen. There are multiple ways to approach the Purchase Receipt Screen.
- From the Purchase Order Master Screen
- From the Purchase Receipt List View Screen
On the Purchase Order Master Screen, under Actions click on the Purchase Receipt option. This will open the Purchase Receipt List View Screen.
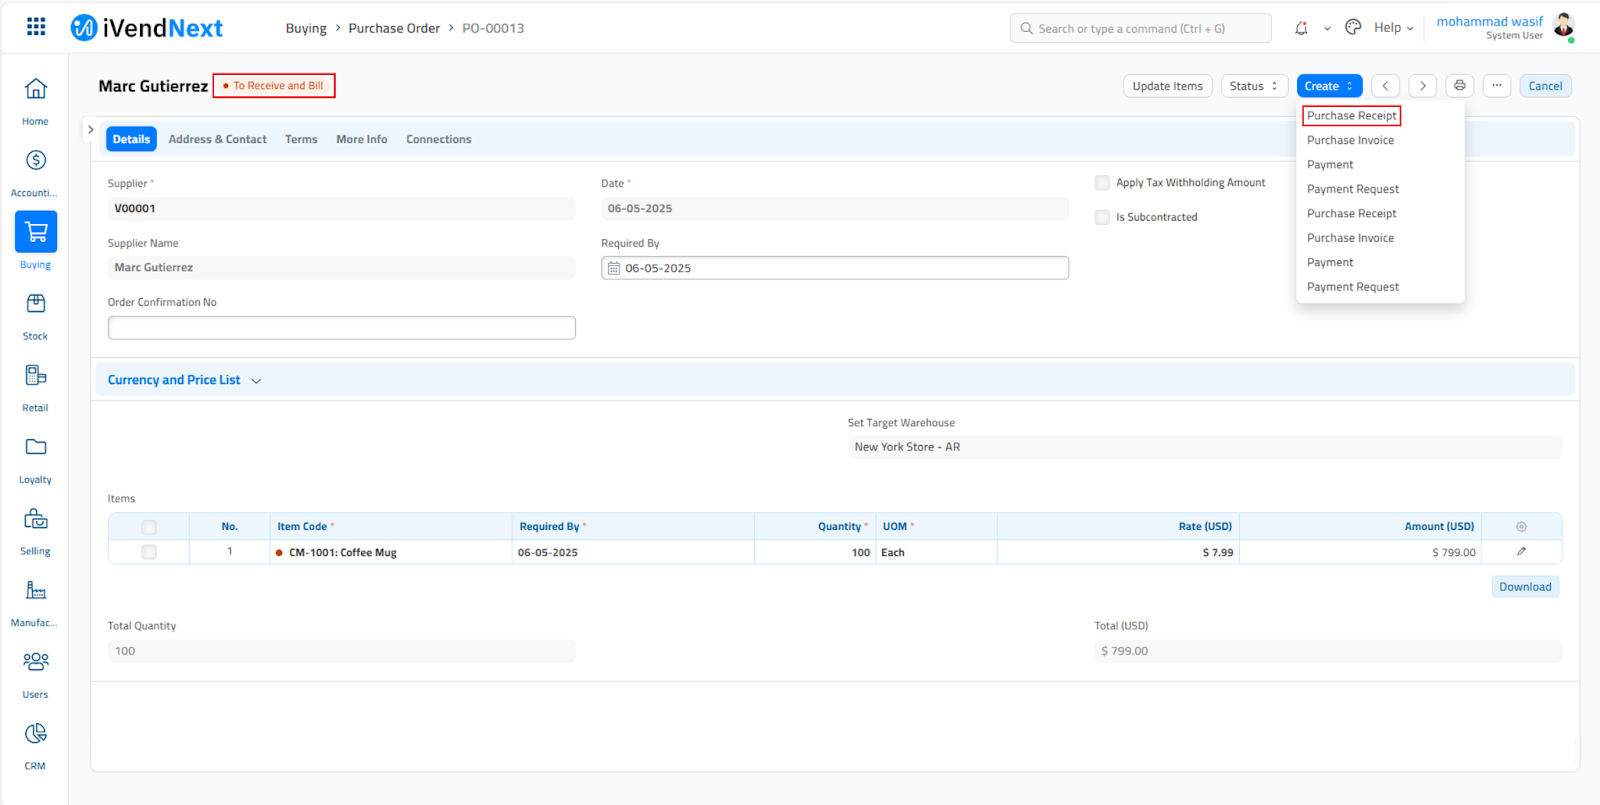
- Click the Add Purchase Receipt button to open the New Purchase Receipt screen.
- Verify the Supplier.
- Verify the Required By Date
- Verify the Accepted Warehouse
- Verify the Accepted Quantity
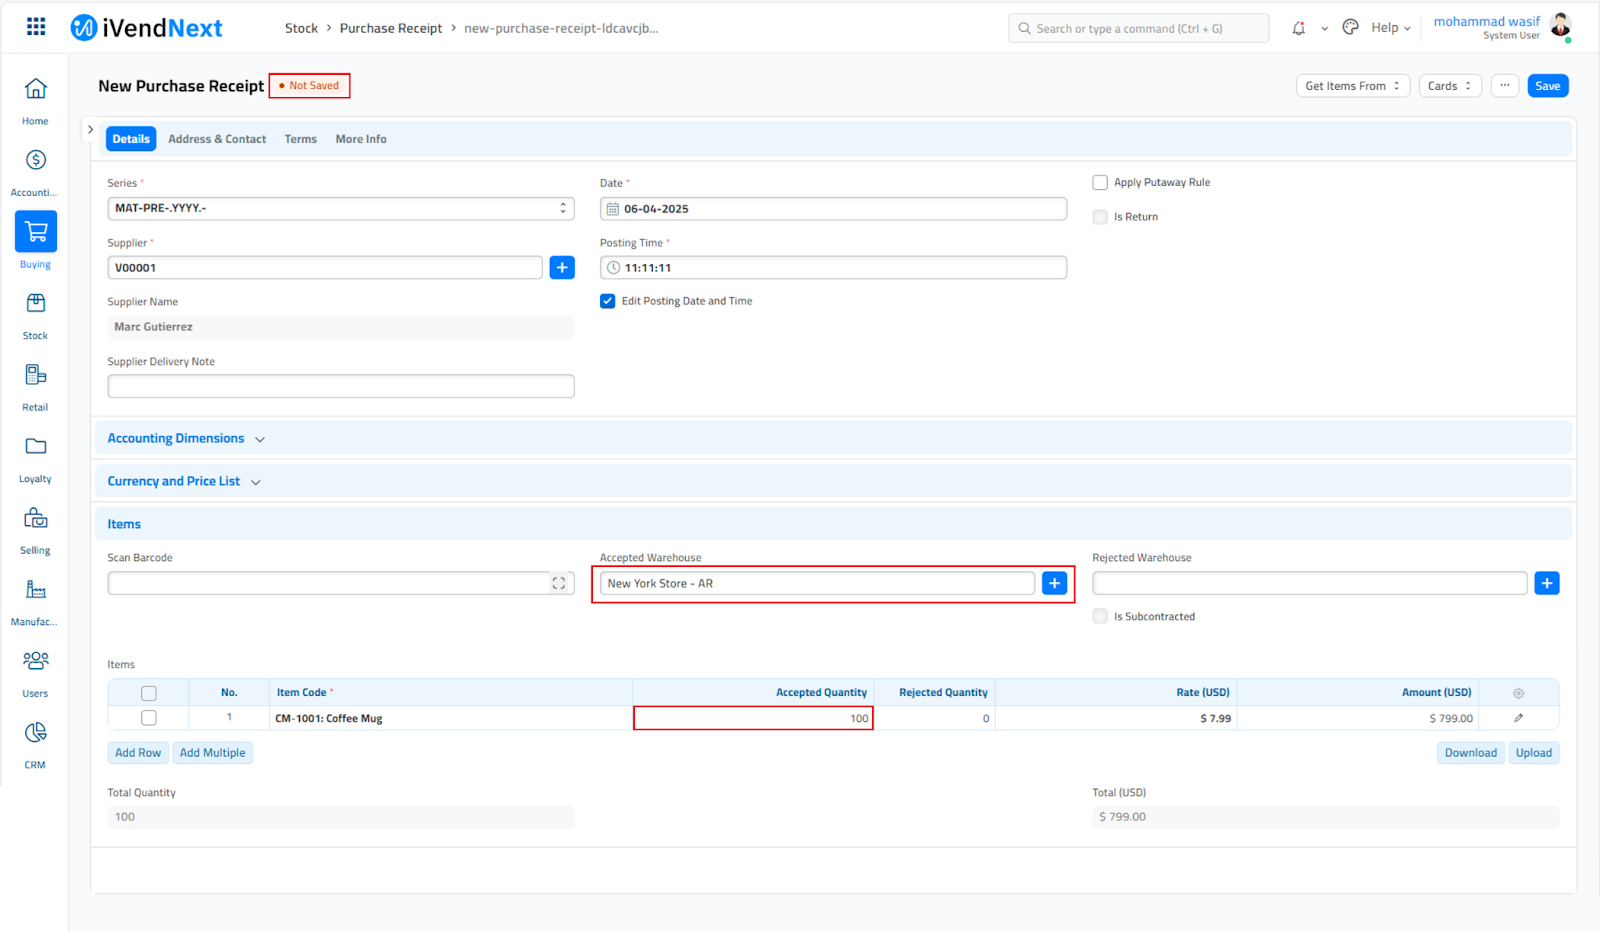
- Save the Purchase Receipt. The Status will change from Not Saved to Draft
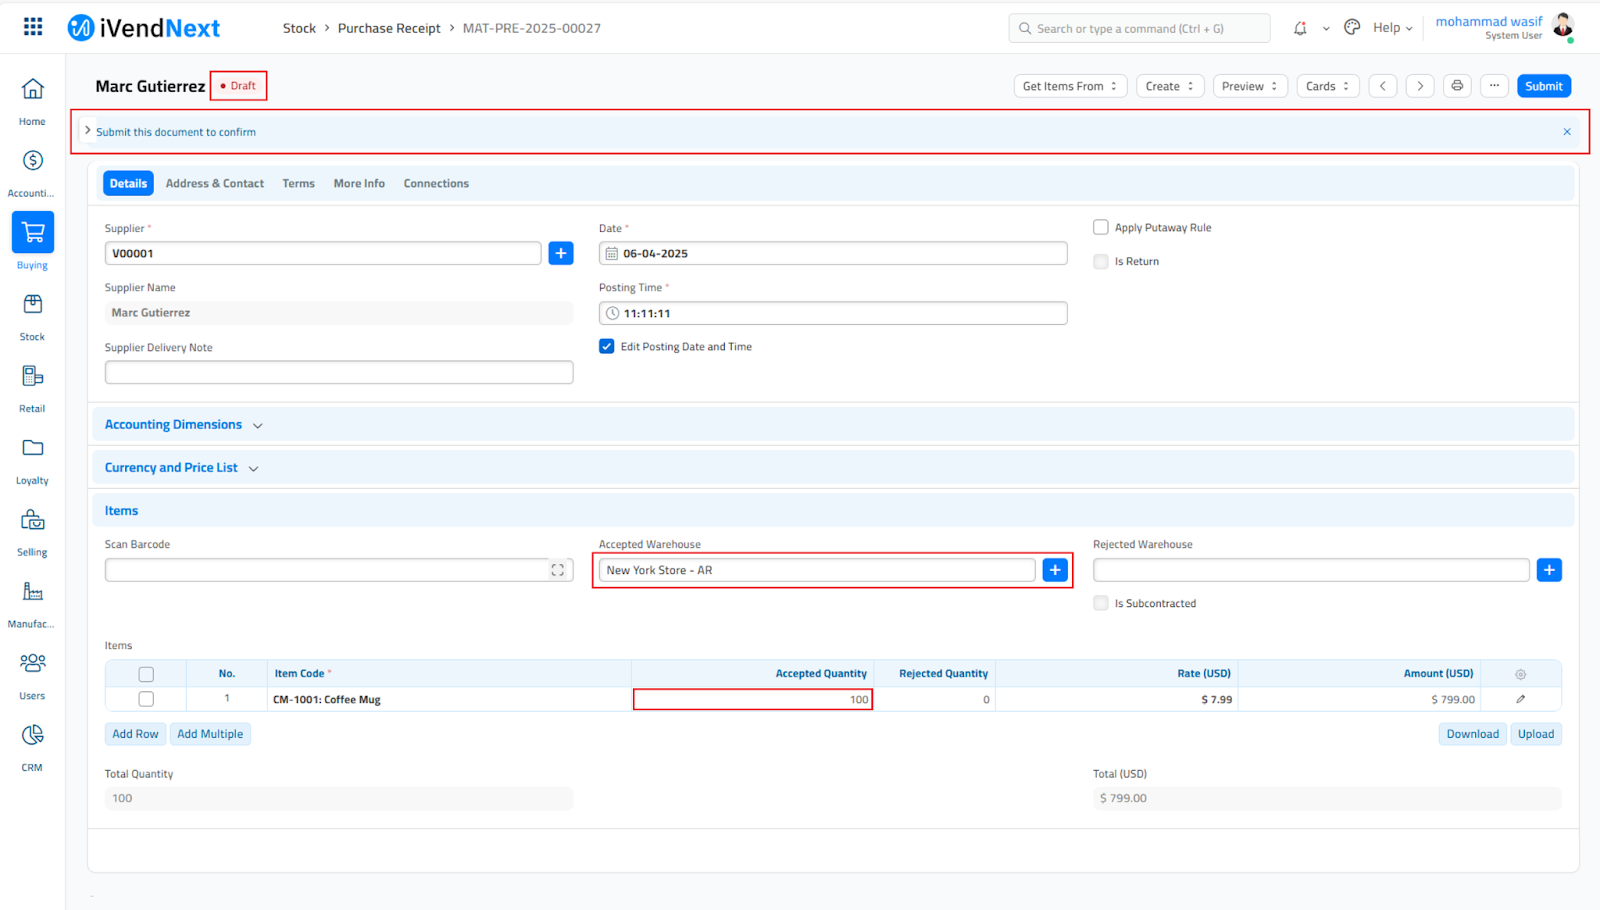
- Submit the Purchase Receipt. The Status will change from Draft to To Bill
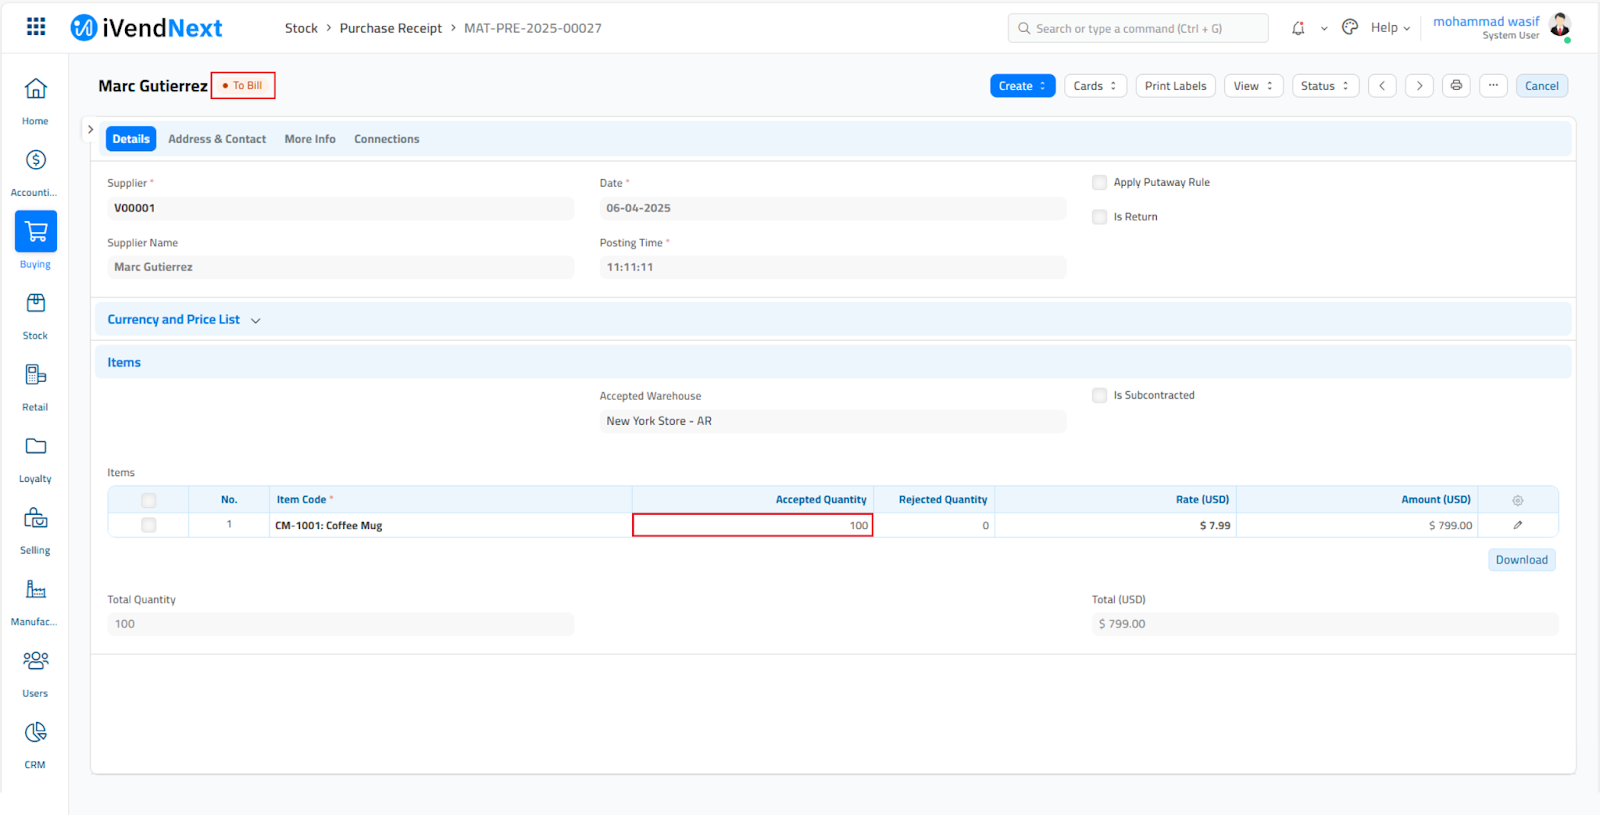
Now that we have procured 100 quantities of the Coffee Mug (CM-1001) item, let us try to sell this at the POS.
Sell Items at POS
Performing a Sale in iVendNext involves a few key steps. Here's a simplified guide to help you get started:
Launch the POS
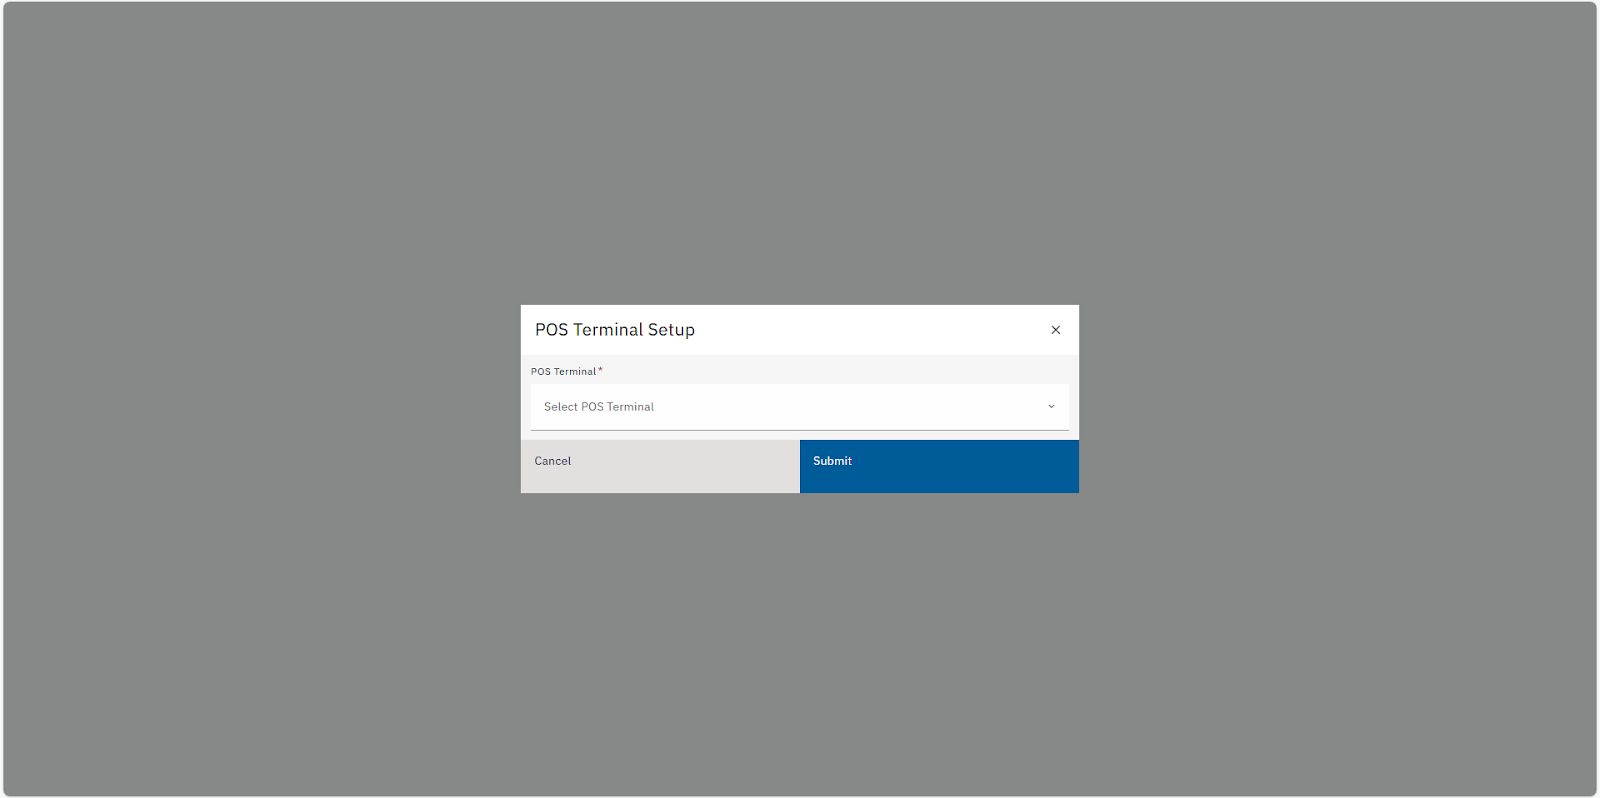
On the POS Terminal Setup screen:
- Select the POS Terminal
- Click the Submit button to launch the Opening Amount screen
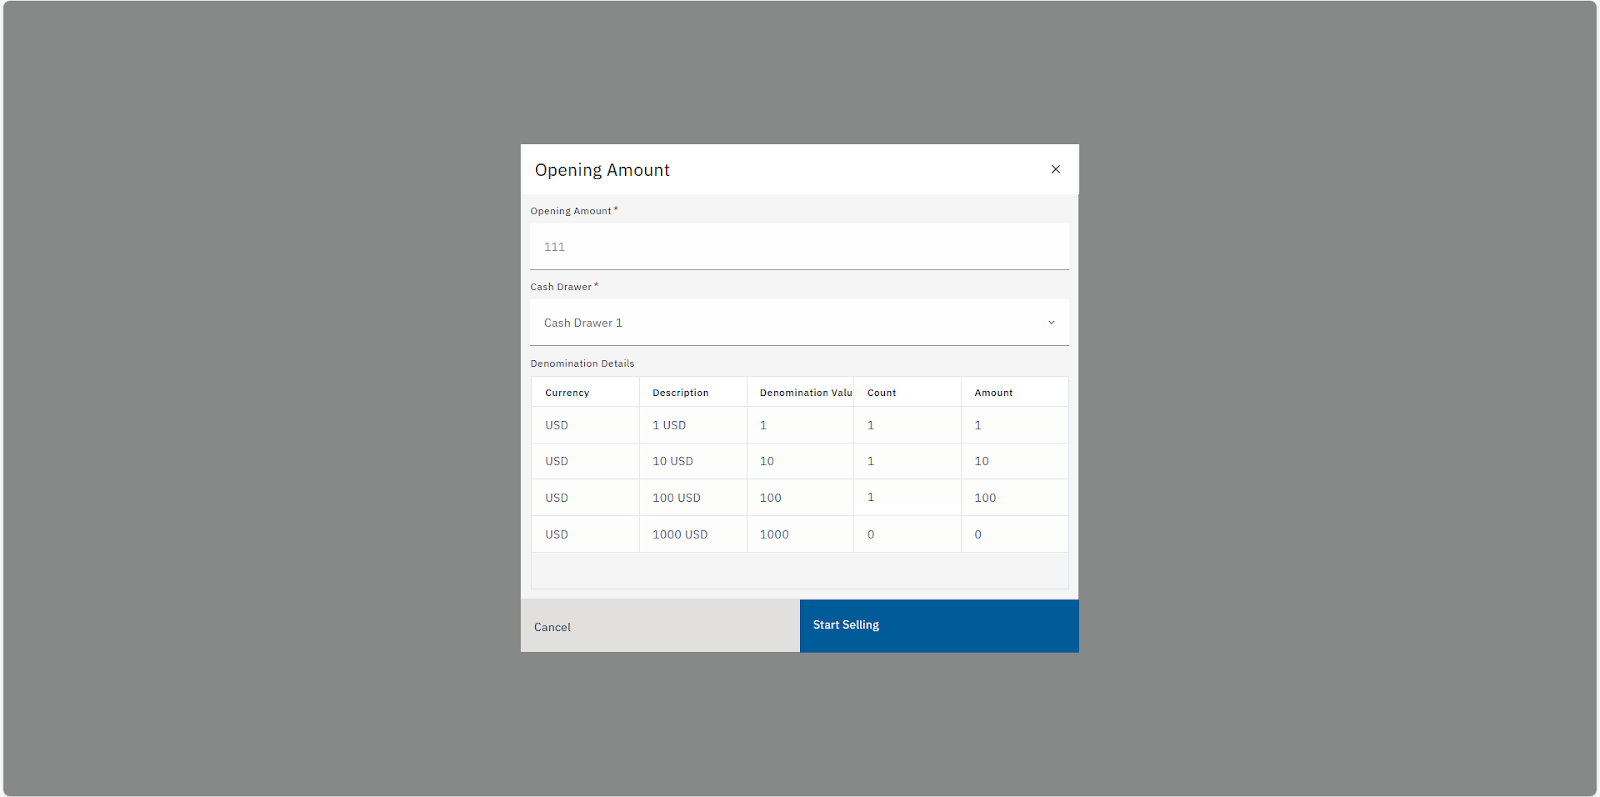
On the Opening Amount Screen:
- Select Cash Drawer
- Specify the Opening Amount
- Start Selling
To demonstrate a simple sale transaction using iVendNext POS, we will add a single item (CM-1001) with multiple quantities.
- Add Item(s). (CM--1001)

- Specify the Quantity To Sell. We have specified 15 as the Quantity To Sell.

- Select a Customer. By default a Walk In Customer, also referred to as the Cash Customer is pre selected. However, to record the sale against a customer, you must add that customer to the sale.

- Click the Cash button to pay by cash

- Click the Credit Card Button to pay the remaining balance by card

- Click OK to make the payment and conclude the sale
- Print the Transaction Receipt (Optional)

Click the New Transaction Button to return to the Transaction Screen.
Received a Purchase Invoice
Earlier we requested some items to sell and raised a Purchase Order. Upon receiving the items we eventually raised a Purchase Receipt to acknowledge the Items Received.
Now the Supplier has issued a Purchase Invoice. It is a bill received from the supplier for the items provided.
Raise a Purchase Invoice for the received Coffee Mug Item (CM-1001).
Creating a Purchase Invoice in iVendNext involves a few key steps. Here's a simplified guide to help you get started:
Path: Home > Buying > Purchase Invoice
Access the Purchase Invoice List View Screen.
There are multiple ways to approach the Purchase Invoice Screen.
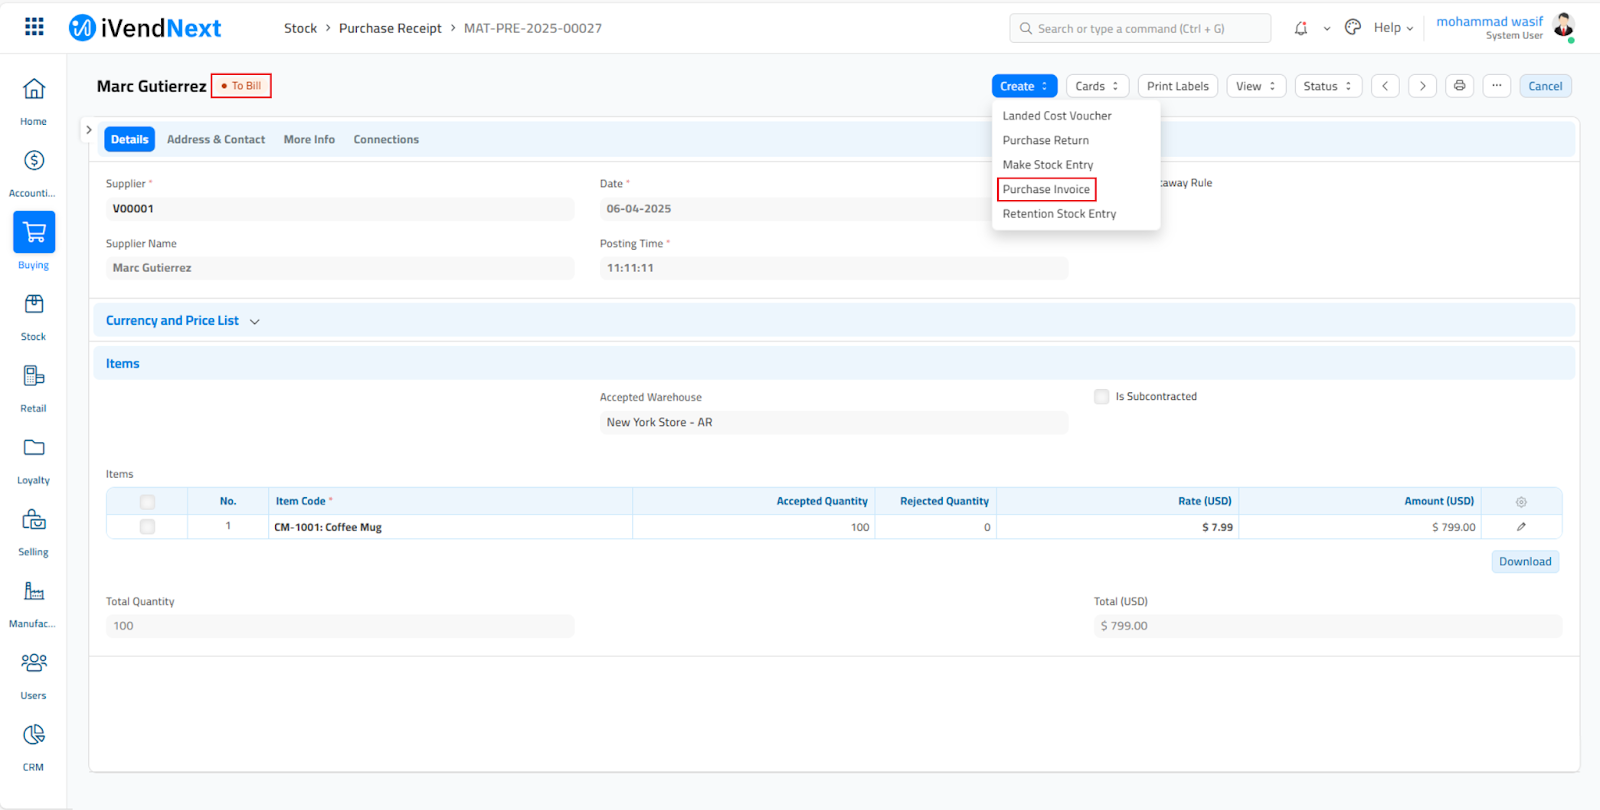
- From the Purchase Receipt Master Screen
- From the Purchase Invoice List View Screen
On the Purchase Receipt Master Screen, under Actions click on the Purchase Invoice option. This will open the New Purchase Invoice Screen.
On the New Purchase Invoice Screen, verify the below information:
- Supplier
- Due Date
- Item Code
- Accepted Quantity
- Item Rate
- Amount
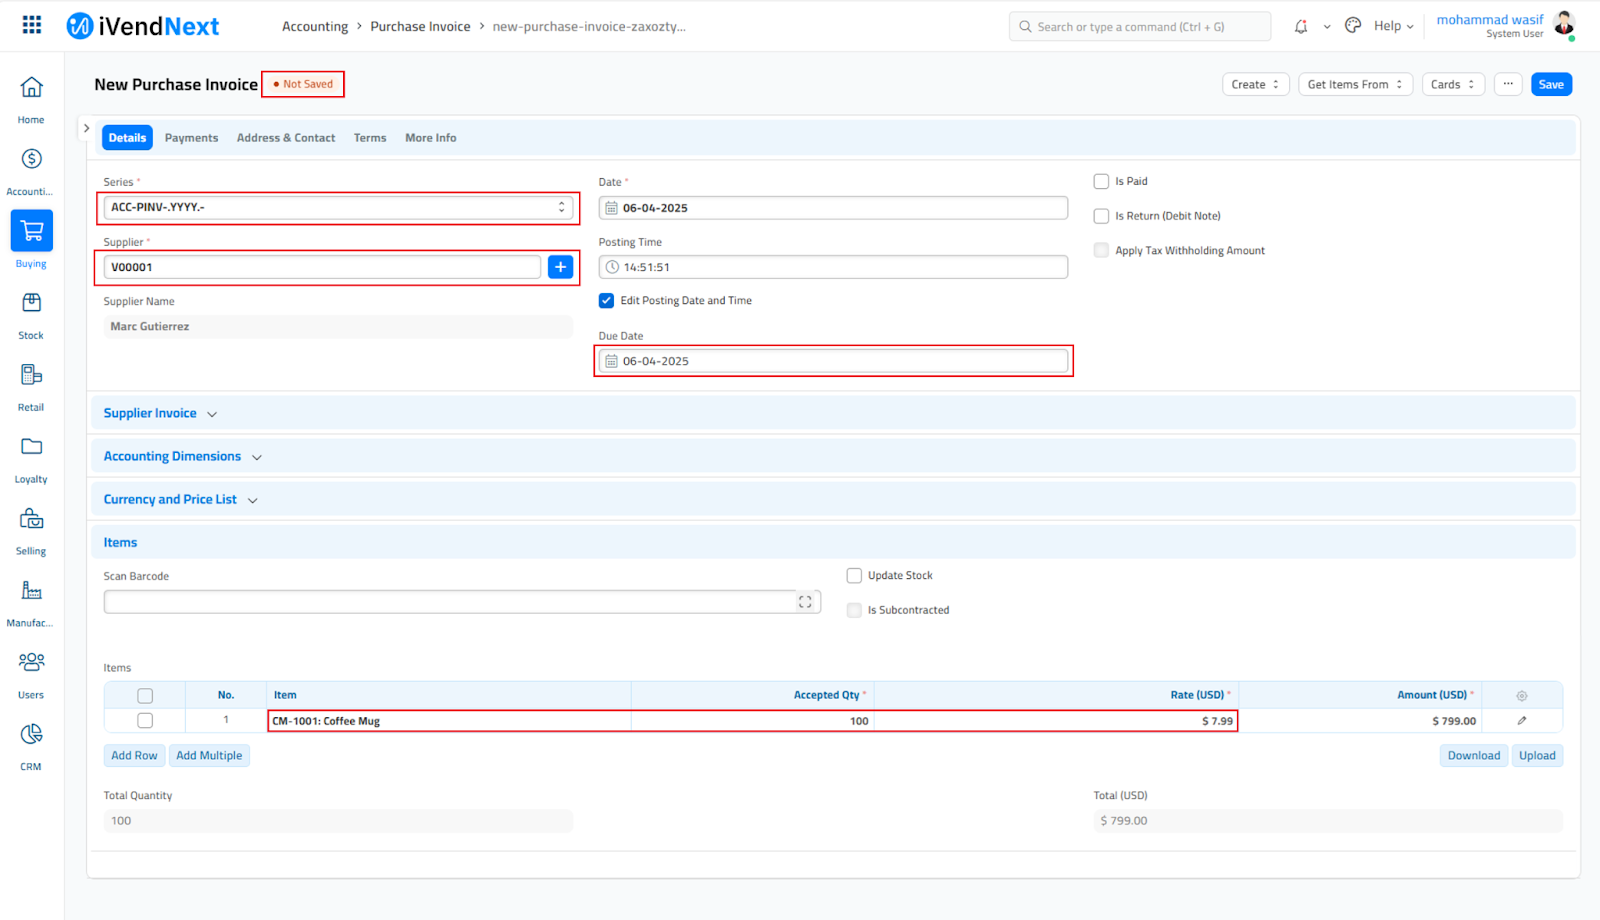
- Save the Purchase Invoice. The Status will change from Not Saved to Draft
**
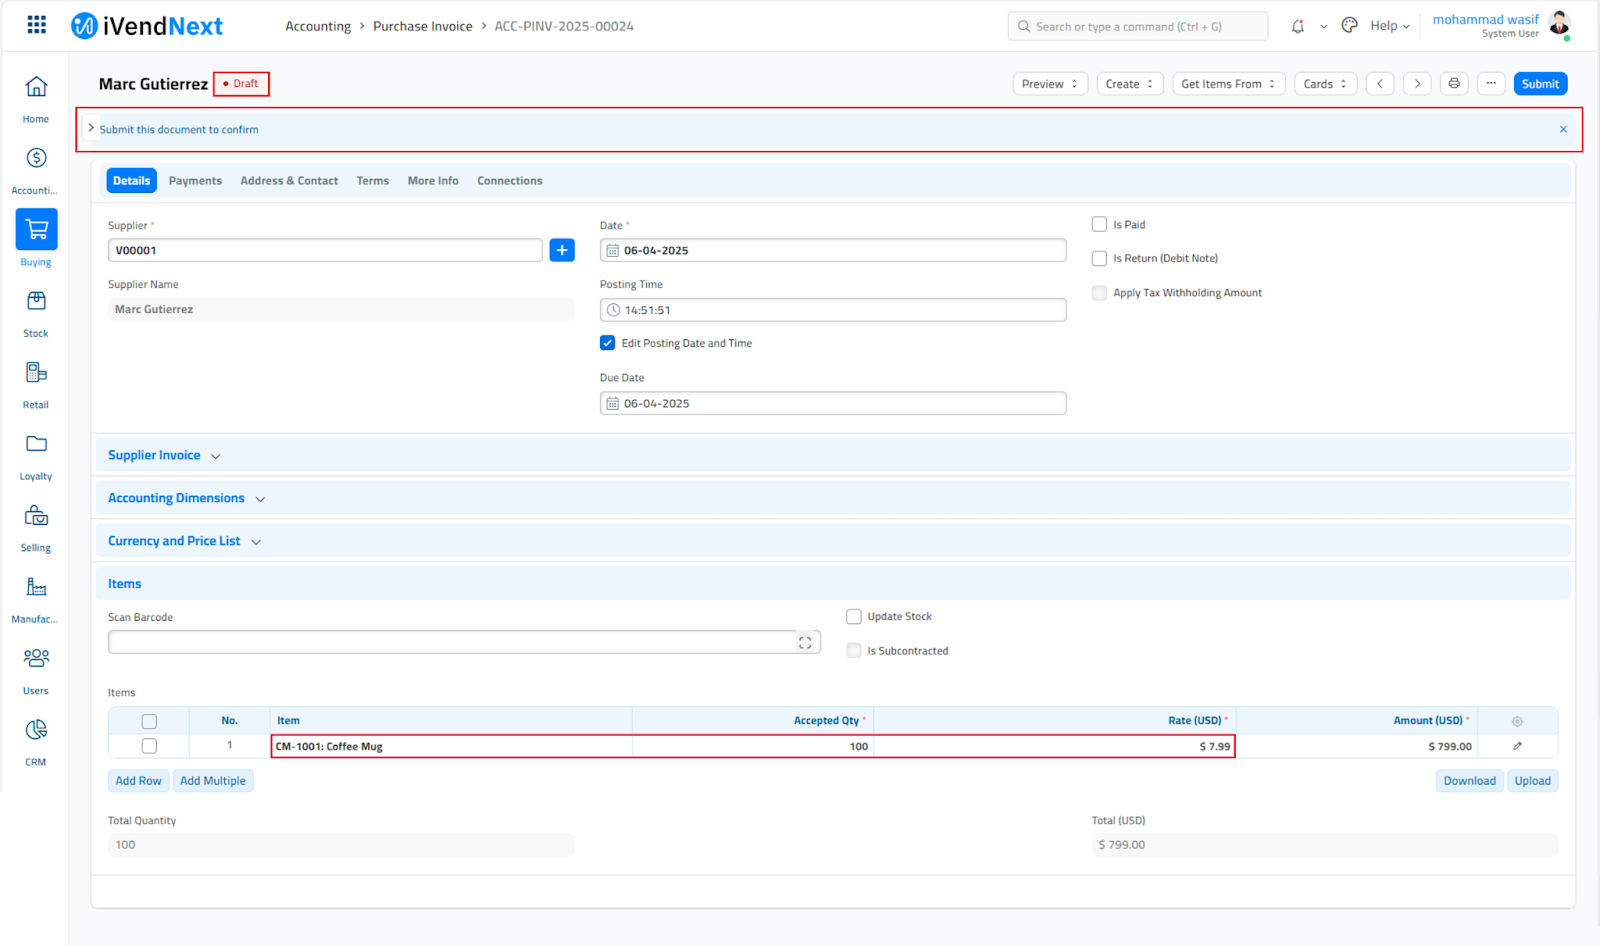
**
Let us pay for the Coffee Mug Item purchased from the Supplier. We will create a Payment Entry to record the same.
Create Payment Entry
Creating a Payment Entry for a Purchase Order ensures that your financial transactions are accurately recorded, tracked, and reconciled, which is vital for effective financial management.
Creating a Purchase Entry in iVendNext involves a few key steps. Here's a simplified guide to help you get started:
Path: Home > Buying > Payment Entry
There are multiple ways to approach the Payment Entry Screen.
- From the Payment Entry Master Screen
- From the Purchase Invoice Screen
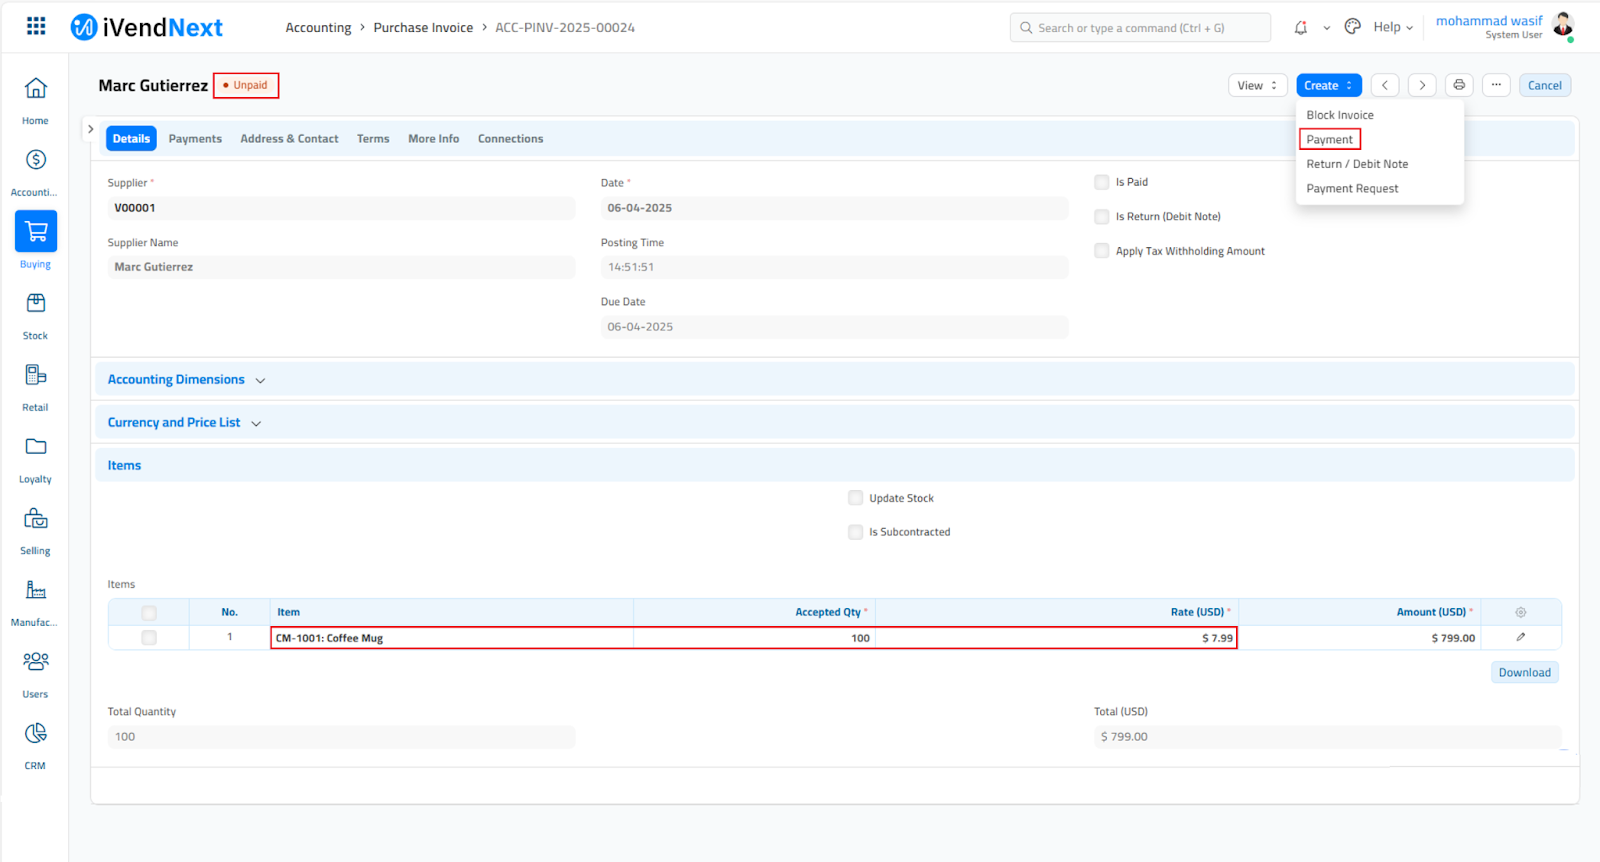
- On the Purchase Invoice Master Screen, under Create click on the Payment option. This will open the New Purchase Entry Screen.
- On the New Payment Entry Screen, specify the Mode of Payment and verify the Paid Amount.
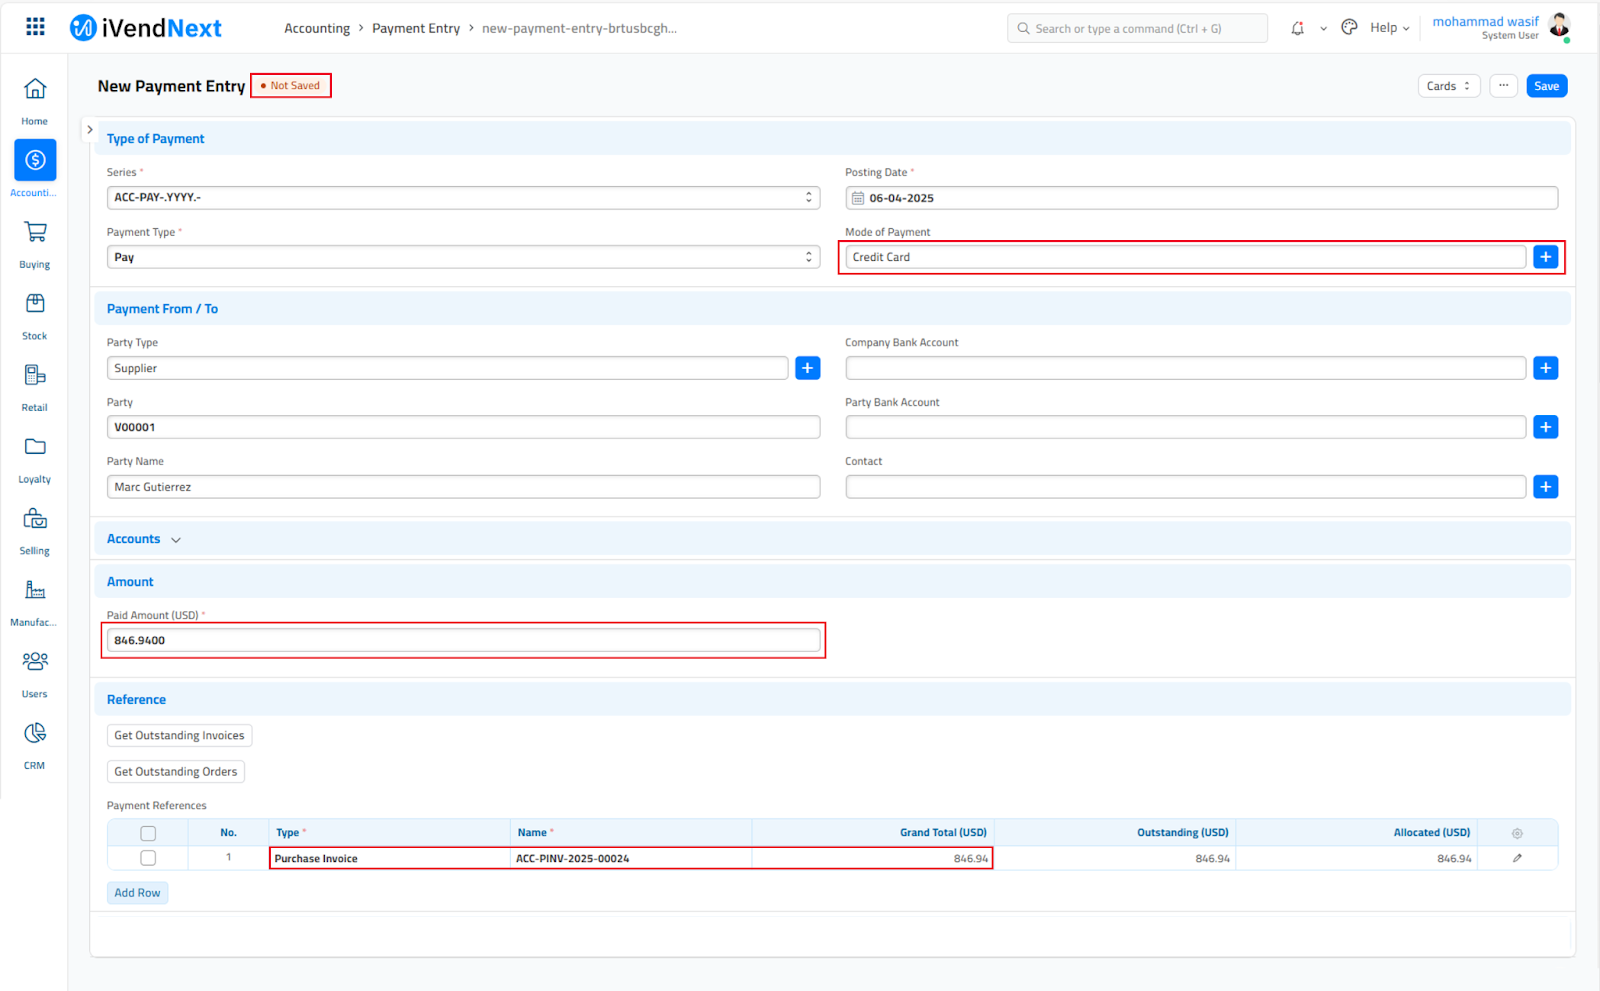
- Save the Payment Entry. The Status will change from Not Saved to Draft.
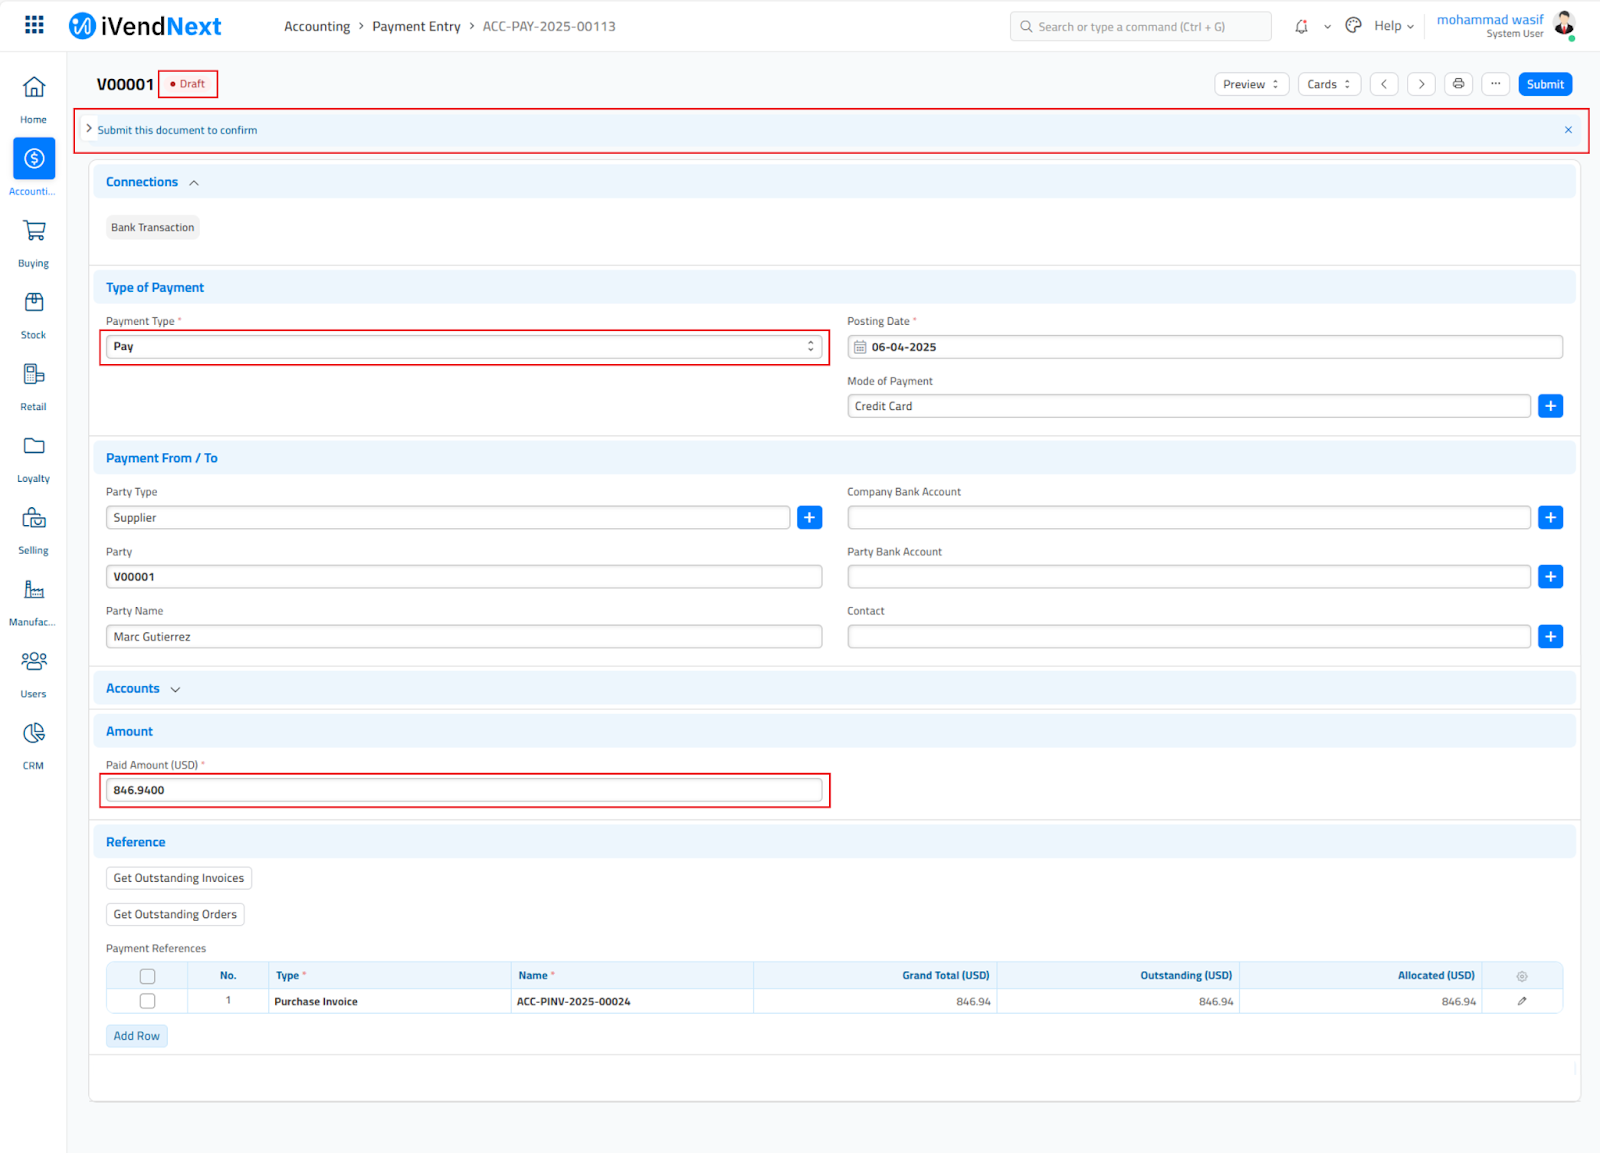
- Submit the Payment Entry. The Status will change from Draft to Submitted.
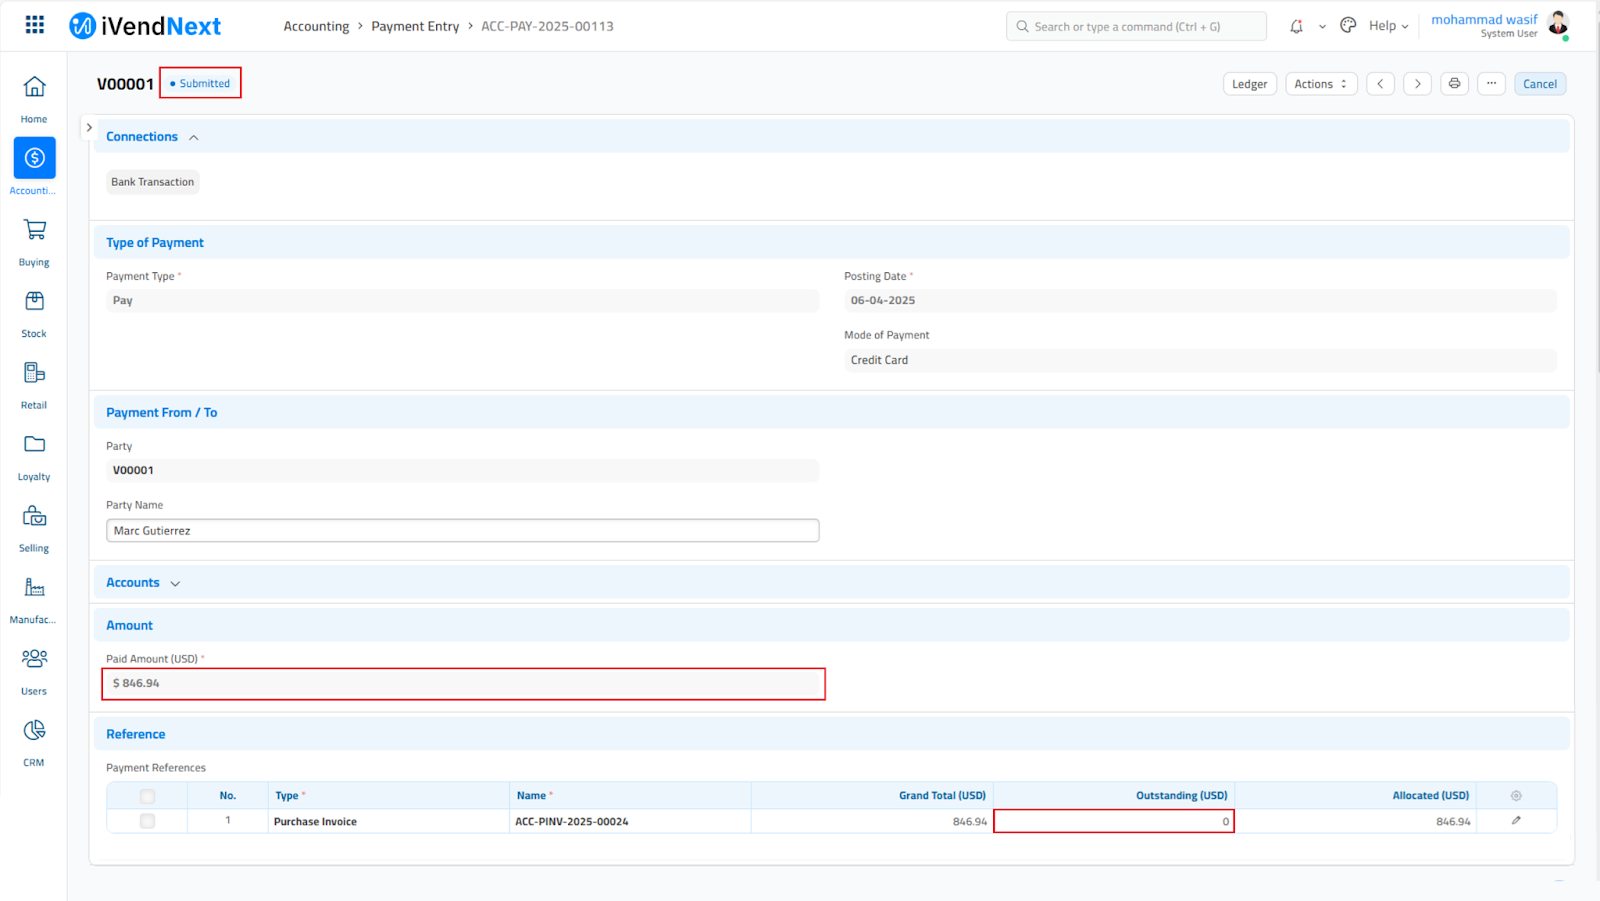
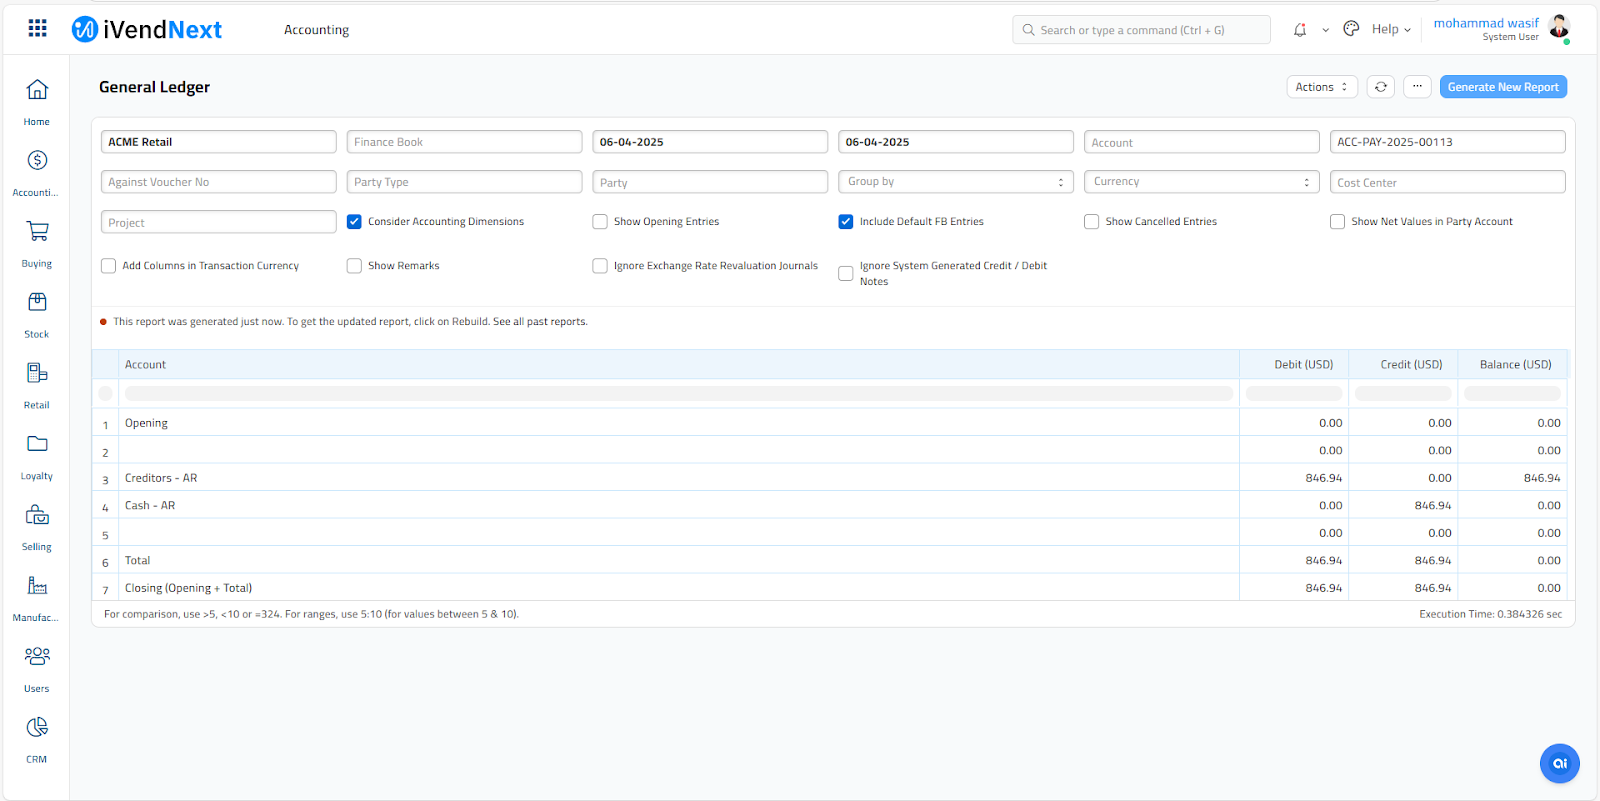
You can click on the Ledger tab to view the corresponding Payment Entry in the Ledger.
Close POS
- Click the Transactions Button

- Click the Close POS button
- Click Yes on the confirmation dialog box

Count Tender
- Count the tender on the Shift Close screen

- Select the desired row
- Click the Count Button
- Specify the count on the Tender Count Details dialog box

- Click "Submit”
In case of multiple Tender Types, you will have to count them individually.
Shift Count Report
Print the Shift Count Report. (Optional)

Z Tape Report
Print the Z Tape Report. (Optional)

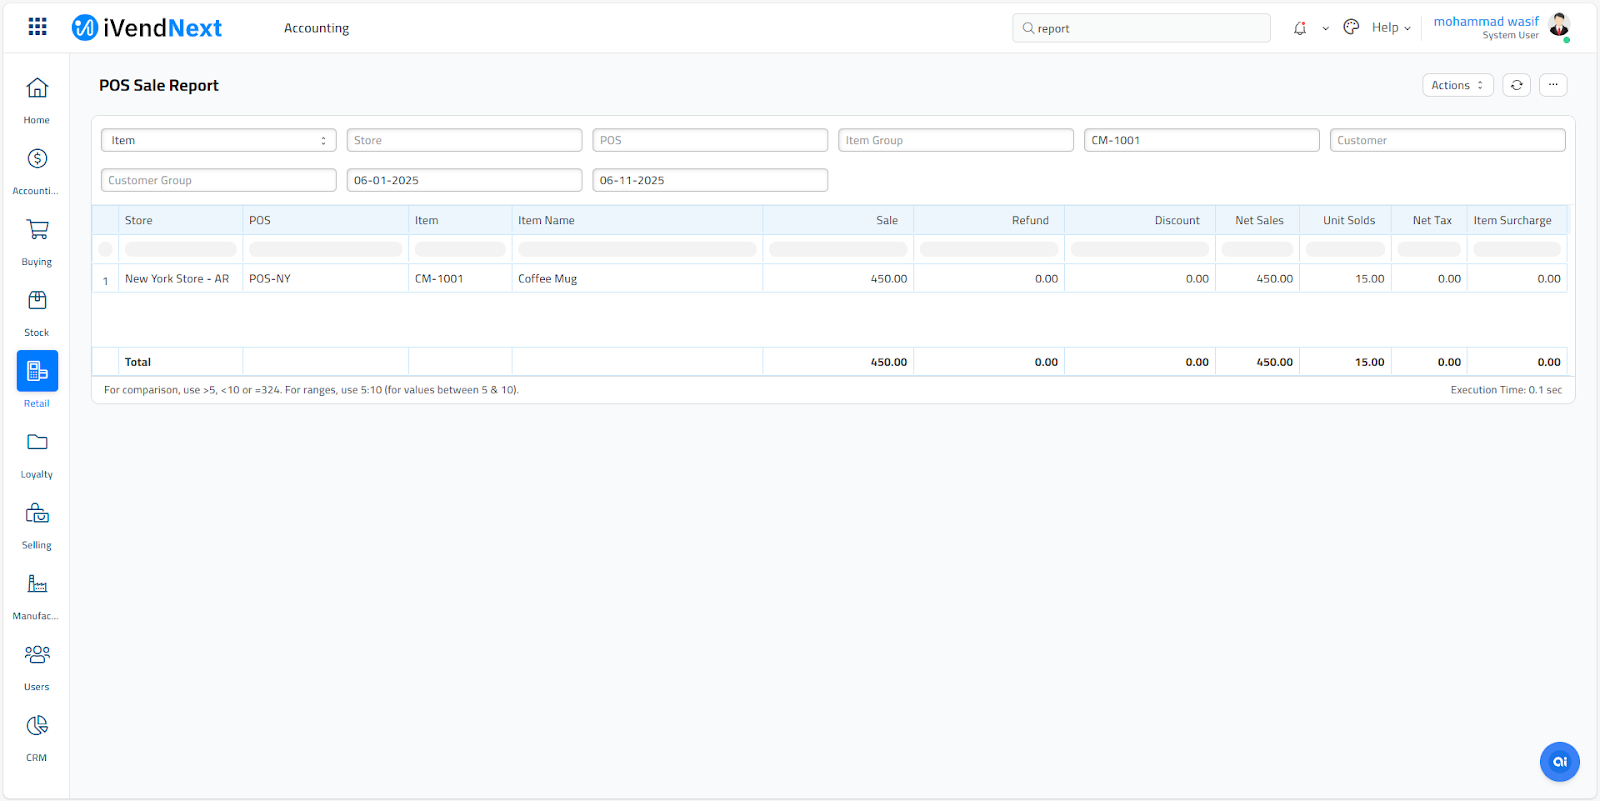
Generate the POS Sales Report
A POS Sales Report provides a detailed and comprehensive analysis of sales transactions processed through the point-of-sale.
Creating a POS Sales Report in iVendNext involves a few key steps. Here's a simplified guide to help you get started:
Path: Home > Retail > Reports > POS Sales Report
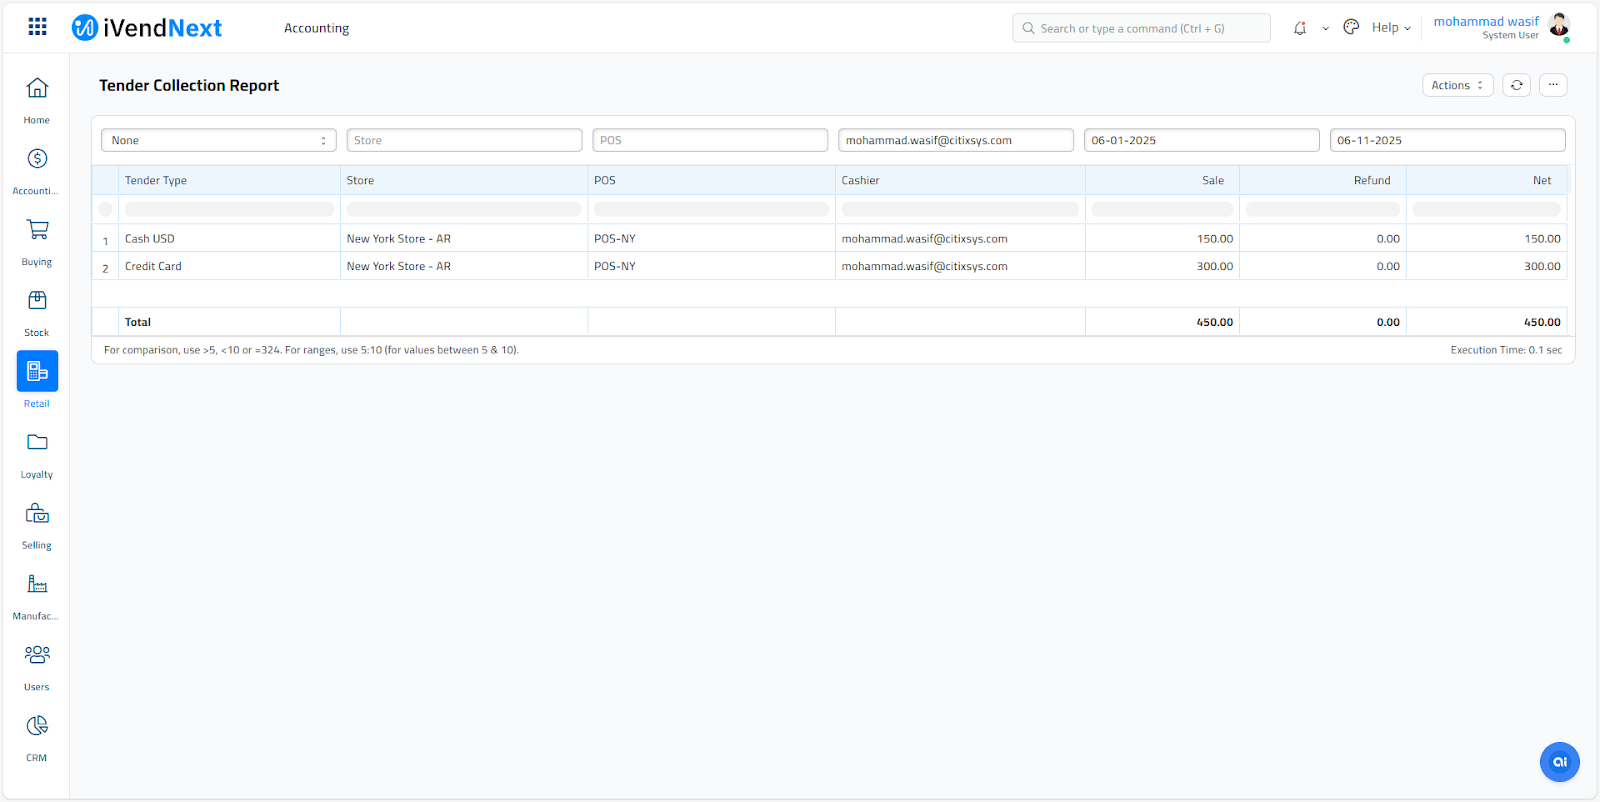
Generate the Tender Collection Report
A Tender Collection Report in iVendNext provides a detailed and comprehensive analysis of all the payment transactions processed through various tender types (like cash, credit card, etc.) within a specific period.
Creating a Tender Collection Report in iVendNext involves a few key steps. Here's a simplified guide to help you get started:
Path: Home > Retail > Reports > Tender Collection Report
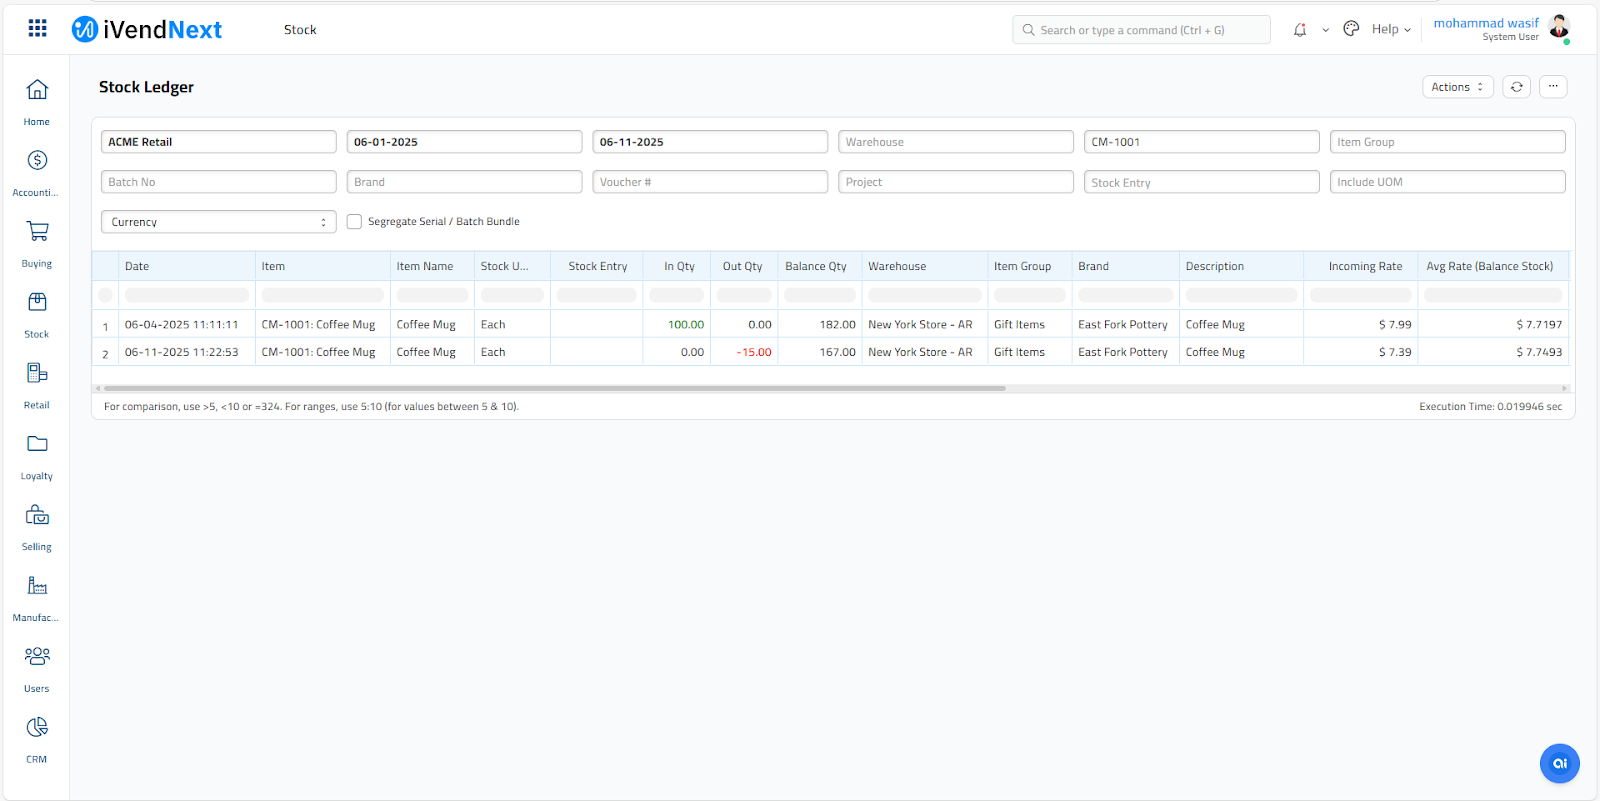
Generate the Stock Ledger Report
A Stock Ledger Report in iVendNext provides a comprehensive record of all stock movements within your organization. This report is essential for tracking stock levels, understanding flow of goods, and maintaining accurate inventory levels.
Creating a Stock Ledger Report in iVendNext involves a few key steps. Here's a simplified guide to help you get started:
Path: Home > Retail > Reports > Stock Ledger Report